

IIS (Internet Information Services) remains a widely used web server for hosting websites, FTP (File Transfer Protocol) sites, and other applications on Windows servers.
While the graphical IIS Manager interface is great for setting things up initially and for providing a visual overview of your web configuration, there are also some great use cases for automation.
Whether you are creating new websites, amending Application Pool settings, or updating Site bindings, there are ways to accomplish all of these things from code.
This article covers how to interact with IIS using C# and the power of the Web Administration library. I will be focusing on a specific example of using the APIs that the library exposes to find websites by their name and then stop and start them on demand.
Web Administration
In the following sections our goal is to understand how we can interact with IIS from C# code, so naturally, we’ll be making use of .NET libraries to accomplish this.
Please note that the instructions in this article assume that you are using Visual Studio as your IDE. However, the steps will be very similar for other IDEs such as Visual Studio Code.
.NET Framework
If your application is targeting the .NET Framework you can add a reference to Microsoft.Web.Administration library.
The caveat is that you need to have the IIS Management Console Windows feature enabled in order for the required library file to be present on your system.
Please note that the library is only compatible with IIS 7.0+. This shouldn’t be a problem though as version 7.0 was released in 2008!
Check for the library
To get access to the Web Administration library, first of all, you should check if you already have the necessary DLL.
To do this, navigate to the following directory.
%systemdrive%\Windows\System32\inetsrv
If there is a file in this directory named ‘Microsoft.Web.Administration.dll’ then you can skip the next sub-section and proceed with adding a reference to the library.
Install Windows feature
If the library isn’t present on your system already you’ll need to install the necessary Windows feature.
There are a couple of options for doing this.
Programs and Features install
The first way to install the Windows feature is via the ‘Programs and Features’ interface.
Enter the following into a ‘Run’ dialog (WIN + R) and press the Enter/Return key.
appwiz.cpl
When the Programs and Features window loads click on the ‘Turn Windows features on or off’ link to open the Windows Features dialog.
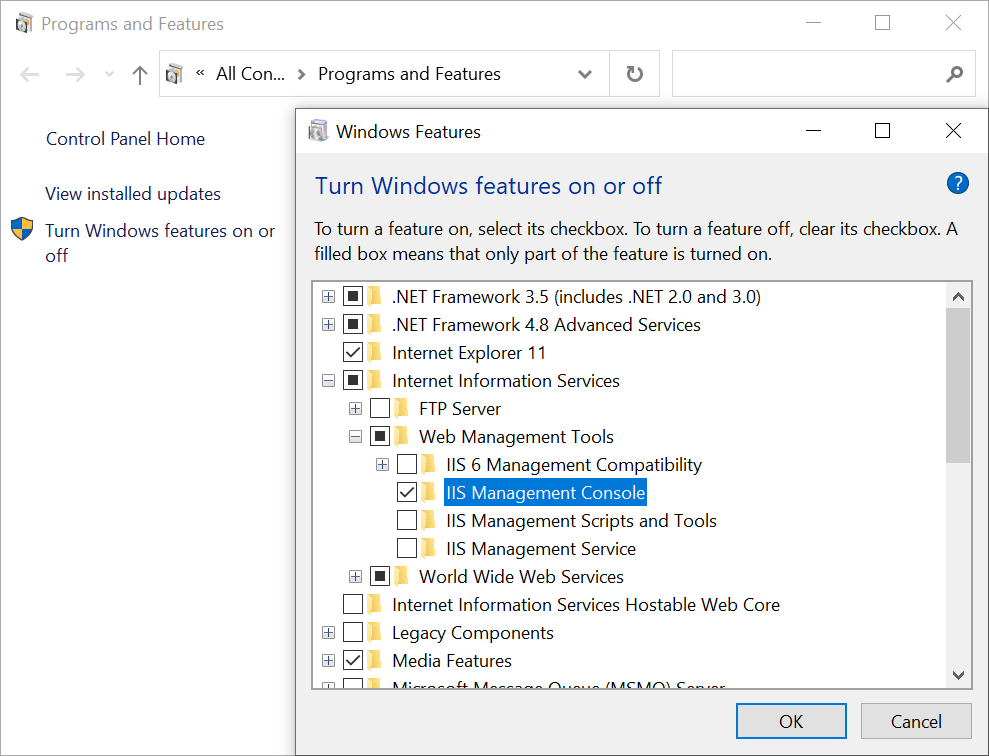
Expand the ‘Internet Information Services’ node, expand the ‘Web Management Tools’ node, tick the ‘IIS Management Console’ checkbox, then press the ‘OK’ button.
It usually takes a few minutes for the feature to be installed.
Command-line install
The second way to install the Windows feature is to launch a Command Prompt (or your preferred terminal) as administrator and execute the following command.
%systemdrive%\Windows\System32\Dism.exe /enable-feature /all /online /featurename:IIS-ManagementConsole
You will receive a confirmation message when the installation of the feature has been completed.
Machine restart
In either case, after the Windows feature installation has been completed you may be asked to restart your computer.
I recommend that you go ahead with the restart to finalise the installation process.
Add the reference
The last setup step is to add a reference to the Web Administration library.
To do this, within your Visual Studio solution, right-click on ‘References’ within the Solution Explorer for the appropriate project and select the ‘Add Reference…’ option from the context menu.
Now you need to select ‘Extensions’ from the left-hand side of the Reference Manager dialog.

Find ‘Microsoft.Web.Administration’ within the list-view, select it, and press the ‘OK’ button to add the reference.
.NET Core
If you’re using .NET Core you’ll need to install the Microsoft.Web.Administration NuGet package into your project.
NuGet Package Manager install
To install the package you can right-click on your project within Visual Studio and use the ‘Manage NuGet Packages’ option to browse for and install the NuGet package.
Package Manager Console install
Alternatively, you can issue the following command from the Package Manager Console.
Install-Package Microsoft.Web.Administration
This will find and install the latest version of the NuGet package for you.
Important notes
Since .NET Core is designed to be platform-independent, the Web Administration library will be included as an additional dependency that will be deployed alongside your application.
It is important to remember that the features within the Web Administration library will only work on Windows since IIS is a Windows web server.
Server management
One of the key classes within the Microsoft.Web.Administration library is the ServerManager class.
Among other things, ServerManager provides access to manage Application Pools, Sites, and Worker Processes.
It is important to note at this stage that administrator rights are required in order for the following code samples to work, otherwise, you’ll get an UnauthorizedException. If you’re using Visual Studio or Visual Studio Code, for example, right-click on the application shortcut and select the ‘Run as administrator’ option before you debug the code. When it comes to running your application in production, see my User Account Control blog post.
To use ServerManager we, first of all, need to new it up.
var server = new ServerManager();
Once we have a ServerManager instance we have access to a plethora of useful properties and methods.
For example, we can use the Sites property to access a SiteCollection containing all IIS websites and FTP sites etc. that have been created on the current machine.
We can iterate through the available sites as follows.
foreach (Site site in server.Sites)
{
    Console.WriteLine(site.Name);
}
If we want to find a site with a specific name we can use LINQ.
Site site = server.Sites.FirstOrDefault(s => s.Name.Equals("Default Web Site", StringComparison.OrdinalIgnoreCase));
If we want to view inspect bindings for a site we can iterate through them, as follows.
foreach (Binding binding in site.Bindings)
{
    Console.WriteLine(binding.ToString());
}
For the ‘Default Web Site’ site that comes pre-installed with IIS, the above code produces the following output.
[http] *:80:
If we want to create an additional binding we can add a new binding to the Bindings collection and then commit changes to the server, as follows.
site.Bindings.Add("*:8080:", "http");
server.CommitChanges();
In the above example, a new HTTP binding is being added for port 8080. The CommitChanges method on the ServerManager object instance is then called to save the changes to the IIS configuration.
There’s so much more that can be done with the Web Administration library and I encourage you to check out the Microsoft Docs for some great examples of how to accomplish other tasks such as creating new Sites and Application Pools.
In the following section, I am going to expand further on the ServerManager functionality by demonstrating how to stop and start sites within a services class.
Services abstraction
Since there are many different versions of IIS out there and the means of interacting with IIS via .NET applications could change in the future, it makes sense to create a layer of abstraction over the Web Administration library.
In the example code that follows, I will be demonstrating how to create a services class that encapsulates IIS site operations. This includes finding a site, checking if a site is running, stopping a site, and starting a site.
The full source code can be found within the accompanying GitHub repository.
Interface definition
When planning to develop a services class it’s a good idea to design an interface that should be adhered to.
We can define the interface for IIS site services as follows.
/// <summary>
/// IIS website services interface.
/// </summary>
public interface ISiteServices : IDisposable
{
    #region Methods

    Site GetSite(string siteName);
    bool SiteIsRunning(string siteName);
    bool StartSite(string siteName);
    bool StopSite(string siteName);

    #endregion
}
The ISiteServices interface specifies a simplified API with methods to which we can pass the name of the site we want to check or stop/start. The methods return either a Site object or a bool to indicate the status or success/failure of an operation.
Feel free to adjust this interface to suit your specific needs (of course you would also need to amend the implementation of the concrete services class).
Services implementation
Now let’s look at the implementation of the services class which can be defined as follows.
Note that I am using Serilog as the logging framework.
/// <summary>
/// Provides IIS website services.
/// </summary>
public class SiteServices : ISiteServices
{
    #region Readonlys

    private readonly ServerManager _server;

    #endregion

    #region Constructor

    /// <summary>
    /// Constructor.
    /// </summary>
    public SiteServices() => _server = new ServerManager();

    #endregion

    #region Methods

    /// <summary>
    /// Gets a <see cref="Site"/> object based on the specified site name.
    /// </summary>
    /// <param name="siteName">The site name</param>
    /// <returns><see cref="Site"/></returns>
    public Site GetSite(string siteName)
    {
        Log.Verbose("Getting site named: {0}", siteName);

        Site site = _server.Sites.FirstOrDefault(s => s.Name.Equals(siteName, StringComparison.OrdinalIgnoreCase));

        if (site != null)
        {
            Log.Verbose("Found site named: {0}", siteName);
        }
        else
        {
            Log.Warning("Failed to find site named: {0}", siteName);
        }

        return site;
    }

    /// <summary>
    /// Checks if a site with the specified name is running.
    /// </summary>
    /// <param name="siteName">The site name</param>
    /// <returns>True if the site is running, otherwise false</returns>
    public bool SiteIsRunning(string siteName)
    {
        Site site = GetSite(siteName);

        bool siteIsRunning = site?.State == ObjectState.Started;

        Log.Verbose("The '{0}' site {1}", siteName, siteIsRunning ? "is running" : "is not running");

        return siteIsRunning;
    }

    /// <summary>
    /// Starts the site with the specified name, if it is not already running.
    /// </summary>
    /// <param name="siteName">The site name</param>
    /// <returns>True if the site was started successfully, otherwise false</returns>
    public bool StartSite(string siteName)
    {
        Site site = GetSite(siteName);

        if (site == null) return false;

        bool started = false;

        if (site.State != ObjectState.Started)
        {
            Log.Verbose("Starting site named: {0}", siteName);
            site.Start();

            started = site.State == ObjectState.Started;

            if (started)
            {
                Log.Verbose("Started site named: {0}", siteName);
            }
            else
            {
                Log.Warning("Failed to start site named: {0}", siteName);
            }
        }
        else
        {
            Log.Verbose("Site named '{0}' is already started", siteName);

            started = true;
        }

        return started;
    }

    /// <summary>
    /// Stops the site with the specified name, if it is not already stopped.
    /// </summary>
    /// <param name="siteName">The site name</param>
    /// <returns>True if the site was stopped successfully, otherwise false</returns>
    public bool StopSite(string siteName)
    {
        Site site = GetSite(siteName);

        if (site == null) return false;

        bool stopped = false;

        if (site.State != ObjectState.Stopped)
        {
            Log.Verbose("Stopping site named: {0}", siteName);
            site.Stop();

            stopped = site.State == ObjectState.Stopped;

            if (stopped)
            {
                Log.Verbose("Stopped site named: {0}", siteName);
            }
            else
            {
                Log.Warning("Failed to stop site named: {0}", siteName);
            }
        }
        else
        {
            Log.Verbose("Site named '{0}' already stopped", siteName);

            stopped = true;
        }

        return stopped;
    }

    #region Implements IDisposable

    #region Private Dispose Fields

    private bool _disposed;

    #endregion

    /// <summary>
    /// Cleans up any resources being used.
    /// </summary>
    public void Dispose()
    {
        Dispose(true);

        // Take this object off the finalization queue to prevent
        // finalization code for this object from executing a second time.
        GC.SuppressFinalize(this);
    }

    /// <summary>
    /// Cleans up any resources being used.
    /// </summary>
    /// <param name="disposing">Whether or not we are disposing</param>
    protected void Dispose(bool disposing)
    {
        if (!_disposed)
        {
            if (disposing)
            {
                // Dispose managed resources.
                _server?.Dispose();
            }

            // Dispose any unmanaged resources here...

            _disposed = true;
        }
    }

    #endregion

    #endregion
}
In the above code, the SiteServices class implements the operations specified by the ISiteServices interface and uses an instance of the ServerManager class underneath to accomplish the required tasks.
The ServerManager object instance is initialised in the constructor.
The SiteIsRunning, StartSite, and StopSite methods check the ObjectState of the specified Site to see if it is started or stopped.
Logging has been included to help diagnose issues in a production environment (you may or may not require this).
Since the ISiteServices interface specifies that the IDisposable interface must be implemented, the SiteServices class includes a Dispose method and uses a standardised pattern to ensure that resources i.e. the ServerManager interface is properly disposed of at the appropriate time.
Services test run
Let’s look at an example of using the services class created in the previous section to stop and start an IIS website.
using ISiteServices services = new SiteServices();

string siteName = "Default Web Site";

Site site    = services.GetSite(siteName);
bool running = services.SiteIsRunning(siteName);
bool stopped = services.StopSite(siteName);
bool started = services.StartSite(siteName);
In the above example, specifying the using keyword means that the SiteServices object instance will be disposed of once it goes out of scope i.e. the code reaches the end of the current block or method.
After ‘newing up’ the SiteServices, the code is setting up the name of the site we want to interact with and is then calling each of the available interface methods and storing the result of each method call.
As an example, with the logging in place and configured correctly, you will see output such as the following when calling the StartSite method.
[23:02:43 VRB] Getting site named: Default Web Site
[23:02:43 VRB] Found site named: Default Web Site
[23:02:43 VRB] Starting site named: Default Web Site
[23:02:43 VRB] Started site named: Default Web Site
As a next step, you could look at amending the services to suit your specific needs. For example, perhaps you want to add the ability to create a new site or amend an aspect of a site via the services.
Depending on your specific needs, you may want the existing methods to accept a Site object (for efficiency) or you may want to return the ObjectState enum to get the exact status of a site.
Of course, there are trade-offs to consider in regards to flexibility, efficiency, and keeping your interface as generic as possible while also being practical.
However, now that you know the basics you can start to effectively use ServerManager and other aspects of the Web Administration library to interact with IIS websites from your C# code.
Stopping…
In this article, I started off by explaining how to get access to the Web Administration library that is required to manage IIS using C#. I walked through how to do this for both .NET Framework and .NET Core applications.
Following this, I covered some examples of server management using the properties and methods exposed by the ServerManager class.
Lastly, I provided an example of a services class that encapsulates IIS site management operations and includes logging to help provide valuable insights when automating the stopping and starting of IIS websites.
To see a working .NET Core example check out the accompanying GitHub repository.
Comments