Automation is becoming increasingly prevalent in each of our lives and it is the key to increasing both business profitability and personal productivity.
As a software developer, it is important to seek out ways to improve efficiency when dealing with repetitive day-to-day tasks or when a potentially time-consuming manual process comes across our path.
In these situations, automation is our friend and I find myself frequently turning to one of my favourite scripting languages, AutoIt, for help.
What is AutoIt?
I often like to quote from the official source, so here’s what the AutoIt website has to say about itself.
AutoIt v3 is a freeware BASIC-like scripting language designed for automating the Windows GUI and general scripting. It uses a combination of simulated keystrokes, mouse movement and window/control manipulation in order to automate tasks in a way not possible or reliable with other languages.
In basic terms, AutoIt offers a simplified set of functions that allow a series of manual steps to be converted into an automated sequence of events.

AutoIt is an interpreted scripting language, which means that we can write a bunch of commands and immediately run the script to see the results. This makes it very fast to get something up and running and to make adjustments wherever they are needed.
However, an AutoIt script can also be compiled to a standalone EXE which makes it a very versatile tool whenever we need to create a script that we intend to run on more than one machine.
Environment setup
To get started with AutoIt, head over to the AutoIt Downloads page.
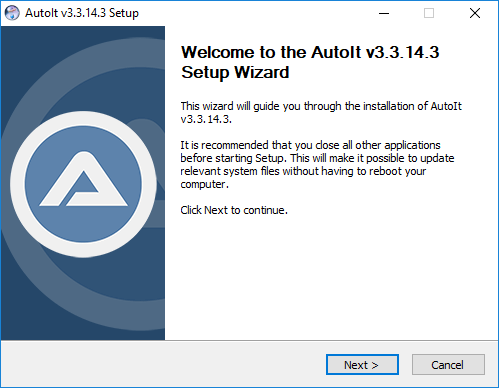
From the Downloads page, click the ‘Download AutoIt’ button to download AutoIt, then run the setup file to launch the installer and step through the wizard.

I also recommend installing the full AutoIt Script Editor which comes with a ton of extra tools which can help you when developing your scripts.
After AutoIt has installed, launch the AutoIt Script Editor from your programs list. You will find the editor within the ‘AutoIt v3’ folder and it will be named ‘SciTE Script Editor’.

You’ll need to spend some time in the editor to get familiar with it, but let’s have a look at the basics.
Start with File –> New to create a new script tab, then enter the following text.
MsgBox(0, "Information", "Hello World")
Now go to File –> Save then choose a location and name for your script file before pressing ‘Save’.
Lastly, go to Tools –> Go to run your script.
A message box should appear containing the text ‘Hello World’ along with an OK button.
Script examples
In this section, I will walk through a number of examples that demonstrate how to use the AutoIt language to create automation scripts.
I will cover most of the operations that I find myself needing to do on a regular basis.
Run a program
When developing a script, one of the first things you’ll likely need to do is to launch a program that you want your script to interact with and then activate the window for that program.
Run("notepad")
WinActivate("Unitled - Notepad")
WinWaitActive("Untitled - Notepad")
In the above example, the Run function is used to launch Notepad.
The WinActivate function is then used to activate the Notepad window based on its window title and the WinWaitActive function is used to wait until the same window is active.
Once the main window of the program is active, we can start interacting with it.
Send and Sleep
After launching and activating a program, you’ll often need to send data and/or commands to the program.
A common way of achieving this is by using the Send function which simulates keystrokes.
Send("Hello World")
Sleep(2000)
Send("!{F4}")
Send("!n")
In the above example, assuming that the Notepad program is open and its window is activated, the Send function will essentially type the text ‘Hello World’ into Notepad.
The Sleep function pauses for the specified number of milliseconds; in this case, we wait for 2 seconds.
It is very common to pause script execution in between function calls to allow time for operations to complete e.g. waiting for programs to launch or waiting for screens to load.
In this example, I’m simply pausing so that you can see the ‘Hello World’ text before the next function call is issued.
Lastly, in the above example, the Send function is used to send the Alt + F4 key combination, followed by the Alt + N key combination to close the Notepad program whenever the ‘save changes’ dialog appears.
The exclamation mark (!) represents the Alt key.
The hat (^) symbol represents the Ctrl key and the plus (+) symbol represents the Shift key.
If we wanted to send a Ctrl + Shift + Escape command to launch the Task Manager we could achieve this as follows.
Send("^+{ESC}")
Many other special keys can be sent via the Send function, such as {SPACE}, {DELETE} and {END}.
Mouse functions
With AutoIt, you can simulate moving the mouse cursor and issue mouse button clicks.
MouseMove(500, 300)
MouseClick("right")
In the above example, the MouseMove function is used to move the mouse cursor to X pixel coordinate 500 and Y pixel coordinate 300 on the display.
The MouseClick function is then used to simulate a right-click event. Of course, a left-click is more common, but I’ve used a right-click in the example just in case you run this as is and it clicks on something with unintentional consequences 🙂
There is also a MouseClickDrag function which allows a drag operation to simulated and a number of other mouse-related functions which you can avail of.
Control functions
Being able to move the mouse cursor around the screen is pretty cool. However, for a more reliable script that doesn’t depend on specific pixel coordinates, it is usually safer to reference controls directly where possible.
Run("C:\Program Files (x86)\Audacity\audacity.exe")
WinActivate("Audacity")
WinWaitActive("Audacity")
Sleep(2000)
ControlClick("Audacity", "", "Record")
In the above example, after running the Audacity audio editing program and waiting for it to load, the ControlClick function clicks on the ‘Record’ button within the main ‘Audacity’ window.
Other useful control functions include ControlFocus which can be used to focus on a specific control and ControlSetText which sets the text of the specified control.
As well as identifying a control by its text, you can also identify a control by its ‘Class’ or ‘ID’.
This can help to make scripts less brittle, as they don’t need to depend on the text within a control which may change in a future program version.
Identifying controls
You may be wondering how to determine a control by its Class or ID.
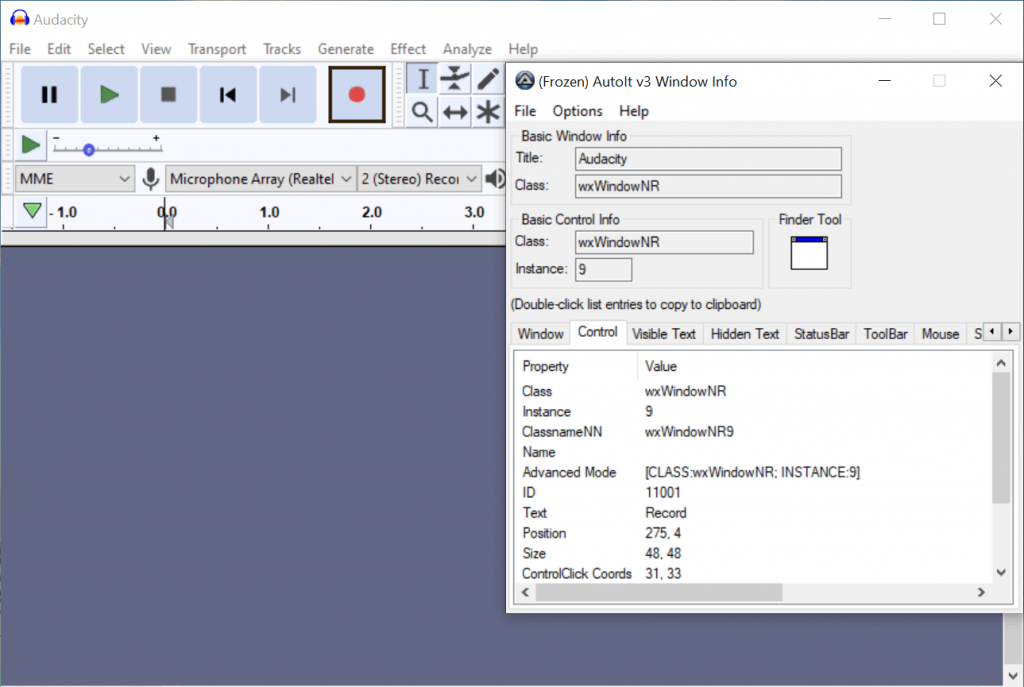
AutoIt comes with a very helpful ‘Window Info’ program which can be found at the following location.
%programfiles(x86)%\AutoIt3\AU3Info.exe
You can use the ‘Finder Tool’ function to drag and drop a crosshairs cursor onto a control within a Windows application to find out detailed information regarding it.

Whenever you launch the tool you’ll notice that it is ‘Frozen’, which just means that the information only updates whenever you drag and drop the crosshairs within a window.
You can use the Ctrl + Alt + F key combination on your keyboard to ‘unfreeze’ the program so that the information within the tool is updated live as you move your mouse cursor around the screen.
For example, you’ll see the ‘ControlClick Coords’ property updated in realtime.
Hotkeys
AutoIt allows hotkeys to be configured which can be wired up to functions.
I find it very handy to have a way of exiting a script while it is running at the press of a button.
HotKeySet("{ESC}", "ExitScript")

Func ExitScript()
    Exit
EndFunc
In the above example, the HotKeySet function is used to wire up the Escape key to a custom user-defined ExitScript function which exits the script when it is called.
Message and input boxes
It’s super-simple to include message boxes in your script, as I demonstrated earlier.
MsgBox(0, "Information", "Hello World")
If you need to get input from the user this is also very straightforward.
$result = InputBox("Input Required", "Please enter a value.", 0)
As well as displaying message and input boxes, you can even use AutoIt to create complex GUIs with all manner of controls such as buttons, tab controls and progress bars.
See the AutoIt GUI Reference page for more information about creating GUIs.
Loops and conditional statements
If you’re automating something you’ll more than likely need to repeat function calls and make conditional decisions along the way in your script logic.
Whenever you need to execute part of a script based on a condition, you can use an if statement as follows.
If $result == "exit" Then
    Exit
EndIf
When you need to repeat something and you know how many iterations you need, you can use a for loop.
For $i = 1 To 10
    MsgBox(0, "Information", "$count = " + $i)
Next
While loops are also straightforward and can be written as follows.
$count = 1
$max   = 10

While $count <= $max

   MsgBox(0, "Information", "$count = " + $count)

   $count = $count + 1

WEnd
You’ll notice that the conditional and loop constructs use a BASIC style syntax e.g. using the WEnd keyword to signal the end of the loop rather than using curly braces or tabs.
Script compilation
After you’ve created your script you can very easily package it up as an EXE which will allow you to run the script on pretty much any Windows desktop machine without requiring anything else to be installed on the machine.
Use the Tools –> Compile menu option to compile your script.
Now check the directory in which your script is located and you should find an EXE version of your script alongside it. Very cool!
If you have the full AutoIt Script Editor installed you can customise lots of additional options regarding the compiled EXE, including icons, compression settings, and even obfuscation.
Reaching further
AutoIt is a very well documented scripting language.
If you are interested in exploring AutoIt further you should check out the AutoIt Docs.
From the main Documentation page, you will find links to lots of helpful information about AutoIt, tutorials and lots of reference documents.
I find the Function Reference particularly helpful for establishing the capabilities of the language and for viewing the details of all of the available parameters that can be passed to a function. There are lots of really great examples too.
If you want to leverage the power of AutoIt in your preferred programming language, you can avail of ‘AutoItX’ which wraps all of the core AutoIt functions into a DLL/COM control which can be found at the following location after installing AutoIt.
C:\Program Files (x86)\AutoIt3\AutoItX
There’s also a C# assembly and PowerShell CmdLets available!
Before wrapping up there’s another useful tool for AutoIt which you can download here. It’s the AutoIt Debugger that lets you set breakpoints and step through your scripts line by line. This is very useful for troubleshooting issues with your script.
Summary
AutoIt is a brilliant tool for automating repetitive tasks and with its ability to compile scripts, it offers an easy way to deploy your scripts to other machines.
You can use AutoIt for many different scenarios such as tidying up or converting files, software installations or even for automated software testing.
I encourage you to check out AutoIt and see how you can use the power of automation to improve your efficiency.


Comments