

Hosted services are a powerful .NET feature, providing a robust mechanism for executing long-running background tasks in different types of applications. Given the flexible nature of .NET, such applications could be running on client devices, on-premise servers, or the cloud, depending on the particular use case.
When it comes to ASP.NET Core, hosted services are an excellent choice when you need to execute periodic background jobs or offload work that will take a long time to complete i.e. longer than a user would be willing to wait for a response.
One of the questions you might have in the context of an ASP.NET Core Web API is how to communicate with hosted services from Minimal API Endpoints or API Controllers. For example, how could you send a message to a hosted service to tell it to start some background work on demand? The solution to this may not appear immediately obvious, since the hosted service code runs outside the HTTP request pipeline, so there is no ‘request’ context or natural scope.
In this article, I will show by way of example how you can effectively communicate with hosted services from API endpoints or controllers using ‘Channels’.
Background
First, let me start by providing a brief overview of hosted services and Channels, in particular their usage within ASP.NET Core web applications.
What are Hosted Services?
In relation to ASP.NET Core, hosted services represent services that are hosted within the web application and can run background tasks outside the context of a HTTP request.
Hosted services are useful for various tasks, such as processing large volumes of data, updating caches, or clearing old records from a database periodically. The possibilities are only limited by your imagination!
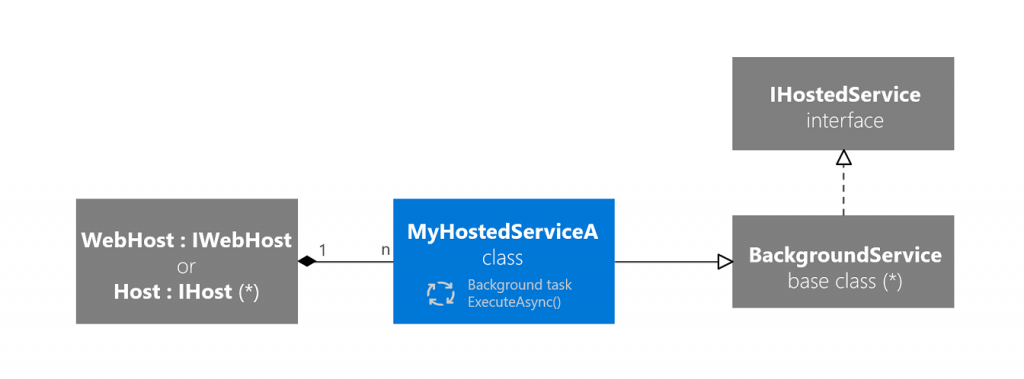
Hosted services have been part of .NET since .NET Core 2.0 and have gained additional features since then. The latest changes at the time of writing come with the release of .NET 8.0 on Tuesday this week (14th November 2023) which added hosted lifecycle services.
Typically, hosted services are implemented by creating a class that inherits from the BackgroundService class (added in .NET Core 2.1) which is defined within the Microsoft.Extensions.Hosting namespace.
We’ll see an example hosted service in action shortly.
What about Channels?
While many .NET developers are aware of hosted services, fewer have heard of Channels.
So what are Channels?
Channels were first introduced in .NET Core 3.0 as part of the System.Threading.Channels namespace which includes various channel primitives that enable asynchronous communication between producers and consumers, following the producer-consumer pattern. Effectively, a Channel can be thought of as a thread-safe queue that we can write to and read from asynchronously.
If you want to dive deep, you can find out almost everything there is to know about Channels on the Microsoft Docs.
The Channel class is the type that we will be focusing on in this article and we’ll see how it works in the next section.
Coding it up
Now that we have a baseline understanding of hosted services and Channels, let’s explore how they can be used together to facilitate communication from API endpoints and controllers.
Project
If you want to follow along, I recommend that you download and install the latest version of Visual Studio (if you haven’t already) and create a new project using the ASP.NET Core Web API project template.
Note that it is also possible to use another IDE or editor such as Rider or Visual Studio Code if you prefer.
In the following subsections, we are going to build the basics of an API that can process background jobs and we will code things in such a way that these jobs can be cancelled while they are still in progress, if required.
The full source code used in this article can be found in my companion GitHub repository.
Model
Let’s start with the model and create a class to represent a background job message that looks as follows.
namespace JC.Samples.HostedServiceChannel.Models;

/// <summary>
/// The background job message that is used when processing the job.
/// </summary>
public class BackgroundJobMessage
{
    /// <summary>
    /// The unique Job ID.
    /// </summary>
    public Guid JobId { get; } = Guid.NewGuid();

    /// <summary>
    /// The data to be processed.
    /// </summary>
    public string? Data { get; set; }

    /// <summary>
    /// <see cref="CancellationTokenSource"/>.
    /// </summary>
    public CancellationTokenSource CancellationTokenSource { get; set; }

    /// <summary>
    /// Constructor.
    /// </summary>
    /// <param name="data">The data to be processed</param>
    /// <param name="cancellationTokenSource"><see cref="CancellationTokenSource"/></param>
    public BackgroundJobMessage(string data, CancellationTokenSource cancellationTokenSource)
    {
        Data = data;
        CancellationTokenSource = cancellationTokenSource;
    }
}
The BackgroundJobMessage class contains a JobId property which can be used to identify a specific job and is particularly useful when we want to cancel a job that is currently in progress. Job cancellation will be possible by virtue of the CancellationTokenSource property (we’ll see how this works shortly).
The Data property is a string that represents some data that we want the background job to process. In a real-world scenario, this could be something else like the path to an image file that we want to compress or a more complex type that defines parameters for the job.
Channel
Next, let’s check out the Channel code, reproduced below for reference.
using JC.Samples.HostedServiceChannel.BackgroundServices.Interfaces;
using JC.Samples.HostedServiceChannel.Models;
using System.Collections.Concurrent;
using System.Threading.Channels;

namespace JC.Samples.HostedServiceChannel.BackgroundServices;

/// <summary>
/// The Background Job Channel.
/// Wraps a <see cref="Channel"/>.
/// </summary>
public class BackgroundJobChannel : IBackgroundJobChannel
{
    private const int MaxChannelMessages = 100;

    private readonly ILogger<BackgroundJobChannel> _logger;
    private readonly Channel<BackgroundJobMessage> _channel;
    private readonly ConcurrentDictionary<Guid, CancellationTokenSource> _jobsInProgress = new();

    /// <summary>
    /// Constructor.
    /// </summary>
    /// <param name="logger"><see cref="ILogger"/></param>
    public BackgroundJobChannel(ILogger<BackgroundJobChannel> logger)
    {
        _logger = logger;

        // Limit the capacity of the channel queue.
        var options = new BoundedChannelOptions(MaxChannelMessages)
        {
            SingleWriter = false, // Multiple producers.
            SingleReader = true   // Single consumer.
        };

        _channel = Channel.CreateBounded<BackgroundJobMessage>(options);
    }

    /// <summary>
    /// Adds a job to the channel queue for processing.
    /// </summary>
    /// <param name="message">The job message to queue</param>
    /// <param name="cancellationToken"><see cref="CancellationToken"/></param>
    /// <returns>True if the job was added to the queue successfully, otherwise false</returns>
    public async Task<bool> AddJobAsync(BackgroundJobMessage message, CancellationToken cancellationToken)
    {
        while (await _channel.Writer.WaitToWriteAsync(cancellationToken) && !cancellationToken.IsCancellationRequested)
        {
            if (_channel.Writer.TryWrite(message) && _jobsInProgress.TryAdd(message.JobId, message.CancellationTokenSource))
            {
                _logger.LogInformation("Job {0} has been queued", message.JobId);
                return true;
            }
        }

        return false;
    }

    /// <summary>
    /// Cancels a job that is currently in progress.
    /// </summary>
    /// <param name="jobId">The Job ID to cancel</param>
    /// <returns>True if the job was cancelled succesfully, otherwise false</returns>
    public bool CancelJob(Guid jobId)
    {
        if (_jobsInProgress.TryRemove(jobId, out var job) && job is not null)
        {
            job.Cancel();
            job.Dispose();

            _logger.LogInformation("Job {0} has been cancelled", jobId);
            return true;
        }

        return false;
    }

    /// <summary>
    /// Marks a job that is currently in progress as completed.
    /// </summary>
    /// <param name="jobId">The Job ID to mark as completed</param>
    /// <returns>True if the job was marked as completed succesfully, otherwise false</returns>
    public bool CompleteJob(Guid jobId)
    {
        if (_jobsInProgress.TryRemove(jobId, out var job))
        {
            job?.Dispose();

           _logger.LogInformation("Job {0} has been completed", jobId);
            return true;
        }

        return false;
    }

    /// <summary>
    /// Reads all messages from the channel queue.
    /// </summary>
    /// <param name="cancellationToken"><see cref="CancellationToken"/></param>
    /// <returns>The job messages that are currently on the queue</returns>
    public IAsyncEnumerable<BackgroundJobMessage> ReadAllAsync(CancellationToken cancellationToken) =>
        _channel.Reader.ReadAllAsync(cancellationToken);
}
The BackgroundJobChannel class essentially wraps the Channel class, exposing methods that use the ChannelWriter to write messages to the queue and the ChannelReader to read messages from the queue.
Note that an ILogger instance is used for logging, but only basic logging has been implemented to keep the sample code as simple as possible. Please feel free to extend the logging or remove it if you do not require it.
In the constructor, a ‘bounded’ channel is created. This means that the channel has some limits placed upon it. In this case, a maximum of 100 messages can exist in the queue at a given moment in time.
Note that it’s also possible to create an ‘unbounded’ channel that doesn’t have any limits via the Channel.CreateUnbounded method.
For the channel options, we have specified multiple writers (producers) and a single reader (consumer). This guarantees that there will only ever be one read operation at a time.
The AddJobAsync method provides a way to add a job message to the channel. The code uses the WaitToWriteAsync method to wait until it is possible to write to the queue. This method could return false if the max message limit has been reached. The code then calls the TryWrite method to add the message to the channel and also adds an entry to a concurrent dictionary of jobs that are in progress. This will provide us with a way of cancelling the job if required, as when we create the message from the API we will set the cancellation token source appropriately.
The CancelJob method tries to remove a job with the specified identifier from the job message dictionary. If the job is successfully removed from the dictionary, the job is cancelled by calling the Cancel method on the CancellationTokenSource for the job message and the cancellation token source is then disposed.
The CompleteJob method works in a similar manner, but only needs to remove the job message from the dictionary and dispose the cancellation token source. There’s no need to trigger a cancellation.
The ReadAllAsync method wraps the ReadAllAsync method on the ChannelReader instance of the Channel, providing the means to read all messages from the channel in an asynchronous fashion.
Hosted service
Let’s tackle the hosted service next. The code for it is listed below.
using JC.Samples.HostedServiceChannel.BackgroundServices.Interfaces;
using JC.Samples.HostedServiceChannel.Models;

namespace JC.Samples.HostedServiceChannel.BackgroundServices;

/// <summary>
/// Background service for processing jobs.
/// </summary>
public class BackgroundJobService : BackgroundService
{
    private readonly ILogger<BackgroundJobService> _logger;
    private readonly IBackgroundJobChannel _channel;
    private readonly IServiceProvider _serviceProvider;

    /// <summary>
    /// Constructor.
    /// </summary>
    /// <param name="logger"><see cref="ILogger"/></param>
    /// <param name="channel">The background job channel</param>
    /// <param name="serviceProvider"><see cref="IServiceProvider"/></param>
    public BackgroundJobService(
        ILogger<BackgroundJobService> logger,
        IBackgroundJobChannel channel,
        IServiceProvider serviceProvider)
    {
        _logger = logger;
        _channel = channel;
        _serviceProvider = serviceProvider;
    }

    /// <summary>
    /// Executes when the service has started.
    /// </summary>
    /// <param name="stoppingToken"><see cref="CancellationToken"/></param>
    /// <returns><see cref="Task"/></returns>
    protected override async Task ExecuteAsync(CancellationToken stoppingToken)
    {
        // Process messages from the channel queue asynchronously.
        await foreach (BackgroundJobMessage message in _channel.ReadAllAsync(stoppingToken))
        {
            // Process one at time.
            await ProcessJob(message, stoppingToken);

            // Process in the background.
            //_ = ProcessTask(message, stoppingToken);
        }
    }

    private async Task ProcessJob(BackgroundJobMessage message, CancellationToken stoppingToken)
    {
        try
        {
            // Associate a new cancellation token source with the job cancellation token.
            var cancellationTokenSource = CancellationTokenSource.CreateLinkedTokenSource(stoppingToken, message.CancellationTokenSource.Token);

            if (cancellationTokenSource.IsCancellationRequested)
            {
                return;
            }

            _logger.LogInformation("Processing job {0}", message.JobId);

            // Since the Background Service is registered as a Singleton in the DI container and
            // the task processor is a Scoped service, we need to control its lifetime manually.
            using var scope = _serviceProvider.CreateScope();
            var processor = scope.ServiceProvider.GetRequiredService<IBackgroundProcessor>();

            // Run the job processing logic.
            await processor.ProcessAsync(message, cancellationTokenSource.Token);
        }
        catch (Exception ex)
        {
            _logger.LogError(ex, ex.Message);
        }
        finally
        {
            _channel.CompleteJob(message.JobId);
        }
    }
}
The BackgroundJobService inherits from the base BackgroundService class and overrides its ExecuteAsync method. This is where the background work is kicked off.
The BackgroundJobService constructor accepts an IBackgroundChannel instance which is used in the ExecuteAsync method to asynchronously process messages that are added to the channel. Using the await foreach syntax in combination with the IAsyncEnumerable enumerator means that the code will continuously await and iterate through new messages received on the channel without breaking from the loop until the CancellationToken that was passed to the ExecuteAsync method has been signalled.
Note that by awaiting the call to the ProcessJob method, we are processing one task at a time. To process jobs simultaneously you can replace the code with the line that has been commented out.
The ProcessJob method uses the CancellationTokenSource.CreateLinkedTokenSource method to create a new cancellation token source that will be in a cancelled state if either the hosted service stopping token or the message token is signalled for cancellation.
A new service provider scope is then created. Under normal circumstances, using a ServiceProvider instance directly like this is frowned upon. However, it is necessary in this case because a hosted service does not have a natural scope like a HTTP request does and the IBackgroundJobProcessor is registered as a scoped service (we’ll see where the registration is configured later).
After getting an IBackgroundJobProcessor implementation from the Dedependency Injection Container, its ProcessAsync method is called to do the background processing work.
The contents of the ProcessJob method are wrapped in a try/catch/finally block. In the catch block, the exception is logged. In the finally block, the job message is removed from the channel to ensure that we do not leak any memory.
Job Processor
Now, let’s breeze through the job processing code listed below.
using JC.Samples.HostedServiceChannel.BackgroundServices.Interfaces;
using JC.Samples.HostedServiceChannel.Models;

namespace JC.Samples.HostedServiceChannel.BackgroundServices;

/// <summary>
/// Processes background jobs.
/// </summary>
public class BackgroundJobProcessor : IBackgroundJobProcessor
{
    private readonly ILogger<BackgroundJobProcessor> _logger;

    /// <summary>
    /// Constructor.
    /// </summary>
    /// <param name="logger"><see cref="ILogger"/></param>
    public BackgroundJobProcessor(ILogger<BackgroundJobProcessor> logger)
    {
        _logger = logger;
    }

    /// <summary>
    /// Processes the specified job message.
    /// </summary>
    /// <param name="message">The job message to process</param>
    /// <param name="cancellationToken"><see cref="CancellationToken"/></param>
    /// <returns><see cref="Task"/></returns>
    public async Task ProcessAsync(BackgroundJobMessage message, CancellationToken cancellationToken)
    {
        if (message.Data == null)
        {
            _logger.LogWarning("Data is null");
            return;
        }

        _logger.LogDebug("Processing job {0}. Data: {1}", message.JobId, message.Data);

        _logger.LogDebug("Replacing characters");
        message.Data = message.Data.Replace("a", "b");

        await Task.Delay(3000);

        cancellationToken.ThrowIfCancellationRequested();

        _logger.LogDebug("Capitalizing characters");
        message.Data = message.Data.ToUpper();

        await Task.Delay(6000);

        cancellationToken.ThrowIfCancellationRequested();

        _logger.LogDebug("Trimming spaces");
        message.Data = message.Data.Trim();

        await Task.Delay(9000);

        cancellationToken.ThrowIfCancellationRequested();
    }
}
The BackgroundJobProcessor looks after the processing of background jobs.
The ProcessAsync method contains some contrived code that performs basic string manipulations on the data and calls the Task.Delay method to simulate intensive operations. In between each operation, the code checks if cancellation has been requested and throws an exception if so.
If your logic needs to iterate through a bunch of items when processing, it’s usually a good idea to check for cancellation at the start of each loop iteration.
API endpoints
Now that we’ve seen how all of the individual pieces work together in the background, it’s time to see how we can use the channel from the API to communicate with the hosted service.
Have a look at the code below from the ‘Program.cs’ file of the ASP.NET Core Web API project.
using JC.Samples.HostedServiceChannel.BackgroundServices;
using JC.Samples.HostedServiceChannel.BackgroundServices.Interfaces;
using JC.Samples.HostedServiceChannel.Models;
using System.Net;

var builder = WebApplication.CreateBuilder(args);

// Add services to the container.
builder.Services.AddScoped<IBackgroundJobProcessor, BackgroundJobProcessor>();
builder.Services.AddSingleton<IBackgroundJobChannel, BackgroundJobChannel>();
builder.Services.AddHostedService<BackgroundJobService>();

var app = builder.Build();

// Configure the HTTP request pipeline.
app.UseHttpsRedirection();

app.MapPost("/backgroundJobs", async(
    BackgroundJobRequest request,
    IBackgroundJobChannel channel,
    CancellationToken cancellationToken,
    HttpContext httpContext) =>
{
    try
    {
        var message = new BackgroundJobMessage(request.Data, CancellationTokenSource.CreateLinkedTokenSource(cancellationToken));

        var addJobCancellationTokenSource = CancellationTokenSource.CreateLinkedTokenSource(cancellationToken);
        addJobCancellationTokenSource.CancelAfter(TimeSpan.FromSeconds(3));

        try
        {
            var jobAdded = await channel.AddJobAsync(message, addJobCancellationTokenSource.Token);

            if (jobAdded)
            {
                var backgroundJobLink = new UriBuilder
                {
                    Scheme = httpContext.Request.Scheme,
                    Host = httpContext.Request.Host.Host,
                    Port = httpContext.Request.Host.Port.GetValueOrDefault(-1),
                    Path = $"/backgroundJobs/{message.JobId}"
                }.ToString();

                return TypedResults.Accepted(backgroundJobLink, new BackgroundJobResponse(message.JobId, false));
            }
        }
        catch (OperationCanceledException) when (addJobCancellationTokenSource.IsCancellationRequested)
        {
            return Results.StatusCode((int)HttpStatusCode.TooManyRequests);
        }

        return Results.BadRequest();
    }
    catch (Exception)
    {
        return Results.StatusCode((int)HttpStatusCode.InternalServerError);
    }
});

app.MapDelete("/backgroundJobs/{jobId:guid}", (Guid jobId, IBackgroundJobChannel channel) =>
{
    try
    {
        bool cancelled = channel.CancelJob(jobId);

        if (cancelled)
        {
            return Results.NoContent();
        }

        return Results.NotFound();
    }
    catch
    {
        return Results.StatusCode((int)HttpStatusCode.InternalServerError);
    }
});

app.Run();
After creating and building the web application instance with the required Dependency Injection Container registrations, the above code defines two endpoints; a POST endpoint for creating a new background task and a DELETE endpoint for cancelling an existing background task.
In this case, the API endpoint is effectively the producer that is pushing messages to the channel queue and the hosted service is the consumer of the messages.
The BackgroundJobRequest is a C# record passed to the POST endpoint which is defined as follows.
namespace JC.Samples.HostedServiceChannel.Models;

/// <summary>
/// The background job request passed to the API.
/// </summary>
/// <param name="Data">The data to be processed</param>
public record BackgroundJobRequest(string Data);
The BackgroundJobResponse returned by the POST endpoint is also a C# record, defined as follows.
namespace JC.Samples.HostedServiceChannel.Models;

/// <summary>
/// The background job response returned by the API.
/// </summary>
/// <param name="JobId">The unique Job ID</param>
/// <param name="IsCompleted">Whether or not the job is completed</param>
/// <param name="Data">The processed data</param>
public record BackgroundJobResponse(Guid JobId, bool IsCompleted, string? Data = null);
The key part of the POST endpoint is the part where the job message is added to the channel. Once this has been done, the hosted service will read the message from the channel and start the processing work in the background.
Additionally, notice that the cancellation token source passed to the AddJobAsync cancels automatically after 3 seconds. This will prevent the code from getting stuck in a loop while trying to write a message to a bounded channel that has reached its capacity and isn’t able to free up message slots.
The API endpoint responds to the caller immediately after adding the message to the channel with a 202 (Accepted) status code and includes a link to where the resource can be found in the Location header.
Note that I haven’t provided an example of how to retrieve a background job via the API, as we are focusing on the API to hosted service communication via the Channel in this article.
The DELETE endpoint calls the CancelJob method on the IBackgroundJobChannel instance to signal that the job should be cancelled and then it indicates the cancellation result via an appropriate HTTP status code.
Testing it out
To test things out, you’ll need a HTTP client such as Postman.
Start a job
To create a background job, issue a POST request with the following URL and body.
https://localhost:7007/backgroundJobs
{
    "data": " a b c d e f g"
}
Note that you should replace the port number according to your configuration and the Content-Type should be set to application/json.
If all goes well, you should receive a response similar to the following with a 202 (Accepted) status code.
{
    "jobId": "0ecaff31-5c77-473e-8e0f-acb4b5955e74",
    "isCompleted": false,
    "data": null
}
If something has gone wrong you may get a 500 (Internal Server Error) status code, or perhaps a 429 (Too Many Requests) status code, although the latter is very unlikely when testing things locally!
Cancel a job
To cancel a job, issue a DELETE request with the following URL before the job completes.
https://localhost:7007/backgroundJobs/911663be-63c5-4eed-9dee-48591c29f569
Note that you should update the GUID at the end of the URL to match the “jobId” that was returned when you created a job via the POST endpoint.
If all goes well, you should receive a response with a 204 (No Content) status code. If there isn’t a job in progress with the specified GUID, a 404 (Not Found) status code will be returned instead.
Summary
In this article, I have documented how you can effectively communicate with ASP.NET Core hosted services from your API endpoints/controllers using Channels.
I started by providing a brief overview of hosted services and Channels to give you some context.
I then proceeded to walk through some extensive code examples that illustrate the concept of API endpoint to hosted service communication. The overall example covered the processing of background jobs, how to trigger them, and how to allow them to be cancelled via API endpoints.
I finished by explaining how to test the example solution by issuing the appropriate API requests to create a background job and subsequently cancel it before completion.
If you want to take things further with the example, the next step would be to implement a repository that persists the jobs to a data store so they can be picked up and restarted if the server is stopped halfway through processing. This would also facilitate the retrieval of the jobs via a GET endpoint.
As you can imagine, there are many different use cases for this API to hosted service communication, so feel free to adapt the concepts shown in this article to suit your particular scenario.
Comments