
If like me, you are fascinated by science, you’ll possibly know a little bit already about the strange phenomena of quantum mechanics.
Concepts like superposition, entanglement, and teleportation are all things that seem like they should be impossible but have been proven time and time again in the lab. Yes, things do behave very strangely at the scale of atoms and sub-atomic particles.
As a software engineer, I’ve been paying close attention to the development of quantum computing and the potential that it has to make light work of tasks that are practically impossible for a classical computer to perform.
In this article, I am aiming to be your gateway to becoming a ‘quantum programmer’, at least at a most fundamental level. As you follow along, it’s important to bear in mind that you may not understand everything fully the first time around, and that’s ok! If we’re honest, even the most brilliant minds out there cannot think about quantum mechanics and all of the apparent oddities that go with it intuitively.
However, with the new Q# programming language and QDK (Quantum Development Kit), I will seek to show you as succinctly as I can how to write your first quantum program and run it.
Come and join me on this journey into the exciting and cutting edge field of quantum computing!
What is quantum mechanics?
Quantum mechanics is a scientific theory that describes the physical properties and workings of the ‘very small’ i.e. how things operate at the atomic and sub-atomic level of our universe.

In our day-to-day life, we are used to things working in a relatively predictable manner. Objects in the world around us appear to adhere to Newtonian physics and Einstein’s general theory of relativity. For example, using the laws of physics, scientists can very precisely calculate how to send a rocket into space and land it on Mars at an exact time and place in the future.
However, at the quantum level, the universe behaves very differently. The position of sub-atomic particles, for example, is unpredictable and things can even be in two places at once! All of this is very strange and difficult to comprehend since all we really know as humans in our day to day lives is how things work on a much larger scale.
The point of this article isn’t to provide any kind of formal education on quantum mechanics. However, it is a fascinating subject and I would encourage you to explore the topic further (video) as this will greatly help with your understanding of quantum computing. When you can grasp at least to some extent the fundamental principles and frankly the weirdness of the quantum world, it will make you all the more awestruck the first time you write and run your first quantum program.
Quantum computing
Let’s move on to the topic of quantum computing, which is based on the principles of quantum mechanics. What makes it so exciting and special?
Classical comparison
One of the first things to understand about quantum computers is how they are different from what we refer to as classical computers.
A classical computer can be considered as pretty much any electronic device that is used in today’s world, including PCs, laptops, tablets, smartphones, smart speakers and so on.
Classical computers are fundamentally based on tiny switches called transistors which can represent a binary state of either on or off i.e. 1 or 0. This most basic unit of information is referred to as a ‘bit’. Microchip manufacturers pack trillions of transistors onto silicon, allowing very large quantities of information to be stored and processed.
With quantum computing, the fundamental computational unit is not a bit, but rather a qubit.
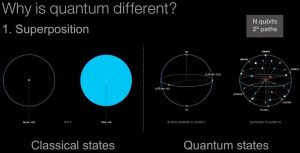
Here’s the weird bit, instead of only being able to store two states i.e. 1 or 0, a qubit can be either 1, 0, or both states at the same time i.e. a qubit can be in what is referred to as superposition. It is only when the state of a qubit is measured that it ‘collapses’ into either a 1 or a 0.
It’s difficult to comprehend how this is possible, but it is and it opens up the door to all of the unique possibilities that quantum computing can provide.
I recommend watching this great YouTube video which helps to explain the basics of quantum computing visually.
How many qubits could a woodchuck chuck?
One of the challenges of quantum computing is scaling up the number of qubits that make up a quantum computer and creating a stable system with a minimal error rate to reduce the number of error corrections that need to be applied.
Essentially, the more qubits there are, the more powerful the quantum computer will be, but it is also harder to maintain system stability.
Several big names out there are already investing heavily in quantum computing and are trying to pack as many qubits into their experimental quantum computers as possible. This includes companies like Amazon, Google, IBM, and Microsoft.
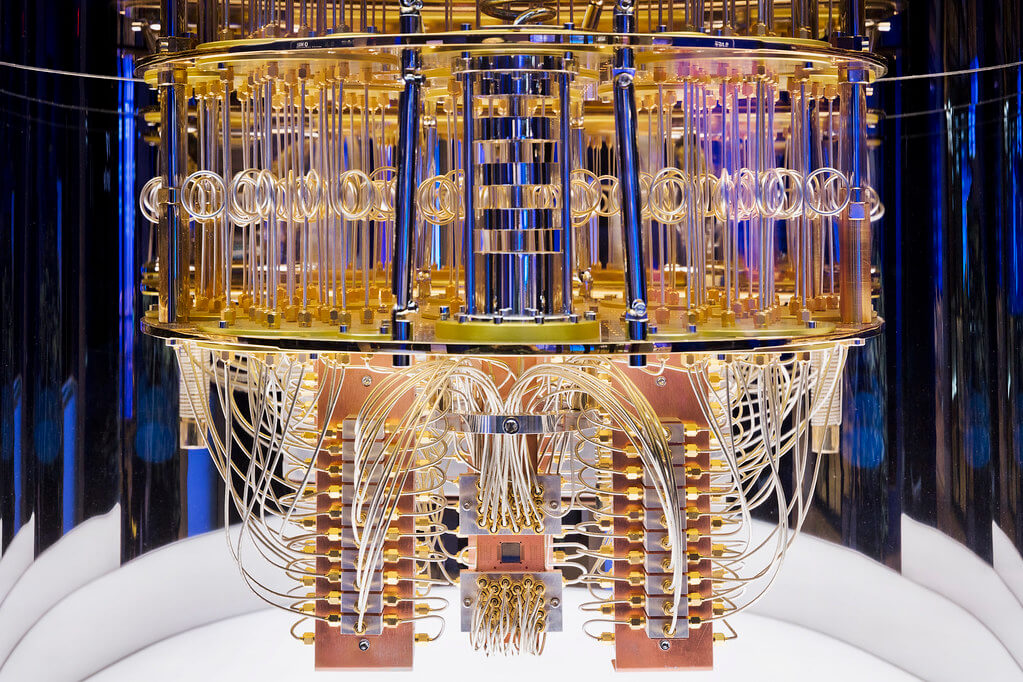
At the time of writing, the largest quantum computer, in terms of qubits, is operated by Google with 72 qubits. I can’t help thinking that in a few years we’ll see this in a similar way to how we view a 1.44 MB floppy disk drive today!
Yes, it doesn’t sound like much, but Google has already been able to claim ‘quantum supremacy’ with the 72 qubit machine. This means they were able to develop a specific algorithm that outperformed what is currently possible on any classical computer for the same problem.
Quantum scaling
Here’s a very cool thing to consider…
We know that a single bit can only store two states, 1 or 0. With a classical computer, if you double the number of bits you double the number of states you can represent.
As an example, if you wanted to store all of the 16 possible states of 4 bits, you would need 64 transistors.
However, with a quantum computer, you can represent the same number of states with only 4 qubits.
When you scale this up things become much more apparent. A quantum computer that has 300 qubits would be capable of representing somewhere in the region of the following number of states simultaneously.
2,000,000,000,000,000,000,000,000,000,000,000,000,000,000,000,000,000,000,000,000,000,000,000,000,000,000,000,000,000,000
This number is larger than the number of atoms in the known universe!
It’s clear to see that as quantum computers develop, they will grow exponentially in regards to the level of computing power that they can offer and it’s amazing to think about the possibilities that this might open up.
Quantum development
Ok, it’s great to have a bit of background on quantum mechanics and quantum computing, but what about quantum software development?
Fear not, I’ve got you covered!
Having said that, I’m not going to cover anything too advanced in regards to quantum algorithms. As a technical writer, it can be difficult to avoid the trap of using the words ‘easy’ and ‘simple’ too often when something seems obvious.
When discussing the setup and code, I will walk you through each step and I won’t be covering how to do ‘simple’ matrix transformations and linear algebra!
Development kit
One of the first things to think about when starting into quantum development is what environment and language you should use to write your quantum programs.
There aren’t that many quantum programming languages available presently, but in my opinion, Microsoft is leading the way with their new Q# language and the QDK (Quantum Development Kit).
Q# is open-source and the syntax is similar to elements of Python, C#, and F#. In addition to its support for basic conditional and loop constructs, Q# features quantum-specific data structures and operations. In a similar vein to languages like C#, the Q# language is constantly evolving and will continue to do so over time.
The great thing about the QDK is that it encapsulates most of the low-level quantum operation sequences you will need, freeing you up to focus on quantum algorithms at a higher level of abstraction.
Note that this article assumes you are using Visual Studio as your IDE.
Quantum hardware
With Q# and the QDK, not only can you write quantum algorithms and debug them in a simulator, but you can also run your programs on real quantum hardware. That’s right, you can run your programs on an actual quantum computer and see the results!
But I don’t have a quantum computer you ask?
That may be true, but it turns out that you don’t need one. As of early 2021, Microsoft has been offering the capability of deploying and running quantum code in the cloud via the Azure Quantum service (in preview).
I think this is a very clever model, and it is certainly going to be the most practical option for running quantum programs for the foreseeable future.
In essence, you will typically write and test your quantum algorithms on a quantum simulator that is running on your development machine, with small, manageable inputs. When you’re ready to run your quantum programs for real, you’ll push your code into the cloud and run it on the quantum resources that are made available to you.
This approach makes a lot of sense for quantum computing at this point in time. Quantum computers are still experimental and are very sensitive to outside interference. If these machines can be managed by dedicated companies and are made accessible via a cloud provider, all you need to worry about after writing your code is getting it deployed to the cloud and retrieving your results.
For the sake of simplicity, I’m only going to cover running quantum programs within the context of a quantum simulator. However, I hope I’ve whetted your appetite and you are encouraged to check out Azure Quantum if you want to see your quantum programs running on real quantum hardware!
Quantum simulation
You might be asking yourself how a quantum simulator works underneath. How can a classical computer simulate a quantum computer?
It does kind of feel like trying to simulate 4K video on a HD display, doesn’t it?
In basic terms, the quantum simulator is doing its best to simulate how quantum particles (i.e. qubits) behave. Although it’s true that a classical computer can never fully simulate the randomness of the quantum world, the quantum simulator does a pretty good job. It allows us, as developers, to have a high degree of confidence that our algorithms will perform as expected when running on real quantum hardware.
As a rough guide, today, the best classical computers can typically simulate no more than around 50-60 qubits. However, this is sufficient to run basic tests against.
QDK setup
To get started with development you’ll need to download the Quantum Development Kit.
To install the QDK, you can download it from the Visual Studio Marketplace.
Alternatively, within Visual Studio click on Tools –> Extensions –> search for ‘quantum’ –> press the ‘Download’ button –> press the ‘Close’ button –> close all instances of Visual Studio and the installation of the extension will begin.
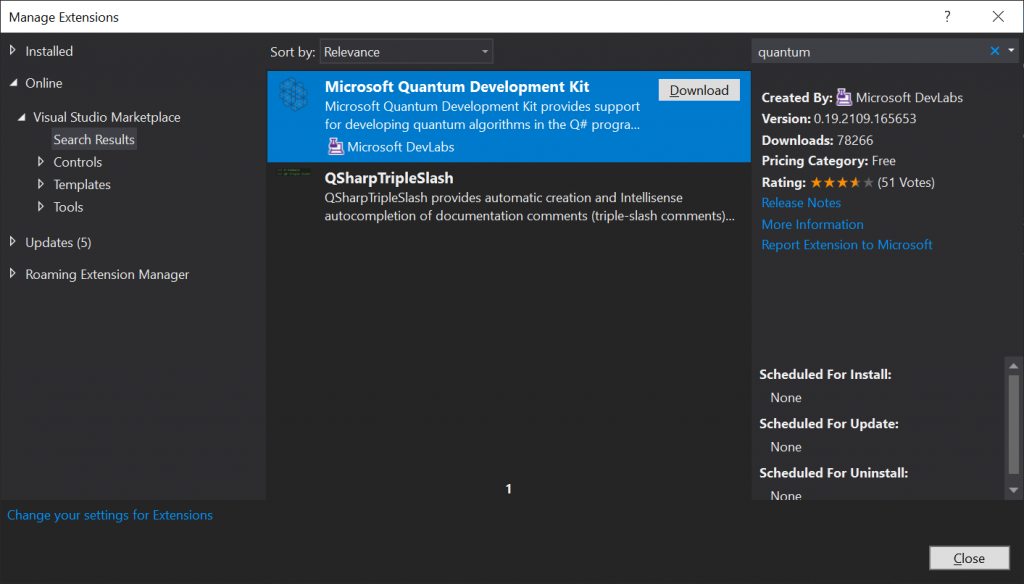
When the VSIX installer window appears you’ll need to press the ‘Modify’ button to proceed.
Finally, press the ‘Close’ button when the modifications have been applied to complete the installation process.
Project creation
After the QDK is installed, open Visual Studio and click on the ‘Create a new project’ button.
You should see that lots of new Q# project templates have been added to the available list.
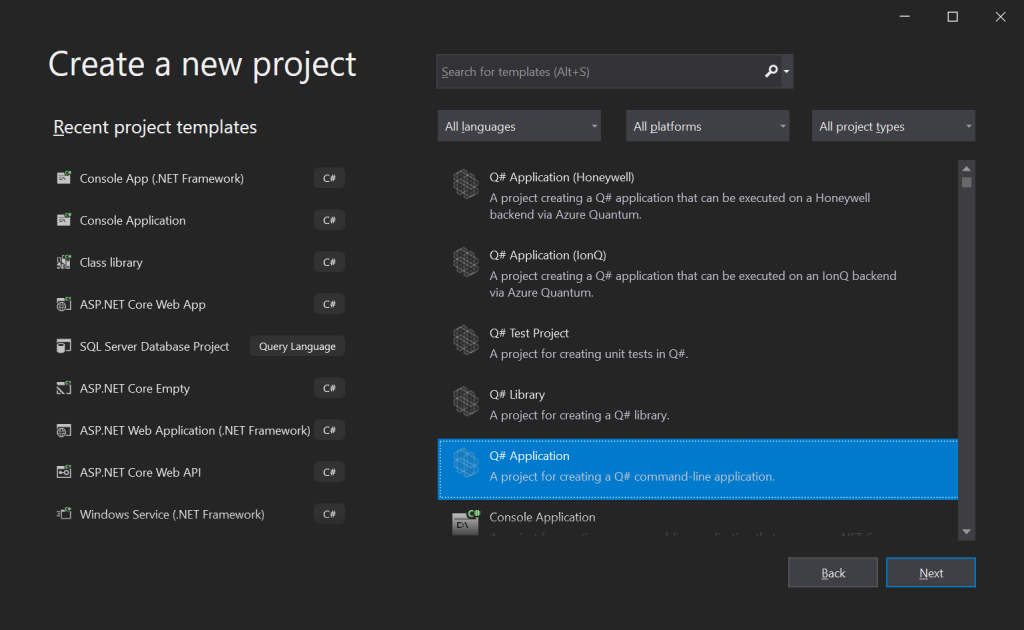
Select the ‘Q# Application’ template and press the ‘Next’ button. Choose a suitable Project name and Location, then press the ‘Create’ button.
This will create a starter template featuring an operation that writes out a “Hello quantum world” message.
The only file in the project, ‘Program.qs’, contains the following code.
namespace Quantum.JC.Samples.QuantumApplicationDemo {

    open Microsoft.Quantum.Canon;
    open Microsoft.Quantum.Intrinsic;

    @EntryPoint()
    operation HelloQ () : Unit {
        Message("Hello quantum world!");
    }
}
In brief, if you’re coming from a C# background, you can think of open as using, Unit as void, and Message as Console.WriteLine.
Press F5 or the Debug button to run the quantum program and see the output.
Note that if you receive errors about missing ‘nuspec’ files and NuGet packages when you try to run the program, try the following steps. Within Visual Studio click on Tools –> NuGet Package Manager –> Package Manager Settings –> General –> press the ‘Clear All NuGet Cache(s)’ button –> right-click on your solution within the Solution Explorer and select the ‘Restore NuGet Packages’ option from the context menu.
Your first quantum program
Hang on, you don’t get your ‘Quantum Wings’ just by writing a “Hello World” program now do you?
Besides, that’s a bit of a waste when you’ve potentially got the power and capabilities of a quantum computer behind you. Mind you, we aren’t going to stretch things too far!
For your first real quantum program, let’s create something that actually demonstrates some quantum phenomena; something that can’t be done in reality on a classical computer.
C# hosting
Before getting into the updated Q# operation, let’s first of all, rework our program with C# hosting.
The starter application is a console program that doesn’t require any other languages aside from Q# to be written as part of the project to run it. The @EntryPoint attribute is used to indicate the main entry point to the quantum program.
Although you only need Q# to write quantum operations and run your quantum programs, it is often useful to have a host program that is written in a classical language such as C#. The host program will contain the entry point and will then call the quantum operations defined in the Q# code.
This approach is especially useful for retrieving the outcome of quantum operations and then performing further processing and analysis on the results. For example, sending the data somewhere, or plotting a graph of the data perhaps.
Creating the Driver
Typically, the file containing the classical code that calls into the quantum operations is called the ‘Driver’.
Create a new file in your project called ‘Driver.cs’ and add the following code into it.
using System;
using System.Threading.Tasks;
using Microsoft.Quantum.Simulation.Simulators;
using Quantum.JC.Samples.QuantumApplicationDemo;

namespace JC.Samples.QuantumApplicationDemo
{
    class Driver
    {
        static async Task Main(string[] args)
        {
            using var sim = new QuantumSimulator();
            await HelloQ.Run(sim);

            Console.WriteLine();
            Console.Write("Press any key to exit...");
            Console.ReadKey(true);
        }
    }
}
Note that you must change the namespaces in the above code to match your project i.e. JC.Samples.QuantumApplicationDemo etc.
The above code is the most basic possible example of how to create a QuantumSimulator object instance and use it to statically invoke the HelloQ operation defined in the Q# ‘Program.qs’ file.
Remove the @EntryPoint attribute from the ‘Program.qs’ file to avoid compile-time errors.
If you now run your program it should execute successfully and display the same output as before.
Entanglement
One of the most amazing and somewhat perplexing aspects of the quantum world is the concept of entanglement.
With entanglement, quantum particles can be linked in such a way that their state is always either opposite or the same when measured, depending on the configuration.
For example, when the state of one qubit is measured and the result is 1, the other entangled qubit will be guaranteed to have the opposite state of 0. When the qubits are entangled in a different manner, if the first qubit is measured and the result is 1, the other entangled qubit is guaranteed to have the same state of 1.
The really amazing part is that this is true regardless of the physical distance between the quantum particles. The mystery is what connects the qubits over long distances; currently, the answer to this is unknown.
Despite this, using Q#, we can write an operation that will initialise two qubits and then entangle them.
Q# entanglement
Remove the ‘Program.qs’ file from your project and create a new file called ‘Entanglement.qs’.
Add the following code into the ‘Entanglement.qs’ file, the operation defined below is one of the possible ways to entangle qubits using Q#.
namespace Quantum.JC.Samples.QuantumApplicationDemo {

    open Microsoft.Quantum.Canon;
    open Microsoft.Quantum.Intrinsic;

    operation Entanglement () : (Result, Result) {

        mutable qubitOneState = Zero;
        mutable qubitTwoState = Zero;

        using ((qubitOne, qubitTwo) = (Qubit(), Qubit())) {
            H(qubitOne);
            CNOT(qubitOne, qubitTwo);

            set qubitOneState = M(qubitOne);
            set qubitTwoState = M(qubitTwo);

            Reset(qubitOne);
            Reset(qubitTwo);
	}

        return (qubitOneState, qubitTwoState);
    }
}
In the above code, the Entanglement operation specifies the Result return type and returns two of these since we will want to inspect the state of two qubits upon the completion of the operation.
At the top of the Entanglement operation, two mutable variables are declared and initialised with a default value of Zero. These are used to capture the state of the qubits upon measurement.
A using block is then specified and two qubits are initialised using the Qubit constructor.
Within the using block, the H (i.e. Hatem) operator is applied to the first qubit. This puts the qubit into superposition.
We then use the CNOT (Controlled NOT) operator, passing in both qubits. With the CNOT operator, if the first qubit has a state of 1 the state of the second qubit will be switched to the opposite of what it currently is. However, since the first qubit is in superposition (i.e. it’s both 1 and 0) the only option the CNOT operator has is to put the second qubit into superposition also.
The net result is that when this sequence of operations is applied, the two qubits will be entangled with each other and their states will both match when they are measured. If we were able to separate the two qubits such that they were light-years apart, in theory when one of the qubits is measured the state of the second qubit will collapse at the same moment and the states will be the same. Pretty amazing to think about!
After the qubits have been entangled as a result of the CNOT operator being applied, the state of the qubits is then measured by calling the M (measure) operator and the results are stored in the mutable variables declared earlier in the operation.
Before completing the using block the Reset operation is used to reset the state of the qubits to Zero.
Lastly, the qubit states are returned by the operation to the calling code.
C# Driver code
The code below demonstrates how to call the Q# entanglement operation from C# and then record and output the results to the console for inspection.
Update the ‘Driver.cs’ file in your project with the following code.
using System;
using System.Threading.Tasks;
using Microsoft.Quantum.Simulation.Core;
using Microsoft.Quantum.Simulation.Simulators;
using Quantum.JC.Samples.QuantumApplicationDemo;

namespace JC.Samples.QuantumApplicationDemo
{
    class Driver
    {
        static async Task Main(string[] args)
        {
            using var sim = new QuantumSimulator();

            int onesCount   = 0;
            int zeroesCount = 0;
            int equalCount  = 0;

            for (int i = 0; i < 1000; i++)
            {
                var (qubitOneState, qubitTwoState) = await Entanglement.Run(sim);

                if (qubitOneState == Result.One)
                {
                    onesCount++;
                }
                else
                {
                    zeroesCount++;
                }

                if (qubitOneState == qubitTwoState)
                {
                    equalCount++;
                }
            }

            string resultsHeading = "Entanglement Results";
            Console.WriteLine(resultsHeading);
            Console.WriteLine("".PadLeft(resultsHeading.Length, '='));
            Console.WriteLine();

            Console.WriteLine("Ones Count      : {0}", onesCount);
            Console.WriteLine("Zeroes Count    : {0}", zeroesCount);
            Console.WriteLine("Equal Percentage: {0}%", (equalCount / 1000) * 100);

            Console.WriteLine();
            Console.Write("Press any key to exit...");
            Console.ReadKey(true);
        }
    }
}
In the above C# code, a QuantumSimulator object instance is created, as per the previous C# example.
Some integer ‘count’ variables are then declared and initialised to hold the results that will be displayed at the end of the program.
A for loop is used to execute the Entanglement operation 1000 times. This should be sufficient to give us a little bit of variation in the results of the qubit state measurements. Within the for loop, the state of the qubits is checked and compared to see if they are equal.
Lastly, the results are output to the console.
Driver output
After running the program, you should see output that is similar to the following.
Entanglement Results
====================

Ones Count      : 516
Zeroes Count    : 484
Equal Percentage: 100%

Press any key to exit...
Amazing!
There is a little bit of variation in the ones vs zeroes count, which is expected given the reality of quantum randomness, but the key thing is that the end result is 100% equality of the state of the entangled qubits.
What we are seeing here is two qubits that have been entangled with a special quantum operation and they are now agreeing on their state every time they are measured, and this is true regardless of how far apart the physical qubits happen to be from each other.
It is very exciting to see the entanglement in action, albeit within the context of a quantum simulator for now.
The phenomena you’ve just witnessed is what Einstein famously referred to as “spooky action at a distance” (video).
Quantum algorithms
Although our first quantum program demonstrates real quantum phenomena, it doesn’t solve any real-world problems.
At this stage, if you want to continue down the path of becoming a quantum programmer, you’re going to need to do some research into how to develop quantum algorithms.
To help get you started, Microsoft has implemented some well-known quantum algorithms in Q#, such as Grover’s algorithm. As per the Wikipedia description of the algorithm, “Grover’s algorithm essentially solves the task of function inversion”.
The use case for the algorithm is in the field of cryptography. Grover’s algorithm has the potential to break some of the encryption that is heavily relied upon in today’s world, given a sufficiently powerful quantum computer. A scary thought indeed. For this reason, it’s a good idea to use longer symmetric key lengths where possible to protect against potential future quantum attacks.
As the next step on your journey, I encourage you to have a look at the Q# implementation of Grover’s algorithm on the Microsoft Docs and check out some of the other code samples for quantum algorithms while you are there.
Disentangling…
Alright, this has been a whirlwind tour through the weird and wonderful world of quantum computing.
At the beginning of the article, I briefly explained the principles behind quantum mechanics and quantum computing, with some examples to explain the underlying theories.
I then walked through how to install the Microsoft Quantum Development Kit and use it to create your very first quantum program.
I explained how to update the starter application to be launched via a C# host program and use the quantum simulator to execute Q# code. The Q# operation demonstrated quantum phenomena, specifically quantum entanglement.
Lastly, I pointed you to an example of a real-world quantum algorithm to give you a taste of what quantum algorithms look like and hopefully provide you with the inspiration needed to start designing and implementing your own.


Comments