

As software developers, we know that SSL certificates are necessary for securing our website traffic.
However, in my experience, the process of obtaining and installing an SSL certificate is not something that very many software developers are familiar with.
So, if you are a software developer and are looking for some guidance on the process from purchasing all the way through to installation, you should find the contents of this article helpful.
Of course, there are many methods of obtaining an SSL certificate and lots of different hosting platforms out there. Although I can’t cover every permutation I trust that you will still be able to glean a reasonable understanding of the general steps and flows of events.
In the sections that follow I will explain the process of purchasing a domain wildcard certificate from 123-Reg, verifying ownership of a domain, as well as the creation and completion of a certificate request via IIS.
Wildcard certificates
A wildcard certificate allows you to use the same SSL (Secure Sockets Layer) certificate for multiple subdomains.
Note that I will be using the term ‘SSL’ as opposed to ‘TLS’ (Transport Layer Security) in this article as it is still the most commonly used acronym.
As an example, if you have registered a domain named ‘acme.com’ a wildcard certificate will allow you to secure all of the following.
- www.acme.com
- ftp.acme.com
- files.acme.com
- login.acme.com
Wildcard certificates are both cost-effective and convenient for situations where you need to secure multiple subdomains.
There is no need to go through the process of obtaining a new certificate for every subdomain that you may need in the future.
You can use a wildcard certificate to secure an unlimited number of subdomains and you will usually be permitted to install it on an unlimited number of servers.
Free vs paid certificates
In order to obtain a wildcard certificate, you’ll need to purchase one from a reputable source.
Although there are now some great options for obtaining free certificates, such as Let’s Encrypt, it’s still usually a better choice to purchase an SSL certificate for a number of reasons.
Lifespan
Free certificates usually only have a lifespan of 90 days, whereas paid certificates are typically valid for 1-2 years. Setting up renewal automation for free certificates can help with this disadvantage, but this can introduce an element of uncertainty around whether the certificate will renew successfully and may require manual intervention in some cases.
Options
Typically there are fewer certificate options for free certificates. For example, if you are looking for an Extended Validation certificate in order to get the ‘green bar’ to display to users of your website this isn’t currently possible with free certificates; Domain Validation certificates are the only option.
Support
Lastly, the technical support and warranty for free certificates are usually either very basic or non-existent. This means that you could run into trouble if you encounter issues with your certificate or if the Certificate Authority is somehow compromised.
Purchasing the certificate
If you decide to purchase a certificate, one example of a reputable dealer is 123-Reg.
Note that 123-Reg are a UK-based company. There are plenty of other options e.g. GoDaddy is a very popular domain registrar and offers SSL certificates.
If you choose to use 123-Reg you can follow the steps below. However, the process should be fairly similar regardless of your chosen provider.
Note that in order to complete the purchase of the certificate, you will need to create a 123-Reg account.
Product selection
From the 123-Reg homepage, navigate to the SSL Certificates page under the ‘Security & SSL’ section.
Within the ‘Wildcard SSL’ tab, click the ‘Add to basket’ button under the ‘Domain SSL Wildcard’ product to begin the checkout process.
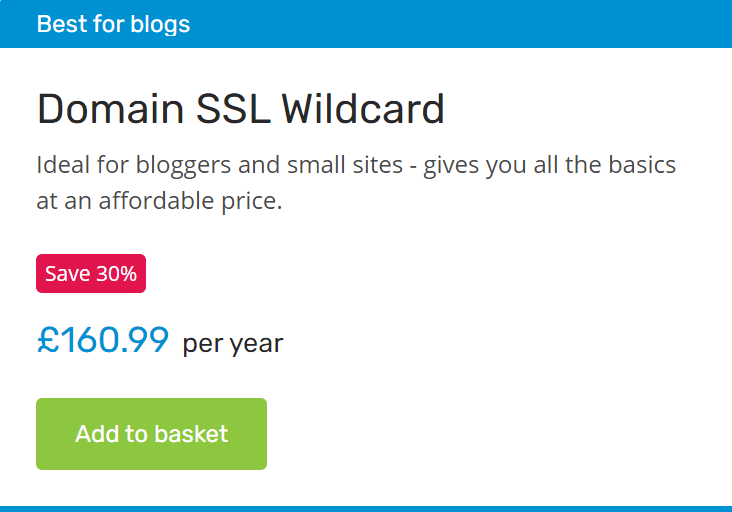
On the Basket page, click either the ‘Continue’ or ‘Secure checkout’ button to proceed to the next stage.
Account creation
If you already have an account enter your Email / Username and Password, then click the ‘Log in’ button.
Otherwise, click the ‘Create an account’ button. You’ll need to specify a valid email address and a strong password, then click the ‘Continue’ button.
At the ‘Details’ stage, you’ll need to specify your First name, Last name, Phone number, and your address. Click the ‘Continue’ button to proceed.
Specify your Contact Preferences and accept the Terms & Conditions, then press the ‘Create account’ button to finalise the creation of your account.
After either logging in or creating your account, you will be redirected to the ‘Payment’ stage.
Payment
On the Payment screen, accept the Terms & Conditions and then enter your payment details to complete the payment.
Following the processing of the payment, you should receive confirmation of your order and an email invoice.
Note that this is a ‘general’ purchase; you do not specify the domain or purpose of the certificate at this stage. This will be specified later when you choose which domain to assign the certificate to.
After purchasing an SSL certificate, you should see a ‘pending’ certificate within the ‘SSL overview’ section of your Control Panel. The certificate is now waiting for you to assign it to a Domain.
Email setup
Before proceeding further, it is important to make sure that you have access to an email account that can receive emails for the domain you need the SSL certificate for.
As an example, if you are using Google Workspace you’ll need access to manage your organisation using the Google Admin console.
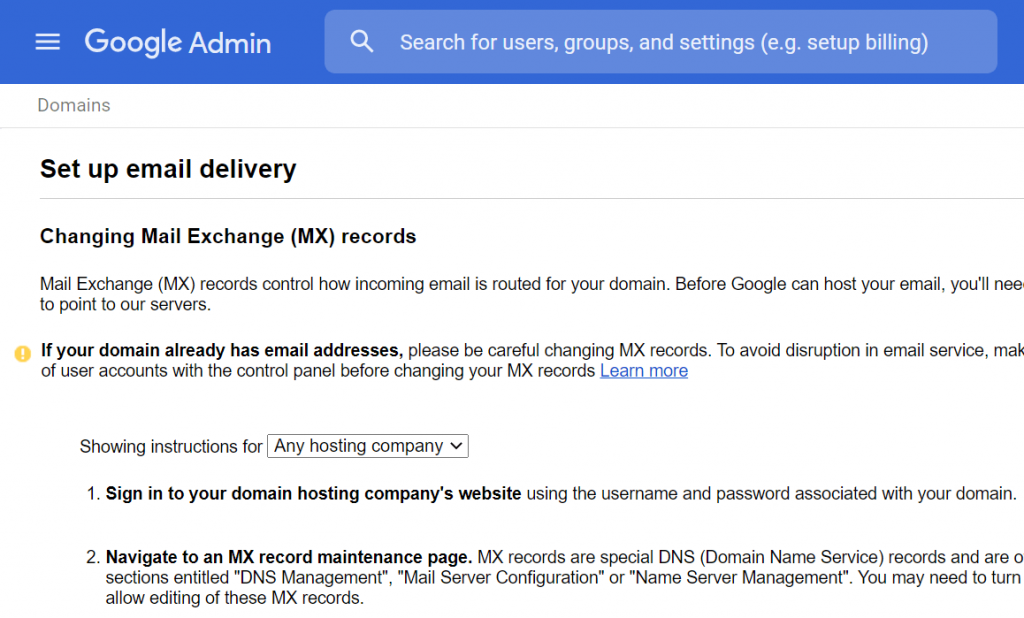
Within the Google Admin console, you’ll need to do the following.
- Add the domain to your organisation
- Use the ‘Manage domains’ section of the Google Admin console to add the domain e.g. ‘acme.com’
- Verify ownership of the domain
- After adding the domain to your organisation, follow the instructions to verify the domain. This usually involves adding a TXT/SPF type record to the list of DNS entries for the domain. The hostname should be an ‘@’ symbol and the value will typically be something like the following.
-
google-site-verification=XXXXXXXXXXXXXXXXXXXXXXXXX-XXXXXXXXXXXXXXXXX
- Add MX records to the domain
- After verifying the domain, click on ‘Set up Google MX Records’ to get instructions on how to configure your domain to route email traffic through Google servers. Again the DNS hostname should be an ‘@’ symbol, however, this time the type will be ‘MX’.
- Create a ‘webmaster’ email address/group
- When it comes time to apply for a certificate there will typically be a predefined list of email addresses which you must choose from to receive the approval emails e.g. ‘admin@acme.com’ or ‘webmaster@acme.com’ – I tend to opt for the webmaster option. Additionally, I find that it is better to create an email group named webmaster and add the users who are permitted to approve certificates etc. to this list. This allows for greater flexibility and ease of access.
- Send a test email
- Last but not least, send a test email to the webmaster email address you set up to make sure that the mailbox is working correctly.
Now you are ready to begin the process of requesting the certificate.
Generating a CSR
You’ll need to generate a CSR (Certificate Signing Request) before you can apply for the certificate.
A CSR contains all of the details needed by the Certificate Authority to issue a certificate according to your specifications. The CSR needs to be in a specific format, usually containing the public key, identifying information and digital signature; it is normally Base64 encoded.
You can use IIS (Internet Information Services) to generate the CSR in the required format.
After opening up IIS, click on the server node, then within the ‘IIS’ section double-click the ‘Server Certificates’ option.
Now underneath the ‘Actions’ pane on the right-hand side of the screen, click on the ‘Create Certificate Request…’ link to launch the Request Certificate wizard.
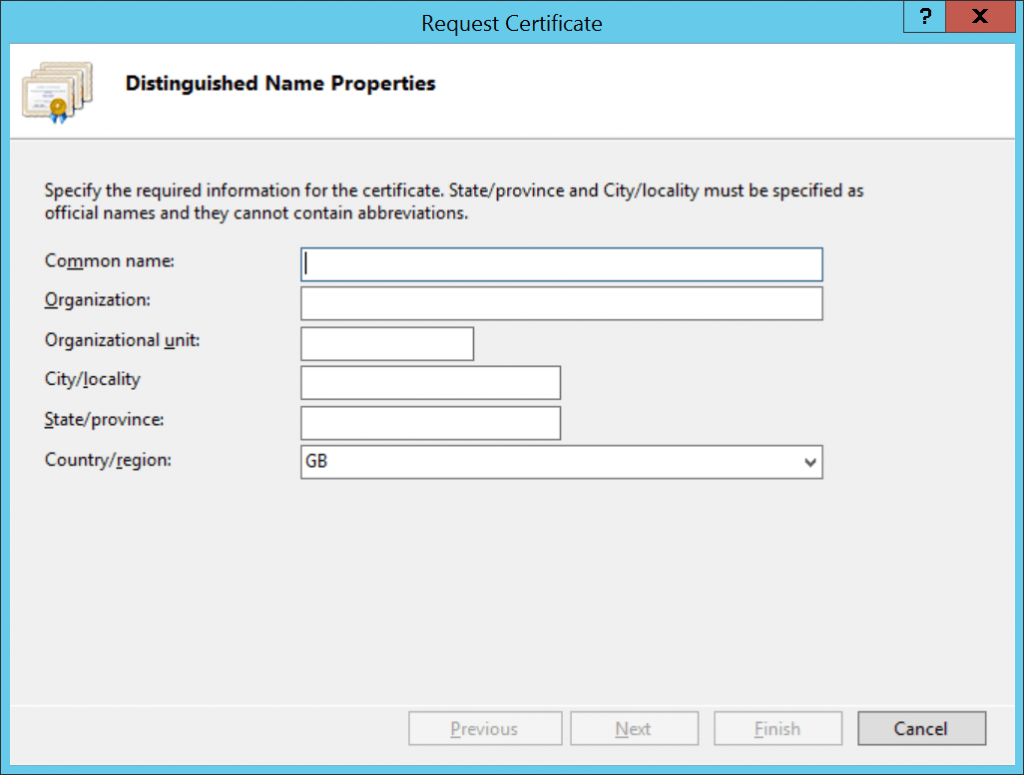
Fill in the information as follows, adjusting the details as required to suit your organisation details.
- Common name: *.acme.com
- Organization: Acme
- Organizational unit: IT
- City/locality: Belfast
- State/province: Antrim
- Country/region: GB
For the Common name, note the asterisk/wildcard character. It is important to include this character so that you can use the certificate for different subdomains. Replace ‘acme’ with the domain you wish to issue the certificate for.
Requirements for the remainder of the fields are fairly self-explanatory. You can adjust the Organizational unit as you see fit but ‘IT’ is a fairly standard option. The Country/region should be specified as a standard ISO country code; IIS helpfully provides a drop-down control that is pre-populated with the majority of recognised codes.
After filling in the Distinguished Name Properties, click the ‘Next’ button to proceed to the Cryptographic Service Provider Properties stage.
I recommend that you use the default ‘Microsoft RSA SChannel Cryptographic Provider’ option and specify a Bit length for the encryption key of at least 2048.
Click the ‘Next’ button to proceed to the File Name stage.
Specify the full path to where the CSR file should be saved. I like to specify an extension of ‘.csr’ to make it clear that the file is a Certificate Signing Request.
Click the ‘Finish’ button to complete the wizard.
Filling in the request form
After creating a CSR, you’ll typically need to fill in a request form within the Control Panel of the website from which you purchased your certificate.
If you’re using 123-Reg, within the ‘SSL Overview’ section of the Control Panel click on the ‘Assign’ link next to your certificate.
This will open up a certificate request form. Complete the required fields as follows, adjusting the details according to your chosen domain and personal/organisation details.
- Domain: *.acme.com
- Email address: webmaster@acme.com
- First name: My First Name
- Last name: My Last Name
- Telephone: My Telephone Number
- Email address to send my certificate: webmaster@acme.com
- Confirm email address to send my certificate: webmaster@acme.com
- Send my Approval email to: webmaster@acme.com
- Paste your CSR here: Paste the contents of the CSR file generated in the previous section
After filling in all of the required fields, go ahead and submit the form.
Domain validation
A vital part of the process for obtaining an SSL certificate is validating that the person to whom the certificate is being issued actually owns the domain for which they are requesting the certificate.
Within an hour or two of submitting the certificate request form, an email should arrive in the inbox of the approval email address you specified. Depending on the certificate provider, this email will normally contain a link that you can click on to validate that you have access to the domain.
You may get a further email that says that domain control needs to be established. If so, add a TXT/SPF type DNS record within your DNS Control Panel with the unique value which has been supplied in the email. As per previous examples, use the ‘@’ symbol for the hostname.
Within another hour or two you should receive an email confirming that your SSL certificate has been issued.
At this point, you should be able to view the certificate within the ‘SSL overview’ section of your Control Panel. There should be a ‘Download Certificate’ link available.
Clicking on the download link will open an ‘SSL Certificate’ page with a text area containing the certificate details.
e.g.
-----BEGIN CERTIFICATE-----
XXXXXXXXXX...
-----END CERTIFICATE-----
Copy and paste the entire contents of the text area into your favourite text editor and save the file with a ‘.cer’ extension.
Installing the certificate
The last stage of the process is to complete the certificate request and install the certificate into your hosting platform.
IIS has the capability to import a .cer file, making the certificate available for use on the machine on which IIS is installed. Following the import, the certificate can then be exported for use elsewhere.
Completing the certificate request
Within IIS, click on the server node, then within the ‘IIS’ section double-click the ‘Server Certificates’ option.
Underneath the ‘Actions’ pane on the right-hand side of the screen, click on the ‘Complete Certificate Request…’ link to launch the Complete Certificate Request dialog.
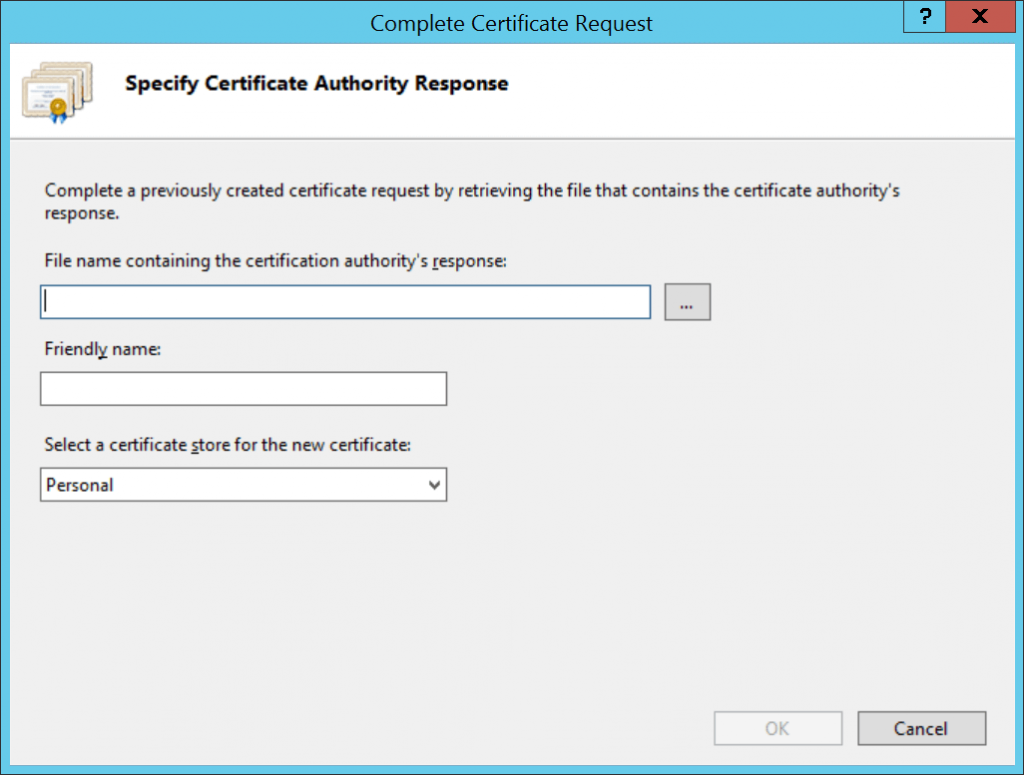
After the dialog opens, browse to the location where you saved your .cer file and click the ‘Open’ button.
Enter a Friendly name for the certificate which will be displayed within the Server Certificates list-view in IIS.
Lastly, select the certificate store you wish to use and press the ‘OK’ button.
Note that as a general rule of thumb, the Personal store is fine if you are only going to have a few certificates installed on your server.
Your certificate should now appear within the Server Certificates list.
Exporting the installed certificate
At this point, your certificate is installed and available for usage on the machine on which IIS is installed.
If you want to use the installed certificate on another server, you’ll need to export it.
To export the certificate, select it from the certificate list and then underneath the ‘Actions’ pane on the right-hand side of the screen, click on the ‘Export…’ link to launch the Export Certificate dialog.
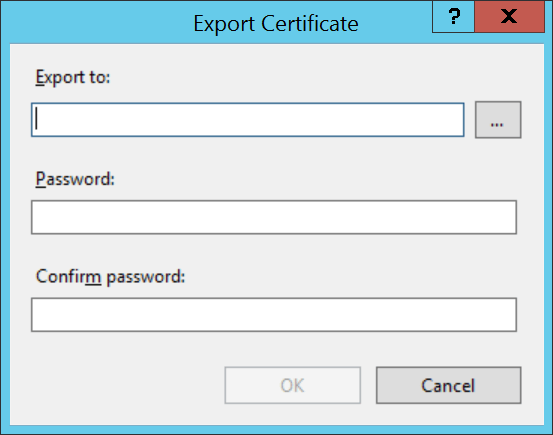
On the Export Certificate dialog, enter the full path to where you wish to save the .pfx file for the certificate.
Fill in the Password and Confirm password fields with a strong password to protect the private key which is encoded within the .pfx file, then click the ‘OK’ button to complete the export.
Now you can install your certificate onto any other hosting platform. For example, you can upload the certificate to Azure to protect your cloud-based web apps.
At this stage, feel free to remove the certificate from IIS if you no longer need it there.
The process is now complete; we’ve covered all of the steps in regards to purchasing, requesting and completing a certificate request, then exporting it for use on other servers.
Summary
The aim of this article was to provide a guide that covers the process from start to finish for obtaining and installing a wildcard SSL certificate.
I acknowledged at the beginning of the article that it isn’t possible to cover every permutation as there are a huge number of companies selling domains and SSL certificates. There are also many different certificate authorities and the process for validating domains can vary between providers. The process of installing certificates also varies depending on the hosting platform.
Having said all this, I believe that the information in this article should serve as a valuable basis for assessing what is involved in the process so that you know what you expect. In combination with vendor-specific documentation, the steps I have documented should help you understand the process as you go along, regardless of your chosen provider and platform.
If you’ve found the information contained herein helpful, or have a question, please let me know in the comments!
Comments