

Mailgun is a popular email delivery service that is built for developers and combines high reliability with scalability.
PowerShell is a cross-platform scripting language that allows tasks to be automated on Windows, Linux, and macOS using the power of .NET.
When developing PowerShell scripts that are running automatically on a schedule, it’s often useful to make these scripts capable of notifying us via email whenever errors or other events occur. While Mailgun provides lots of great documentation on how to send emails using their API, there isn’t currently any official documentation on how to send a Mailgun email using PowerShell.
In this article, I share a PowerShell function that simulates the built-in Send-MailMessage cmdlet, providing a way to call the Mailgun API natively within PowerShell scripts.
Mailgun setup
If you haven’t heard of Mailgun before I encourage you to head over to the official Mailgun website and check it out.
You can sign up for a free account on the sign-up page to get started.
After you’ve signed up and logged into the Mailgun portal, click on the ‘Sending’ link on the left-hand navigation pane and then press the ‘Select’ button within the ‘API’ box.
Following this, the page will display your API key, API base URL, and some sample code for sending a Mailgun email.
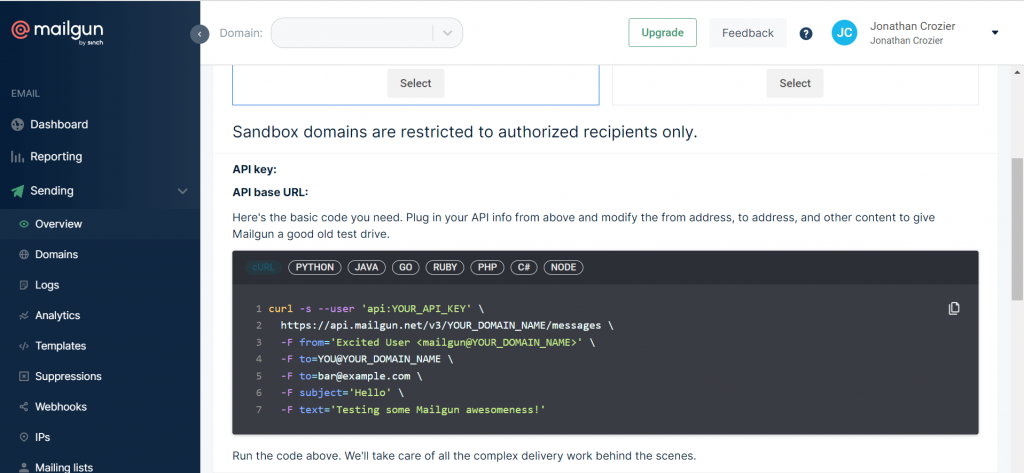
As you can see from the screenshot above, there is sample code available for cUrl, Python, Java, etc. but there is no code sample for PowerShell.
Of course, we could just use cURL from within our PowerShell script, but wouldn’t it be nice to have something that integrates more seamlessly?
Let’s look at implementing a suitable PowerShell function in the next section.
PowerShell
PowerShell provides a built-in Send-MailMessage cmdlet that allows emails to be sent via the standard SMTP protocol.
However, the official Microsoft documentation clearly states that the Send-MailMessage cmdlet is obsolete. This is due to the cmdlet using the deprecated SmtpClient class underneath.
The documentation also states that there is no immediate replacement for Send-MailMessage. This is where the Mailgun API comes into play, allowing us to send emails via a REST API endpoint. As a result, this helps to work around any potential firewall/port or other security issues and abstracts away the SMTP protocol from us.
Function
The PowerShell Send-MailgunMessage function shown below imitates the built-in Send-MailMessage cmdlet, providing most of the same parameters.
The function has been developed to work with PowerShell v5.1 or greater, offering a high degree of compatibility across systems that are reasonably up to date.
If you’re new to PowerShell, feel free to check out my PowerShell Quickstart blog article before studying the code samples in the current article.
function Send-MailgunMessage(

    [Alias("PsPath")]
    [ValidateNotNullOrEmpty()]
    [string[]]$Attachments,

    [ValidateNotNullOrEmpty()]
    [string[]]$Bcc,

    [ValidateNotNullOrEmpty()]
    [string]$Body,

    [Alias("BAH")]
    [switch]$BodyAsHtml,

    [ValidateNotNullOrEmpty()]
    [string[]]$Cc,

    [Parameter(Mandatory=$true)]
    [ValidateNotNullOrEmpty()]
    [string]$From,

    [Parameter(Mandatory=$true)]
    [ValidateNotNullOrEmpty()]
    [string]$Domain,

    [ValidateNotNullOrEmpty()]
    [System.Net.Mail.MailPriority]$Priority,

    [string[]]$ReplyTo,

    [Alias("sub")]
    [string]$Subject,

    [Parameter(Mandatory=$true)]
    [ValidateNotNullOrEmpty()]
    [string[]]$To,

    [ValidateNotNullOrEmpty()]
    [System.Management.Automation.PSCredential]$Credential,

    [switch]$UseSsl
)
{
    <#
    .DESCRIPTION
        Sends an email message via the Mailgun API.

    .PARAMETER Attachments
        Specifies the path and file names of files to be attached to the email message.

    .PARAMETER Bcc
        Specifies the email addresses that receive a copy of the mail but are not listed as recipients of the message.

    .PARAMETER Body
        Specifies the content of the email message.

    .PARAMETER BodyAsHtml
        Specifies that the value of the Body parameter contains HTML.

    .PARAMETER Cc
        Specifies the email addresses to which a carbon copy (CC) of the email message is sent.

    .PARAMETER From
        Specifies the sender's email address.

    .PARAMETER Domain
        Specifies the Mailgun Domain to use.

    .PARAMETER Priority
        Specifies the priority of the email message.

    .PARAMETER ReplyTo
        Specifies additional email addresses (other than the From address) to use to reply to this message.

    .PARAMETER Subject
        Specifies the subject of the email message.

    .PARAMETER To
        Specifies the recipient's email address.

    .PARAMETER Credential
        Specifies the API credentials to use.

    .PARAMETER UseSsl
        Specifies that the message must only be sent over a TLS connection.

    .EXAMPLE
        Send-MailgunMessage
            -From "Your Name <mailgun@YOUR_DOMAIN_IDENTIFIER.mailgun.org>"
            -To "YOUR_IDENTIFIER@example.com"
            -Subject "Test Subject"
            -Body "Test Body"
            -Domain "YOUR_DOMAIN_IDENTIFIER.mailgun.org"
            -Credential (New-Object System.Management.Automation.PSCredential("api", (ConvertTo-SecureString "YOUR_API_KEY" -AsPlainText -Force)))

    .NOTES
        Returns an API response similar to the following example.

        {
          "message": "Queued. Thank you.",
          "id": "<20111114174239.25659.5817@samples.mailgun.org>"
        }
    #>

    # Build up the request parameters as a set of key-value pairs within an array.
    $requestParameters = [System.Collections.ArrayList]@(
        @{"from" = $from}
    )

    # Add the subject, if specified.
    if ($Subject.Length -gt 0)
    {
        $requestParameters.Add(@{"subject" = $Subject})
    }

    # Determine the correct parameter to hold the message body.
    if ($BodyAsHtml)
    {
        $requestParameters.Add(@{"html" = $Body})
    }
    else
    {
        $requestParameters.Add(@{"text" = $Body})
    }

    # Add the specified To, CC, and BCC addresses.
    $To  | ForEach-Object { $requestParameters.Add(@{"to"  = $_}) }
    $Cc  | ForEach-Object { $requestParameters.Add(@{"cc"  = $_}) }
    $Bcc | ForEach-Object { $requestParameters.Add(@{"bcc" = $_}) }

    # Add the specified 'Reply To' addresses.
    $ReplyTo | ForEach-Object { $requestParameters.Add(@{"h:Reply-To" = $_}) }

    # Set the Priority and TLS options.
    $requestParameters.Add(@{"h:X-Priority"  = [int]$Priority})
    $requestParameters.Add(@{"o:require-tls" = $UseSsl})

    # Determine the best Content Type depending on whether or not there are file attachments.
    $contentType = "application/x-www-form-urlencoded"
    $requestBody = ""

    if ($Attachments.Length -gt 0)
    {
        # If there are file attachments, add these to the request parameters.
        $Attachments | ForEach-Object { $requestParameters.Add(@{"attachment" = $_}) }

        # When attaching files the 'multipart/form-data' Content Type must be used.
        $boundary    = [Guid]::NewGuid().ToString()
        $contentType = "multipart/form-data; boundary=$boundary"

        # Add each request parameter with the appropriate formatting.
        foreach ($parameter in $requestParameters)
        {
            foreach ($key in $parameter.Keys)
            {
                $value = $parameter[$key]

                # Add the boundary divider.
                $requestBody += "--$boundary`r`n"
                $requestBody += "Content-Disposition: form-data; name=`"$key`""

                if ($key -eq "attachment")
                {
                    # Get the filename and contents.
                    $fileName     = [System.IO.Path]::GetFileName($value)
                    $encoding     = [System.Text.Encoding]::GetEncoding("ISO-8859-1")
                    $fileContents = $encoding.GetString(([System.IO.File]::ReadAllBytes($value)))

                    # Add the filename and contents to the request body.
                    $requestBody += "; filename=`"$fileName`"`r`n"
                    $requestBody += "Content-Type: application/octet-stream"
                    $requestBody += "`r`n`r`n" + $fileContents + "`r`n"
                }
                else
                {
                    # Add the parameter value to the request body.
                    $requestBody += "`r`n`r`n" + $value + "`r`n"
                }
            }
        }

        # End with a final boundary divider.
        $requestBody += "--$boundary--"

        <#
        EXAMPLE REQUEST BODY

        --7c386e61-e7ab-4095-a8a7-28542010bc8e
        Content-Disposition: form-data; name="from"

        Your Name <mailgun@YOUR_DOMAIN_IDENTIFIER.mailgun.org>
        --7c386e61-e7ab-4095-a8a7-28542010bc8e
        Content-Disposition: form-data; name="subject"

        Test Subject
        --7c386e61-e7ab-4095-a8a7-28542010bc8e
        ...
        etc.
        #>
    }
    else
    {
        # When there are no file attachments, the 'application/x-www-form-urlencoded'
        # Content Type can be used for greater efficiency.
        $parameterNumber = 1

        # Add each request parameter with the appropriate formatting.
        foreach ($parameter in $requestParameters)
        {
            foreach ($key in $parameter.Keys)
            {
                $value = $parameter[$key]

                $ampersand = "&"

                if ($parameterNumber -eq 1)
                {
                    # Don't add an ampersand character to the first parameter.
                    $ampersand = ""
                }

                # Add the parameter value with URL encoding to the request body.
                $requestBody += "$ampersand$key=$([Uri]::EscapeDataString($value))"

                $parameterNumber++
            }
        }

        <#
        EXAMPLE REQUEST BODY
        from=Your%20Name%20%3Cmailgun%40YOUR_DOMAIN_IDENTIFIER.mailgun.org%3E&subject=Test%20Subject&...etc.
        #>
    }

    # Call the Mailgun API and return the result.
    $result = Invoke-RestMethod `
        -Method "POST" `
        -Uri "https://api.mailgun.net/v3/$Domain/messages" `
        -Credential $Credential `
        -Body $requestBody `
        -ContentType $contentType

    return $result
}
Let me break down the key aspects of the above function for you in the following sub-sections.
Parameters
The Send-MailgunMessage function parameters are very similar to the built-in Send-MailMessage cmdlet and are defined in the same order as per the official documentation.
A notable exception is the Domain parameter that more or less replaces the SmtpServer parameter defined by the Send-MailMessage cmdlet. Since we’re calling the Mailgun API, the API Base URL is built up within the function based on the Domain, rather than specifying an SMTP Server host address.
Additionally, the following parameters are not supported by the function.
EncodingDeliveryNotificationOptionPort(not required)
However, the function supports everything else, allowing multiple ‘To’ addresses and ‘CC’ addresses etc. to be passed in, as well as multiple file attachments and HTML body formatting if required.
I’ve based the parameter types and attributes on the official Send-MailMessage documentation and the C# implementation of the Send-MailMessage cmdlet on GitHub. The ValidateNotNullOrEmpty attribute is used on most parameters to disallow empty arrays or empty strings. Some of the parameters are marked as mandatory.
Parameter documentation
It’s good practice to document the parameters of your PowerShell functions.
I’ve lifted part of the help text for most of the parameters from the official Send-MailMessage documentation to help keep things as consistent as possible.
I’ve also added a note to document the type of response that the Mailgun API should return.
Building the request parameters
The first section of the function body deals with building up the request parameters that need to be passed to the Mailgun API.
An ArrayList containing a collection of hash tables (with a single key-value pair) is used to build the parameter names and values based on the specified function parameters.
By using the ForEach-Object cmdlet to add the address type parameters, the function is able to avoid too many conditional statements in this section that would otherwise clutter up the code unnecessarily.
All of the request parameter names (e.g. “h:Reply-To”) are based on the Mailgun API documentation.
Building the request body
The most involved part of the function is where the request body for the API call is built up.
Form Data
If any file attachments have been specified, the request body must use the ‘multipart/form-data’ Content Type. This involves separating each request parameter with a boundary string that tells the server where the details of each parameter start and end. The function uses a Guid to generate a globally unique identifier that will act as the unique boundary for the request.
The code is basically iterating through each parameter and building up the request body in the required format, with the file contents being read into a byte array and then converted to an encoded string that is placed in the request body.
I’ve included an example of the request body as a comment in the function to help with visualising the end result.
You can read more about the ‘multipart/form-data’ Content Type here.
URL Encoded
If there are no file attachments, the request body can be formatted using the ‘application/x-www-form-urlencoded’ Content Type, which is much simpler and concise than Form Data. Request parameters are separated with an ampersand (&) character and parameter names and values are joined with the equals (=) character.
The static EscapeDataString of the .NET Uri class is used to properly URL-encode each value.
An example of a URL-encoded request body is included as a comment in the function for reference.
Calling the API endpoint
The Send-MailgunMessage function uses the built-in Invoke-RestMethod cmdlet to make the Mailgun API call and returns the result to the caller.
The API call is a POST request to the Mailgun ‘Messages’ endpoint.
Credentials are passed to the API via the Credential parameter.
The Form Data or URL-encoded string that was built up is passed as the request body, along with the corresponding Content Type for the request.
Note that newer versions of the PowerShell Invoke-RestMethod cmdlet feature a Form parameter that makes sending Form Data much easier. However, the approach taken in the function we’ve walked through allows older versions of PowerShell to be supported for maximum compatibility across systems.
Calling the function
The Send-MailgunMessage function can be called like any other PowerShell function or cmdlet.
The code below demonstrates how to call the function with the full set of possible parameters.
$domain      = "YOUR_DOMAIN_IDENTIFIER.mailgun.org"
$apiKey      = ConvertTo-SecureString "YOUR_API_KEY" -AsPlainText -Force
$credentials = New-Object System.Management.Automation.PSCredential("api", $apiKey)

$result = Send-MailgunMessage `
    -From "Your Name <mailgun@YOUR_DOMAIN_IDENTIFIER.mailgun.org>" `
    -To "FIRST_IDENTIFIER@example.com", "SECOND_IDENTIFIER@example.com" `
    -Cc "THIRD_IDENTIFIER@example.com" `
    -Bcc "FOURTH_IDENTIFIER@example.com" `
    -ReplyTo "FIFTH_IDENTIFIER@example.com" `
    -Subject "Test Mailgun API email" `
    -Body "Hi, this is a test <b>Mailgun</b> message." `
    -BodyAsHtml `
    -Attachments ".\Test1.txt", ".\Test2.txt" `
    -Priority Normal `
    -Domain $domain `
    -Credential $credentials `
    -UseSsl

Write-Host "Result: $($result.message)"
If you want to simplify things, please be aware that the only required parameters are From, To, and Domain. You’ll also need to pass a Credential object, and ideally, your email should have a Body and Subject.
Note that the PowerShell Credential type requires the ‘password’ to be specified as a SecureString. It’s important to make sure you are considering security requirements when dealing with credentials.
To make things more readable and to avoid some code duplication, a few variables are initialised before calling the Send-MailgunMessage function. To test things out, replace the value of the variables with your Mailgun Domain and API key. You should also replace the email addresses and other values that are passed into the Send-MailgunMessage function accordingly.
If the function succeeds, a message that is similar to the following should be output to your terminal.
Result: Queued. Thank you.
Assuming that you specified your own email as one of the addresses to send the email to, now check your inbox!
Note, try checking the ‘Spam’ folder within your email client if there’s no sign of the message being received.
Summary
In this article, I shared a PowerShell Send-MailgunMessage function that imitates the functionality of the built-in Send-MailMessage cmdlet to send an email via the Mailgun API.
I started by pointing you in the right direction in regards to setting up Mailgun if you aren’t currently familiar with it.
I then provided the code listing for the custom Send-MailgunMessage function and walked through its implementation before demonstrating how to call the function to test it out.
Comments