

GitHub Copilot is a revolutionary AI-powered coding assistant that helps developers write code faster, reducing effort and freeing up time to focus on problem-solving and collaboration.
For decades, aside from their own experience, developers have relied on online resources such as Stack Overflow and various forms of documentation, where available, to assist with the development of software solutions. However, with the advent of AI assistance tools such as GitHub Copilot, much of that development friction can now be alleviated.
By harnessing the power of the Codex model by OpenAI, GitHub Copilot can understand the context of your software project and offer intelligent code suggestions in real-time that are tailored to your application. Using tools such as ChatGPT and Claude in a standalone fashion can be very helpful, but integrating the intelligence into your development environment with GitHub Copilot enables a whole new level of productivity.
In this article, I will provide an introduction to GitHub Copilot in Visual Studio, explaining how to set it up and get signed in, as well as covering the key features to be aware of, along with some practical use case ideas.
Setup
To begin using GitHub Copilot in Visual Studio, you’ll need Visual Studio 2022 v17.8 or later. However, I highly recommend installing the newest available version to benefit from the latest and greatest GitHub Copilot features.
The GitHub team are continuously improving GitHub Copilot, so it’s worth updating your Visual Studio installation regularly.
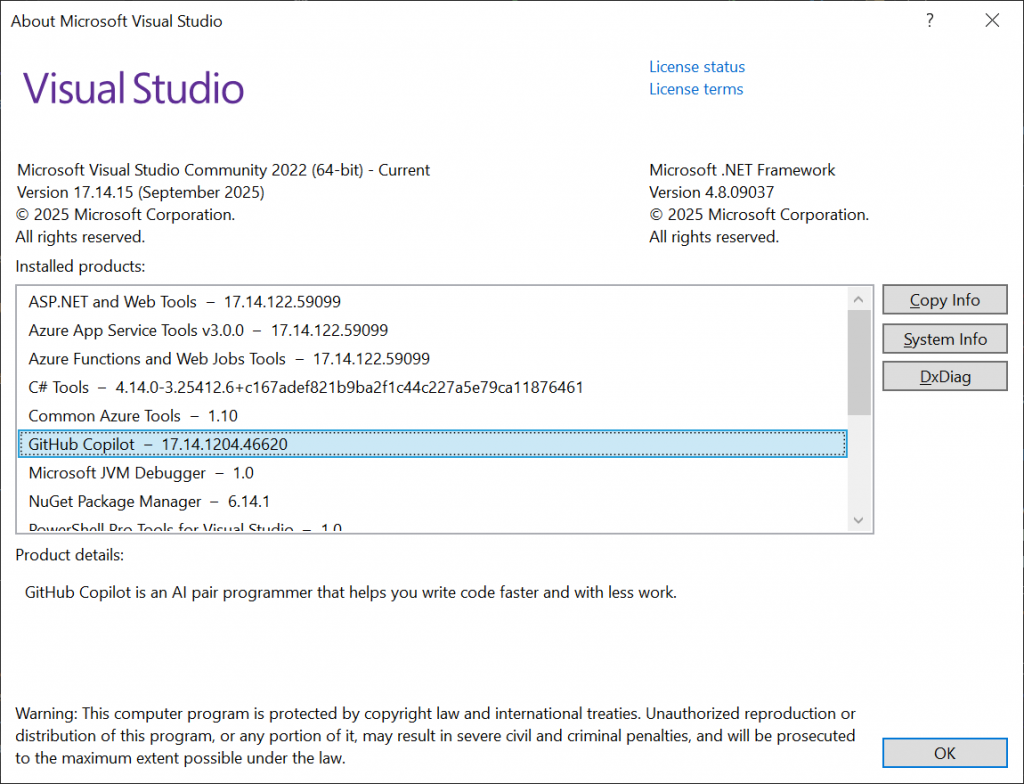
When installing Visual Studio for the first time, the GitHub Copilot feature will usually be included by default. You can check if GitHub Copilot is installed and verify your version within Visual Studio by navigating to Help –> About Microsoft Visual Studio. You’ll then see a dialog appear that is similar to the one shown in the screenshot below.
Suppose you’re already on the newest version of Visual Studio and you notice that GitHub Copilot isn’t currently installed. In that case, you can enable the feature by navigating to Help –> Check for Updates. This will launch the Visual Studio Installer, where you can click the ‘Modify’ button to add or remove installed components.
Within the ‘Individual Components’ tab, you should find the ‘GitHub Copilot’ feature under the ‘AI Assistance’ section, as shown in the screenshot below.
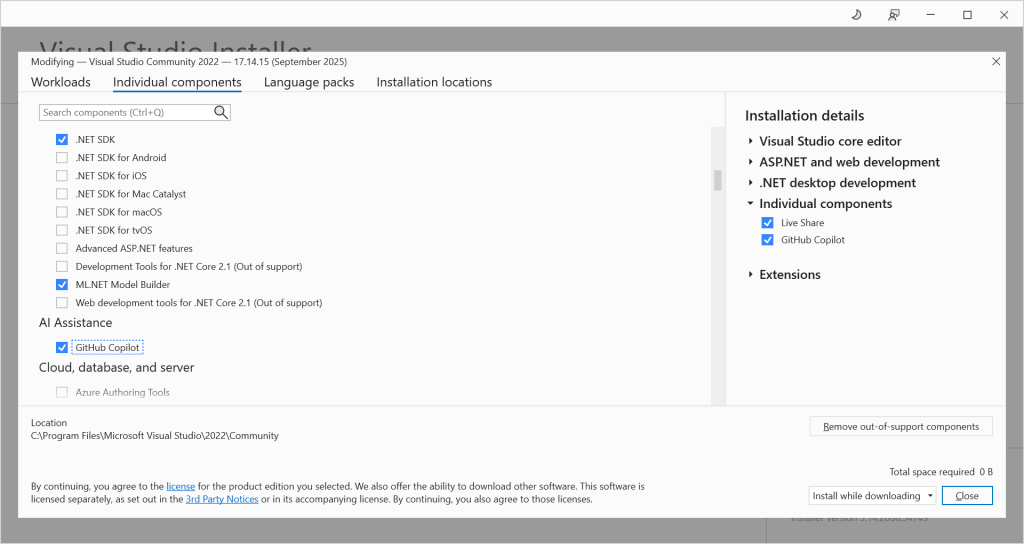
If the ‘GitHub Copilot’ feature is not already enabled, select it, then press the ‘Close’ button, followed by the ‘Modify’ button at the bottom-right of the dialog to apply the updates (this can take a while).
Another simple way to check if the GitHub Copilot feature is installed is to look for the ‘GitHub Copilot’ button at the top-right of the Visual Studio interface, which we’ll see in the following section.
Signing In
Before you can start using GitHub Copilot in Visual Studio, you’ll need to sign in, which means you’ll need a GitHub account. If you don’t have an account already, you can register for a new account using the Sign up for GitHub page, or you can use the ‘Sign up’ option within Visual Studio.
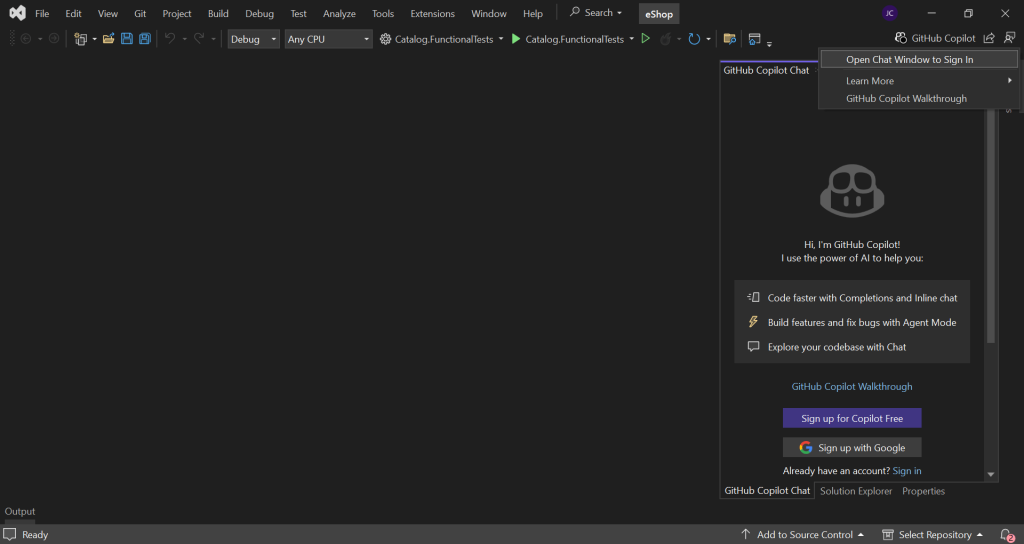
To initiate the sign-in from Visual Studio, you can click on the ‘GitHub Copilot’ button at the top-right of the main Visual Studio interface, then select the ‘Open Chat Window to Sign In’ option from the context menu, as shown below.
Within the GitHub Copilot Chat Window, you have the option to sign up or sign in.
If you click on the ‘Sign in’ link, you’ll be redirected to the Sign in to GitHub page, where you can enter your GitHub credentials. On the ‘Select user to authorize’ page, click the ‘Continue’ button, then click the ‘Authorize github’ button on the following page to grant the necessary permissions. After this, you will be prompted to ‘Open Microsoft Visual Studio’ by the browser.
Once you’re back in Visual Studio, click on the ‘Sign up for Copilot Free’ button, and you should be ready to go.
GitHub Copilot features
The main aspects of GitHub Copilot in Visual Studio are the following.
- Code Completions
- Ask Copilot
- Chat Window
Let’s explore how to get started with each of the above features so that we can get a handle on what’s possible.
Note that in the following subsections, I will be working with the eShop Reference Application, which you can clone if you are looking for a project to experiment with.
Code Completions
When editing code files in Visual Studio, GitHub Copilot will provide context-aware suggestions and code snippets as you type. This can be especially helpful for boilerplate code, reducing manual typing effort.
In the eShop application, imagine that we need to extend the Order class within the ‘Ordering.Domain’ project.
There is already an AddOrderItem method, so let’s say we want to add a RemoveOrderItem method.
To do this, all we need to do is type public void Re below the existing AddOrderItem method and GitHub Copilot will determine that we’re probably trying to implement a method to remove an order item, as shown in the screenshot below.
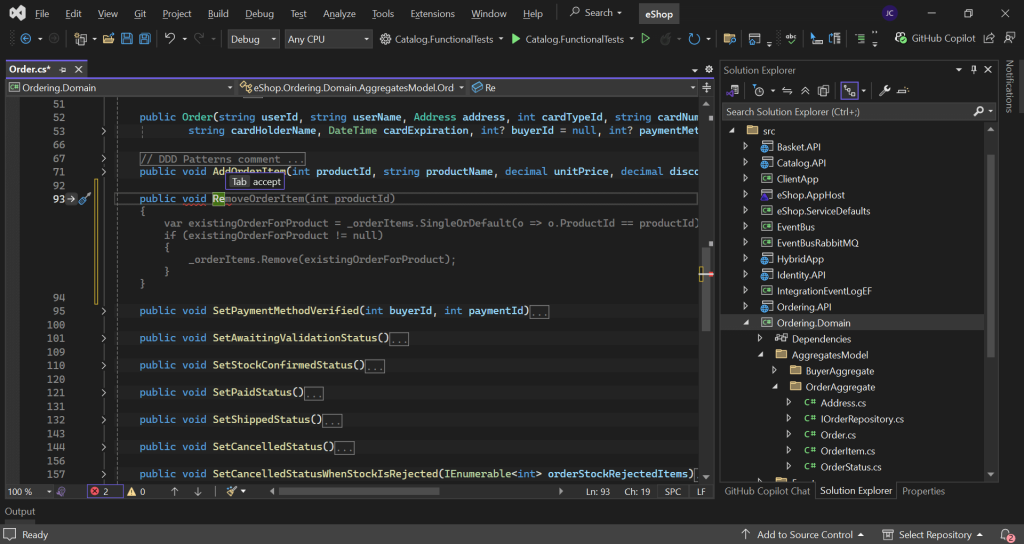
To accept the suggested code, all we need to do is press the Tab key. Alternatively, we can accept the current word using the Ctrl + Right Arrow key combination, or accept the current line using the Ctrl + Down Arrow key combination.
While this feature can be helpful and save a lot of time, you’ll usually find that there are things that need to be adjusted after accepting the suggestion. GitHub Copilot is making its best attempt to predict what you want to do based on the current file you’re editing and the code that is in proximity to your cursor.
Ask Copilot
When there is something very specific that you want to ask GitHub Copilot about, regarding a particular method or line of code, for example, you can right-click on a line within your current code file and select the ‘Ask Copilot’ option from the context menu (or use the Alt + / key combination).
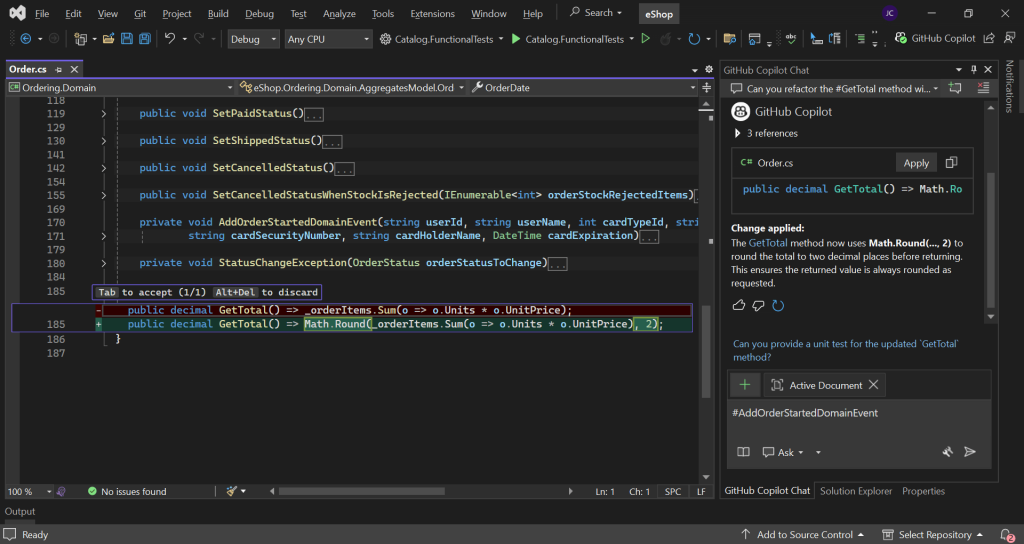
Below is an example from the same Order class where I’m asking GitHub Copilot if there could be any potential rounding issues when getting the total of the order via the GetTotal method.
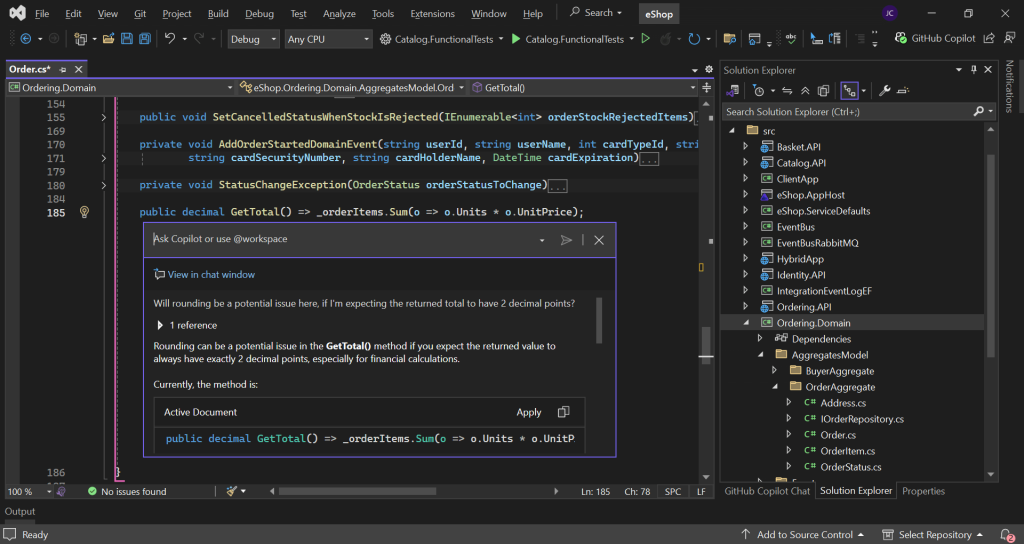
As you can see from the screenshot above, GitHub Copilot responds with details regarding potential rounding pitfalls. If we scroll down, we’ll see that GitHub Copilot also suggests some new code that uses the Math.Round method to round the total value. The suggested change can be easily applied to the active document using the ‘Apply’ button above the code snippet.
Chat Window
The Chat Window is where the real power of GitHub Copilot in Visual Studio becomes apparent. You’ll likely find that most of your time is spent in the Chat Window when you’re interacting with GitHub Copilot.
From the Chat Window, you can ask GitHub Copilot any number of things regarding your code.
Here are a few of the many possible use cases…
- Explain code
- Fix bugs
- Generate documentation
- Optimize code
- Render diagrams
- Write SQL scripts
- Write unit tests
And the list goes on… You’re only limited by your imagination!
The quickest way to get started with the Chat Window is to type any question you can think of into the prompt text area and review the response, so you can start learning how it behaves.
Let’s start by asking GitHub Copilot to explain some code.
With the ‘Order.cs’ file open in the editor, let’s type the following question into the Chat Window.
Can you explain what the code is doing in the file that is currently open?
When we press the Enter key, GitHub Copilot will generate a response, as shown in the screenshot below.
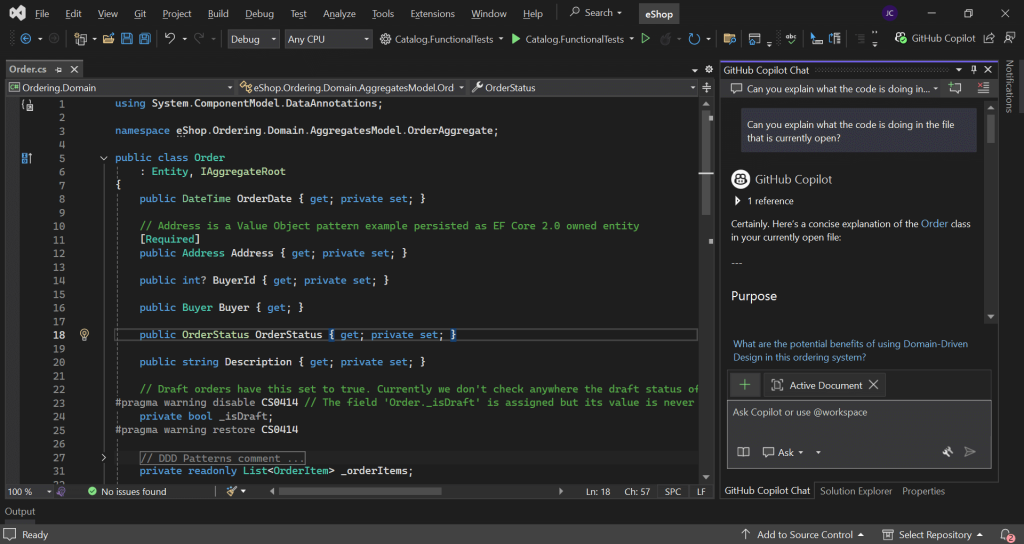
In this case, GitHub Copilot produces a response that includes Purpose, Key Features, Design Patterns Used, and Summary sections to provide a clear yet concise explanation of the Order class.
Asking GitHub Copilot to provide explanations can be very useful, especially for complex code with lots of moving parts.
However, this is a very rudimentary example of what is possible with the Chat Window. The GitHub Copilot Chat functionality deserves a lot more attention, so let’s tackle the various features you should be aware of in the next section.
GitHub Copilot Chat
The Chat capabilities of GitHub Copilot are very powerful, and there are lots of aspects to the Chat Window, both big and small, that are well worth knowing about. So, let’s dive in.
Slash Commands
While you are free to use as much natural language as you like within the Chat Window, Slash Commands can help cut down on the amount of typing you need to do and help to focus GitHub Copilot on your intent.
Below is an example of using a Slash Command in the Chat Window.
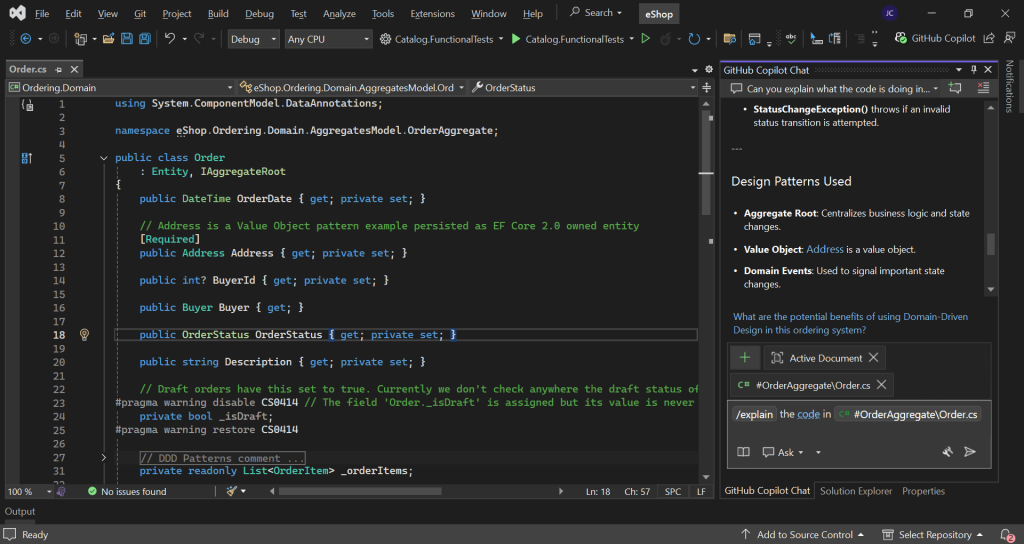
To generate the prompt shown in the screenshot above, all I had to do was type the slash (/) character within the prompt text area, navigate to the ‘explain’ option with the pop-up menu, and then press the Tab key.
The response from GitHub Copilot will be very similar to the one that was received when using the natural language prompt from the previous section, but much less typing was required.
Some of the other Slash Commands include the following.
- doc
- fix
- help
- optimize
- tests
I encourage you to try each of them out with a file opened in the editor and inspect the generated prompt.
Chat Variables
Another extremely useful thing to know about in relation to the Chat Window is the concept of Chat Variables.
With GitHub Copilot, the more specific you can be with your prompts, the better outcome you’ll likely receive.
However, it can be tedious and error-prone to manually type out class names, method names, and namespaces as part of your prompt, and GitHub Copilot may need to spend time searching for the types you are referring to if you are not specific enough.
This is where Chat Variables come in; they help provide context, enabling GitHub Copilot to know exactly what you are referring to, so that your prompts can be more targeted. In fact, we already saw an example of Chat Variables in the previous subsection, where the auto-generated prompt was referring to the ‘Order.cs’ file.
Below is an example of referring to a specific method within the Order class.
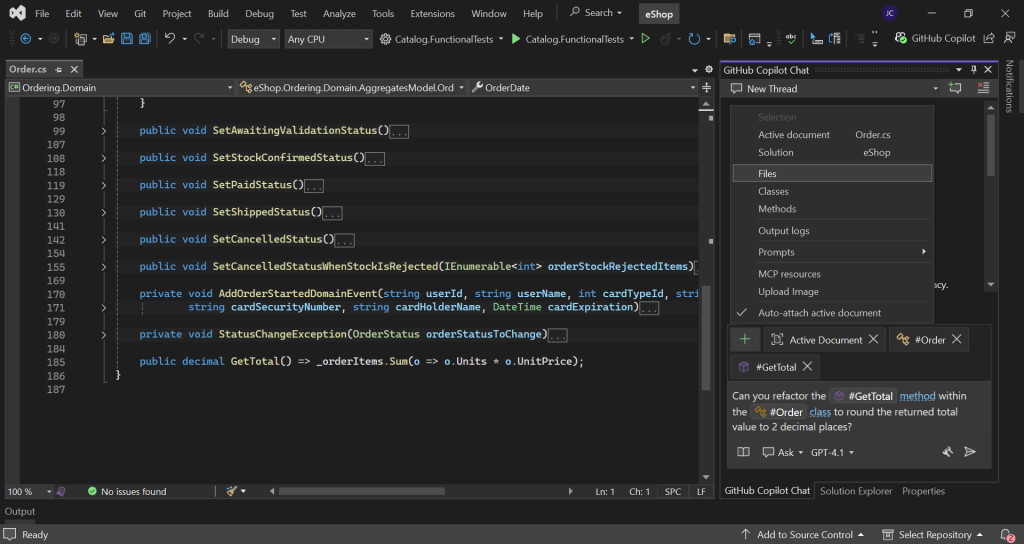
In the above example, I’m asking GitHub Copilot to refactor the GetTotal method within the Order class.
When typing the prompt, if the hash/pound (#) key is pressed, a list of possible type suggestions is shown in a pop-up menu for selection. The list is narrowed down as you type the name of what you’re looking for after the hashtag, and includes classes, methods, files, and more. You can use the Up/Down Arrow keys to navigate through the list of possible options and then press either the Tab or Enter key to add the reference to your prompt; it’s very intuitive.
As you can imagine, with the above prompt, we can now be certain that GitHub Copilot will target the exact method belonging to the class we are expecting when it suggests changes for us.
Agent Mode
Another very cool feature of GitHub Copilot Chat is Agent Mode.
Near the bottom of the Chat Window, you’ll notice that the Mode is set to ‘Ask’ by default. When using GitHub Copilot Chat in Ask Mode, GitHub Copilot always respond to prompts within the Chat Window and allows you to manually apply code suggestions.
In the screenshot shown below, you can see the result of pressing the ‘Apply’ button within the Chat Window. The Tab key must then be pressed to accept the change and update the code file.
In Agent Mode, GitHub Copilot behaves in a much more interactive fashion. If you ask for a specific code change to be made, GitHub Copilot will edit your code files directly and provide you with updates on what it is doing within the Chat Window. The GitHub Copilot Agent will run builds to verify its changes and can even run terminal commands to execute unit tests. It’s pretty cool!
Below is an example of executing the same prompt as before, but this time in Agent Mode.
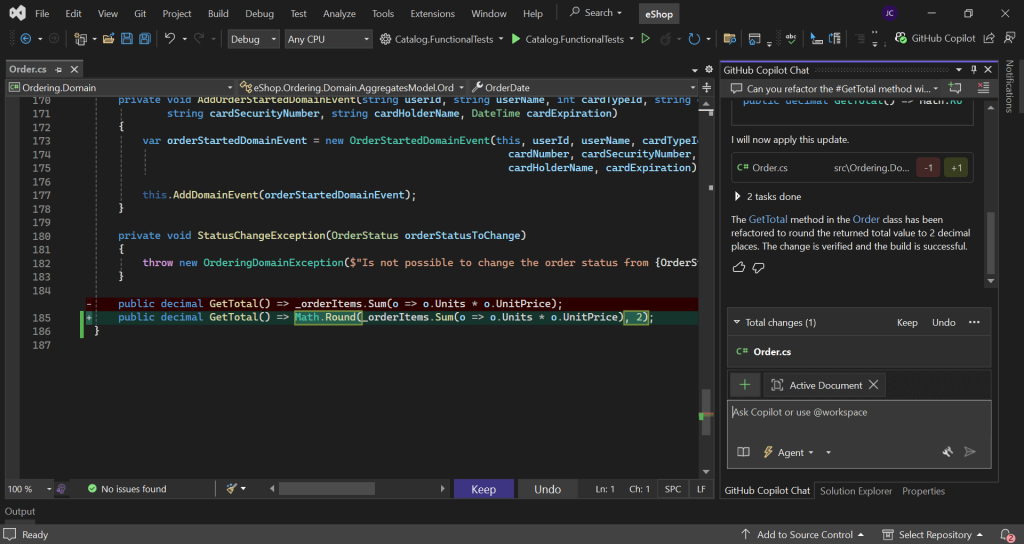
As you can see, GitHub Copilot has edited the code file directly and is providing us with the option to Keep or Undo the changes.
As part of this process, GitHub Copilot builds the solution and can inspect the build output, making adjustments to the code if it comes across any errors until the build succeeds. In this case, it was a simple change, so the build passed on the first attempt.
We can review the changes line by line in a similar way to reviewing source control changes. If you’re using Git, you may find it easier to keep the suggested changes, make any required adjustments, and then review the differences via the Git Changes window before staging them ahead of a commit.
Workspace Prompts
In addition to user prompts, it’s possible to include workspace prompts to help steer GitHub Copilot in a particular direction.
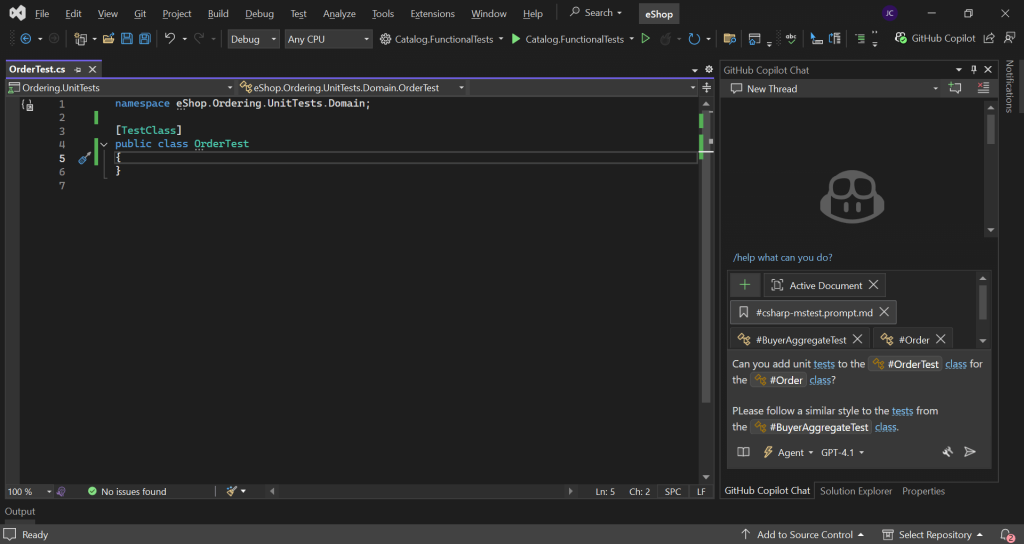
Let’s say we want to write some unit tests for the Order class. We can write a prompt that tells GitHub Copilot which test class to add the tests to and which class we want to write the tests for. We can even tell GitHub Copilot to base the style of the tests on an existing test class. However, further to this, we can specify a workspace prompt that GitHub Copilot will process first to provide it with more information regarding the rules it should follow when writing the tests.
Workspace Prompts can be accessed from the Chat Window by clicking on the green ‘Plus’ icon button, and then navigating to Prompts –> Workspace prompts.
When you do this for the first time, you’ll notice that there aren’t any prompts available to select from; we need to add the prompts as Markdown (.md) files inside the ‘.github’ folder within a ‘prompts’ folder. The ‘.github’ folder should be located at the same level as our solution file.
So, how do we create a prompt file? Well, the awesome-copilot GitHub repo is an awesome place to obtain carefully crafted prompts and instructions that you are free to use and amend according to your requirements.
To get started quickly, I recommend downloading the repository as a zip file and extracting the ‘prompts’ folder into your ‘.github’ folder so that you can try out all of the prompts.
Back in Visual Studio, you should now find that when you navigate to the ‘Workspace prompts’ option, a list of prompts is available for selection. In the screenshot below, you can see that I’ve selected the ‘csharp-mstest-prompt.md’ prompt file.
Another cool thing you can do is add instructions to your solution. Simply create an ‘instructions’ folder within your ‘.github’ folder and copy over some files from the awesome-copilot ‘instructions’ folder as an experiment.
GitHub Copilot will always take into account any instructions you’ve provided it with before it processes user prompts. This is an ideal way to help guide GitHub Copilot to follow your coding standards.
Other features
GitHub Copilot is packed full of features, and it would take a lot of content to explain each of these in detail.
In lieu of this, before I wrap things up, I’d like to call out some additional features that you should be sure to check out.
Models
GitHub Copilot usually defaults to the latest OpenAI GPT model. However, GitHub Copilot makes several models available, and it’s worth experimenting with each of these, as each model has its own strengths. Personally, I’ve had a lot of success recently with the Claude models.
You can change the selected model by selecting it from the list of available models at the bottom of the Chat Window.
Note that paid versions of GitHub Copilot provide access to additional Premium models.
Upload Image
If you’re working on some front-end changes, providing GitHub Copilot with an image of a problem you’re seeing in the user interface can help Copilot understand things better, and you can even ask Copilot to attempt to replicate a user interface design.
Aside from this, you could use the feature to upload a screenshot of an error log or perhaps an architecture diagram.
You can access the Upload Image feature by clicking on the green ‘Plus’ icon button within the Chat Window and then selecting the ‘Upload Image’ option.
Mermaid Diagrams
GitHub Copilot can generate diagrams in Mermaid format; just ask it to create a diagram that illustrates a particular workflow, and it will do its thing. In the latest version of Visual Studio, you can even preview the diagram directly in the IDE, as shown in the screenshot below.
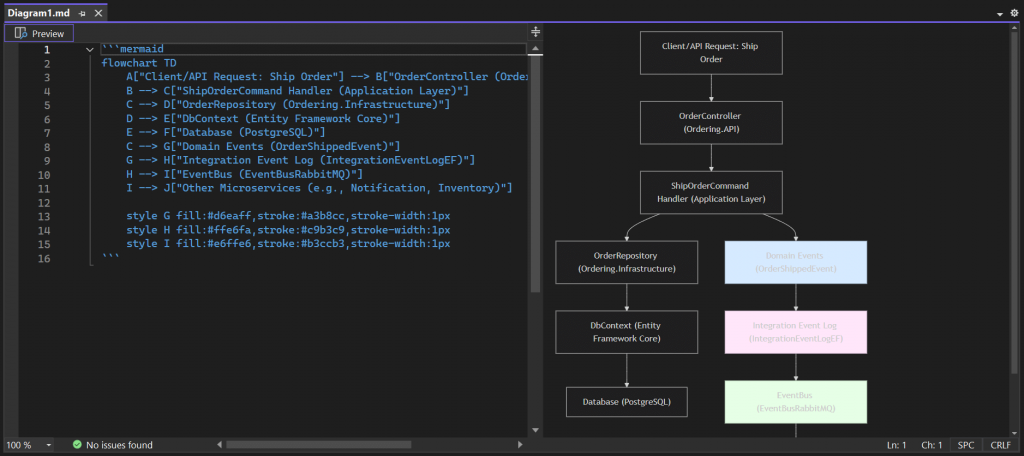
This feature can be invaluable for visualising complex logic, and is another very nice feature that could save you a huge amount of time compared to drawing a diagram manually.
Summary
In this article, I introduced you to GitHub Copilot in Visual Studio.
I started by explaining what you need to install and how to sign in so that you can get started.
I then provided an overview of the main GitHub Copilot features that are available for Visual Studio, including Code Completions, Ask Copilot, and the Chat Window.
Following this, I focused on GitHub Copilot Chat, where most of the beneficial features are located, covering everything from basic prompts and context hashtags to workspace prompts and other additional features.
There’s so much more to GitHub Copilot than I can cover in this blog article, and the product is continuing to evolve at a rapid pace. However, I trust that the information I’ve provided herein will help you get off to a good start with GitHub Copilot. Once you’ve become familiar with the available functionality, my closing advice would be to focus on crafting precise prompts, which I believe is the key to achieving the desired outcomes and obtaining the most value from GitHub Copilot.
Comments