

Most front-end web developers are aware of the developer tools that are built into modern web browsers such as Google Chrome. Many of these developers also use some of the available features to help debug their applications. However, in my experience, not many developers have put in the effort required to learn the full extent of what these tools can offer.
There are a number of hidden gems within Chrome Developer Tools that can help make life much easier when developing web applications.
If you’ve spent any time using the features of developer tools you’ll probably be aware that it’s possible to manipulate the structure and style of your web pages and see the results immediately reflected within the browser.
However, what you might not know is that it’s possible to save those changes back to their source files when developing locally via ‘Workspaces’. If you haven’t come across this feature before, read on to learn more!
What we’ll cover
The Chrome Developer Tools make it easy to find and modify client-side code within the web browser. As a result, it’s quite natural to want to save all of these changes at the same time.
The alternative is to somehow keep track of all the changes you are making and then manually add each one into every affected source file after the fact.
The Workspaces feature within Chrome Developer Tools alleviates this burden by letting you save any changes you’ve made directly back to the source files as soon as you save the changes in the browser.
In the sections that follow, I’ll show you how to access the developer tools and specifically, the Workspaces feature within the Sources panel. From here I’ll walk you through how to map your web project folder and then make and save changes to HTML, CSS, and JavaScript source files from the browser.
Accessing developer tools
I’m going to be focusing on how to use the Workspaces feature within Google Chrome.
However, if you are using the new Microsoft Edge then you’ll be able to access the same features since Edge is now a Chromium browser.
If you haven’t accessed the developer tools before here’s how to open them: click on the vertical ellipsis (⋮) button at the top-right of Chrome –> from the context menu click on the ‘More tools’ option –> click on ‘Developer tools’.
An alternative way to access the developer tools is via a keyboard shortcut, either Ctrl + Shift + I or the F12 key on a Windows machine.
Sources
When the developer tools pane opens you’ll see quite a number of different tabs available to select from. These tabs provide access to various panels, for example, ‘Console’, ‘Elements’, etc.
What we are looking for is the ‘Sources’ tab. Click on this to open the Sources panel.
Note that sometimes you’ll need to press the >> button to access Sources from a list of options if you are working on a small display or if your developer tools are docked to the left or right of the browser.
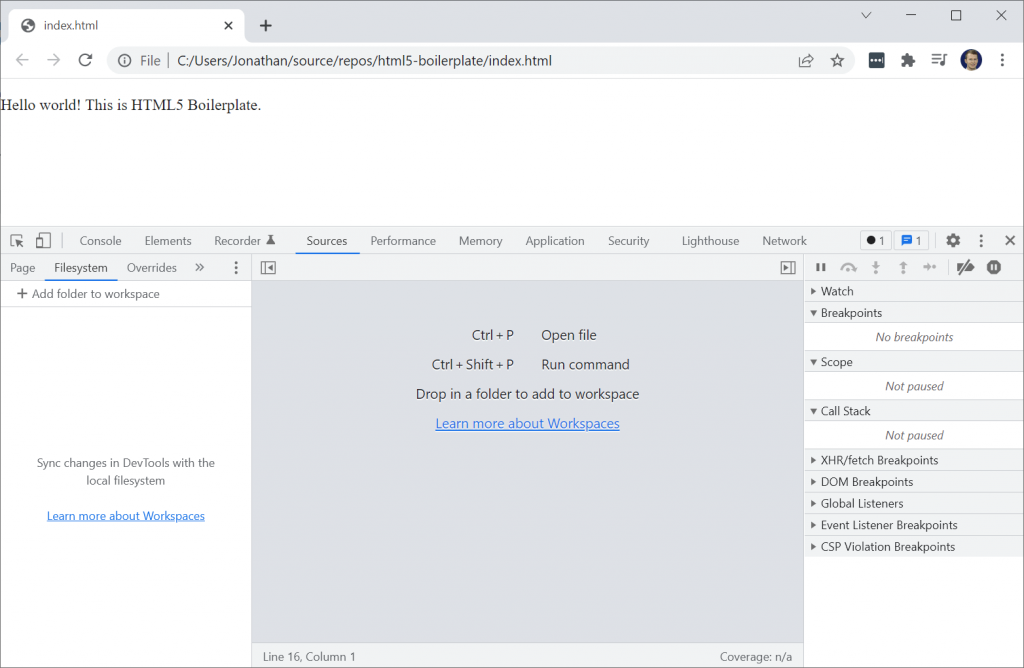
After selecting the Sources tab, by default, the ‘Pages’ sub-panel is selected. This shows the files that have been downloaded from the webserver for the current page.
Click on the ‘Filesystem’ sub-tab to open the Filesystem panel and get access to the Workspaces feature.
The Workspaces feature lets us map downloaded files to files that exist on our local filesystem.
Note that as per the Sources tab, you’ll sometimes you’ll need to press the >> button to access the Filesystem sub-tab.
In the examples that follow I am using the standard HTML5 Boilerplate project template (v8.0.0). You can download it and open the main ‘index.html’ file in Google Chrome if you want to follow along exactly with each step that follows.
Now we can move on to looking at how to configure the mapping to our local filesystem with Workspaces.
Workspaces
So what are workspaces?
Workspaces allow changes that are made within the developer tools interface to be synchronised back to the source files on the local filesystem.
As mentioned earlier, this can be a great time saver when you are debugging and tweaking your front-end code. It means that you don’t have to spend time replicating the changes you’ve made within your IDE or potentially leave out something vital that you changed along the way.
The really neat thing about the Workspaces feature is that it allows you to save changes to any part of your front-end web application, whether it’s the HTML, CSS, JavaScript, or any other file type.
If you’ve used something like Brackets or Visual Studio Code which both have ‘live preview’ capabilities (either built-in or via plugins), Workspaces provides a new perspective where the editor is the browser itself and it is pushing the changes back to the actual source files.
Mapping a folder
To map a folder click on the ‘Add folder to workspace’ button just below the ‘Filesystem’ tab. This will bring up an Open File dialog, prompting you to select a folder.
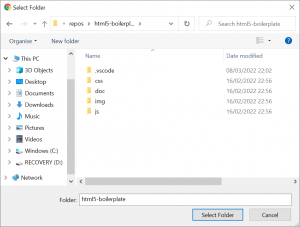
Select the root folder for your web project that contains your front-end assets (usually the main repository folder for your project, or an ‘src’ folder within this) and press the ‘Select Folder’ button.
Chrome will display a notification banner at the top of the current web page, informing you that DevTools is requesting full access to the folder path you selected.

Press the ‘Allow’ button to continue.
After granting the required access rights to Chrome, you will see the entire folder hierarchy for your web project within the Filesystem pane.
HTML changes
Now we can start making changes and saving these back to our local filesystem.
We’ll start by making a simple change to a HTML file.
If you downloaded the HTML5 Boilerplate project template that was mentioned previously, open up the ‘index.html’ file on the left side of the interface by double-clicking it. Alternatively, open up any other HTML file within your own web project. This will open the contents of the file in the centre section of the interface.
Now let’s make a change to the file and save it to test the Workspaces source mapping.
In the screenshot below I have added the text “Here’s a Workspaces change.” to the first p tag within the body element (line 28).
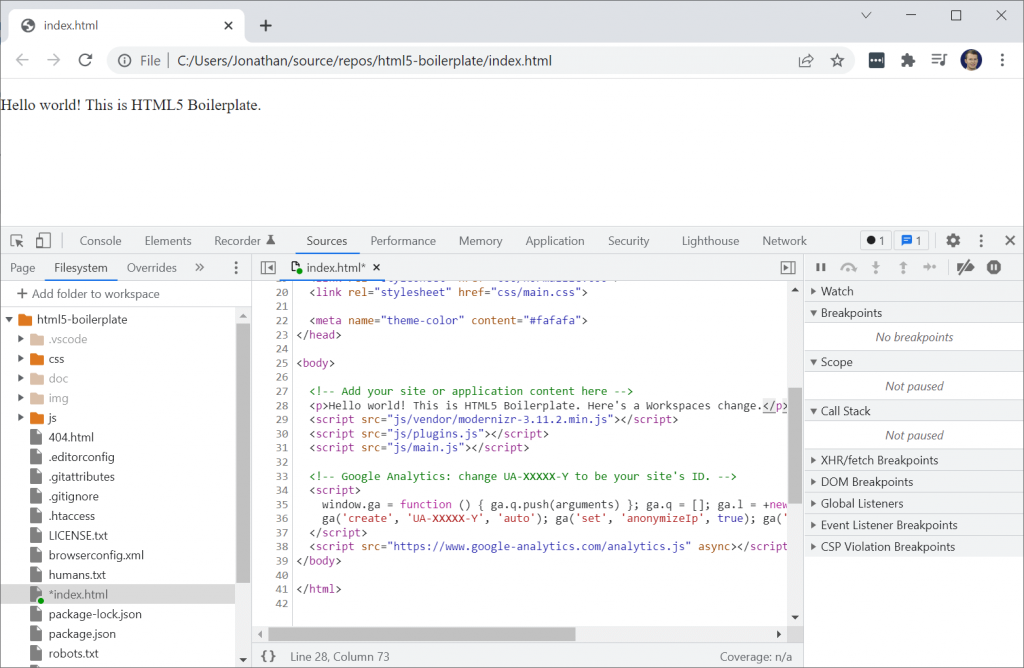
You’ll notice in the above screenshot that the index.html file has a little green dot beside it. This indicates that the file has been successfully mapped back to the source file.
You’ll also notice that there is an asterisk (*) character beside the index.html filename. This indicates that unsaved changes have been made to the file. You can use the Ctrl + S keyboard shortcut to quickly save changes to any files that you edit within the developer tools.
After saving the file you’ll need to refresh the current page within the browser to see the changes take effect.
If you now open the index.html file in your IDE or any text editor you’ll be able to verify that the changes have indeed been saved back to the source file, pretty neat, right?
DOM !== HTML
When making changes to HTML within the developer tools interface, it’s important to bear in mind that there is a fundamental difference between the DOM and the HTML.
The ‘Elements’ panel within the developer tools displays a visual representation of the current state of the DOM that was originally generated from the HTML source file that was downloaded from the webserver. However, the DOM can deviate from the HTML. This means that it isn’t possible for the Workspaces feature to accurately map DOM changes back to the HTML source.
One of the main reasons that the DOM deviates from the HTML is the result of JavaScript modifying the DOM to provide dynamic content on the page. In these cases, the JavaScript is modifying the in-memory DOM, not the HTML file that was downloaded by the browser. Therefore, any DOM changes that are made within the Elements tab are not saved back to the source files.
On the other hand, CSS changes that are made within the Elements panel can be saved back to source files without any problems, since there are no mapping issues to contend with.
CSS changes
Making and saving CSS changes is just as straightforward as with HTML.
If you’re using the HTML5 Boilerplate project template, within the mapped project folder, expand the ‘css’ folder and open up the ‘main.css’ file. Alternatively, for your own project open up a CSS file that is used by the current HTML page you have opened in the browser.
When you modify CSS that affects the current page you’ll immediately see the changes reflected in the browser, even before you save the file.
In the screenshot below, within the html selector I’ve changed the font-size property value to 2em (line 16).
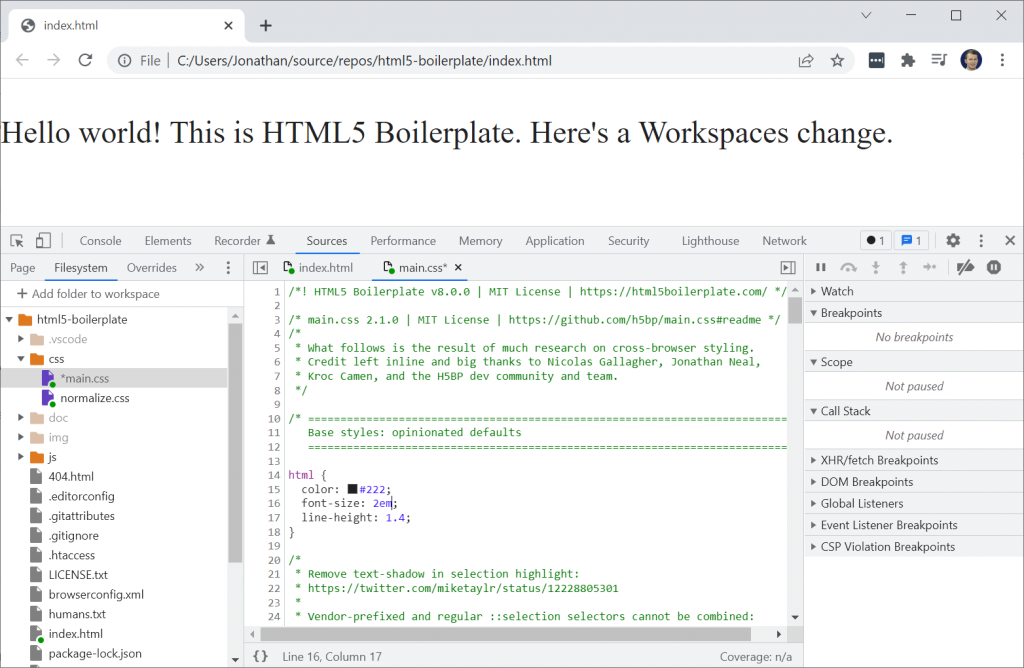
You can see from the above screenshot that the text on the page is now twice as large and the main.css file has the asterisk (*) character beside it, indicating that the change hasn’t been saved yet.
Press Ctrl + S on your keyboard to make the change permanent and you’ll see the asterisk character disappear.
JavaScript changes
Last but not least, let’s look at making changes to JavaScript files and saving these back to disk.
If you’re using the HTML5 Boilerplate project template, within the mapped project folder, expand the ‘js’ folder and open up the ‘main.js’ file. Alternatively, open up a JavaScript file for your own project that is loaded by the HTML page you currently have open within the browser.
Now add some JavaScript code to the file. In the screenshot below you can see that I’ve added a simple alert function call to the previously empty JavaScript file by way of demonstration.
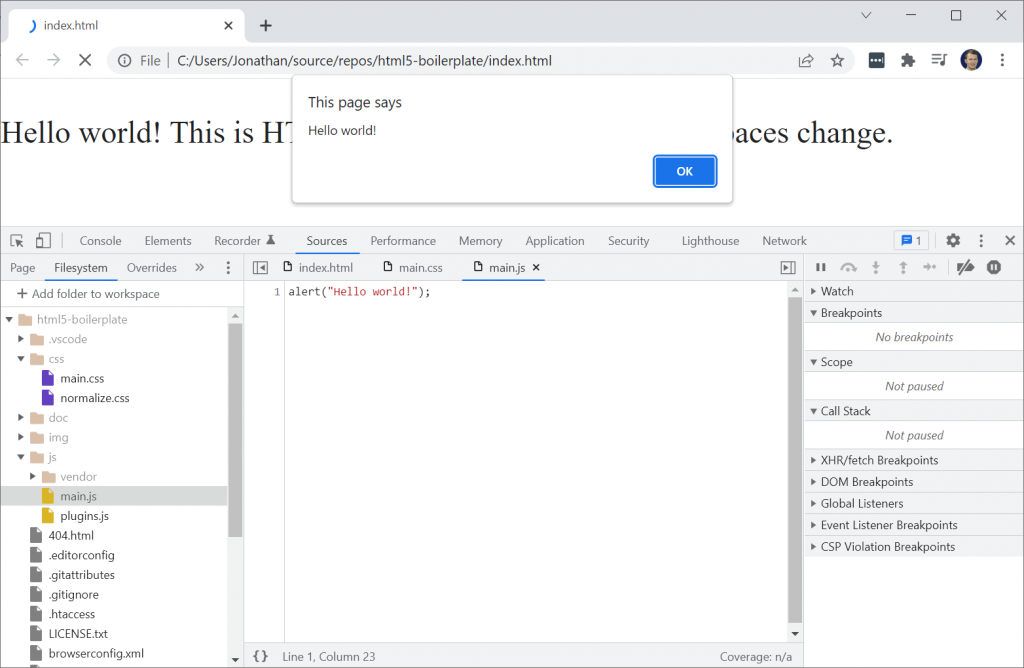
After pressing Ctrl + S on your keyboard to save the changes, refresh your browser and you’ll see an alert box pop up, as per the screenshot above.
Next, you can try making changes to other file types e.g. TXT or JSON files. Once you save the changes within the browser your source files will be updated.
Using Workspaces can work very well when your project is part of a source control repository (e.g. Git) as you will then get a chance to double-check all of the changes you’ve saved from the browser before committing them.
Tidying up
When you’re done making changes via Workspaces you can remove the link back to your project source by right-clicking on the root directory that you previously mapped and selecting the ‘Remove folder from workspace’ option. Press OK on the alert box to confirm that you want to remove the folder.
If you are using a client-side framework such as Angular or React or other tools that package your code you’ll need to do some testing to ensure that the Workspaces feature is correctly mapping changes back to the source files as you would expect.
The Workspaces feature supports most but not all of the major frameworks. Since these frameworks are constantly being updated it is recommended that you test that the Workspaces feature is working correctly with your chosen framework before you make too many changes.
Summary
In summary, I have covered how to use the Workspaces features within Chrome to map and save changes that are made within the developer tools back to source files.
I explained how to access Chrome Developer Tools and find the Workspaces feature within the Filesystem section of the Sources panel.
I then talked about what Workspaces are and covered the process for mapping a folder containing the source files you want to save changes to.
Lastly, I demonstrated how to open, edit, and save mapped files back to your local filesystem. I explained the difference between the DOM and HTML and provided further examples of making and saving changes to CSS and JavaScript files.
Comments