

Software assemblies containing managed code, such as those used by .NET applications can be easily decompiled into readable source code using free decompilation tools.
This can present a challenge to application vendors who have a desire to prevent their code from being viewed or changed due to copyright or potential security concerns.
For any application that is deployed to a client device, complete protection from viewing or tampering with code cannot be guaranteed. However, by using an obfuscation tool, such as ConfuserEx, you can make it significantly harder to decompile your application.
In this article, I provide a walkthrough of how to use ConfuserEx to add a layer of protection to .NET assemblies that are deployed to your clients.
Obfuscation facilities
Rather than delving deeply into the pros and cons of obfuscation, I’m going to assume that you’ve already decided that you want to obfuscate one or more of your .NET assemblies.
By obfuscating assemblies you can help to protect them from being decompiled, viewed, and manipulated using free tools such as IlSpy and JetBrains dotPeek.
ConfuserEx is an open-source obfuscation tool that can add several different protections to .NET assemblies. In this article, I am using ConfuserEx 2, which is the successor to the original Confuser and ConfuserEx projects.
ConfuserEx 2 provides the following obfuscation features.
- Supports .NET Framework 2.0/3.0/3.5/4.0/4.5/4.6/4.7/4.8
- Symbol renaming (Support WPF/BAML)
- Protection against debuggers/profilers
- Protection against memory dumping
- Protection against tampering (method encryption)
- Control flow obfuscation
- Constant/resources encryption
- Reference hiding proxies
- Disable decompilers
- Embedding dependency
- Compressing output
- Extensible plugin API
Source: https://github.com/mkaring/ConfuserEx
Not bad at all for a free tool!
Of course, there are many other obfuscation tools out there, some free and some not.
This article focuses on ConfuserEx 2 and how to use its GUI and CLI tools.
Note that for the remainder of this article I will refer to ‘ConfuserEx 2’ as ‘ConfuserEx’ for the sake of simplicity.
Using the GUI
The ConfuserEx GUI (Graphical User Interface) is great for getting started with ConfuserEx obfuscation and it may be a good option for you going forward if you don’t need to obfuscate assemblies very often.
Note that this article assumes you are following along using a Windows workstation.
ConfuserEx download
To get started, head over to the ConfuserEx releases page.
Scroll down to the ‘Assets’ section of the latest release and click on the ‘ConfuserEx.zip’ file to download it. This file contains both the GUI and the CLI components in a single package.
After the zip file has been downloaded, I recommend unblocking the file by right-clicking on it, then selecting Properties –> Unblock –> Apply –> OK.
I then recommend creating a directory named ‘ConfuserEx’ within your Program Files directory and extracting the ConfuserEx zip file into it. This should result in ConfuserEx being installed at the following location (assuming a System Drive letter of C).
C:\Program Files\ConfuserEx
Note that you may want to consider adding the above to your system path so that you are able to access ConfuserEx more conveniently from the command line later.
Launching the GUI
To launch the ConfuserEx GUI, within the install directory double-click on the ‘ConfuserEx.exe’ file (consider creating a shortcut to the EXE to make it easier to access).
The GUI should look very similar to the screenshot below.
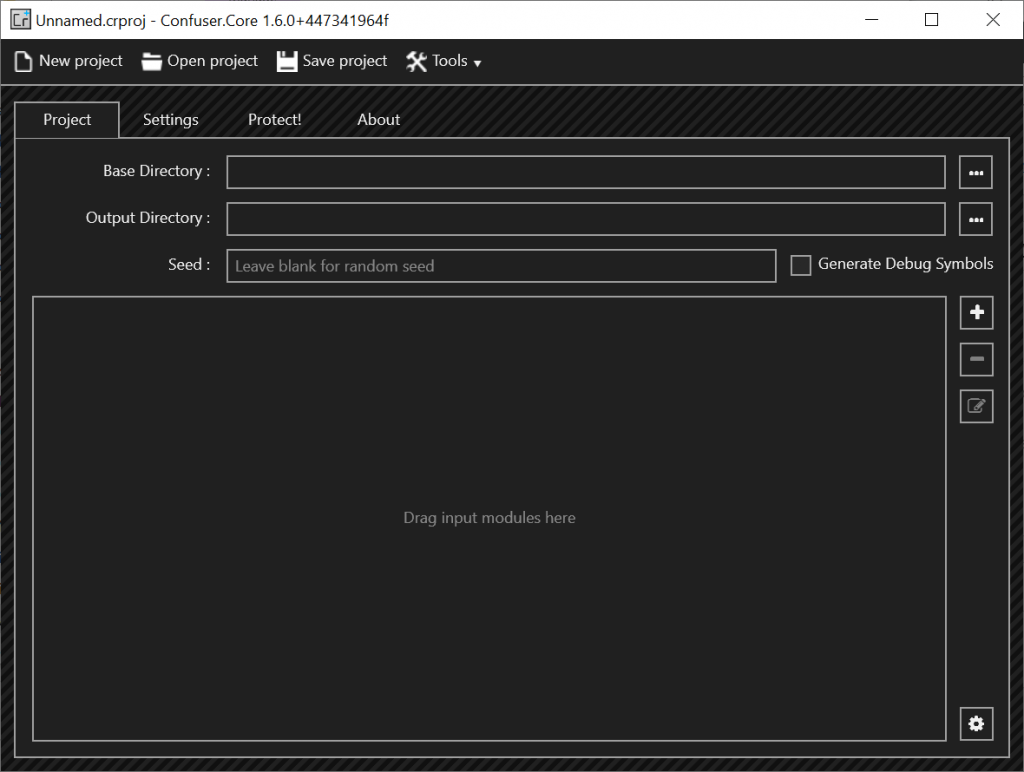
The ConfuserEx GUI displays a number of different tabs and buttons that are used to access various aspects of its functionality.
In the sub-sections that follow, I’ll be concentrating on the main functions you’ll need to know about in order to obfuscate one or more assemblies using common settings.
Project input modules
The first thing we need to do is specify the input modules that we want to obfuscate.
We can do this by dragging and dropping the required assemblies into the ‘Drag input modules here’ area of the user interface. Alternatively, press the plus (+) button to select the assemblies using an Open File dialog.
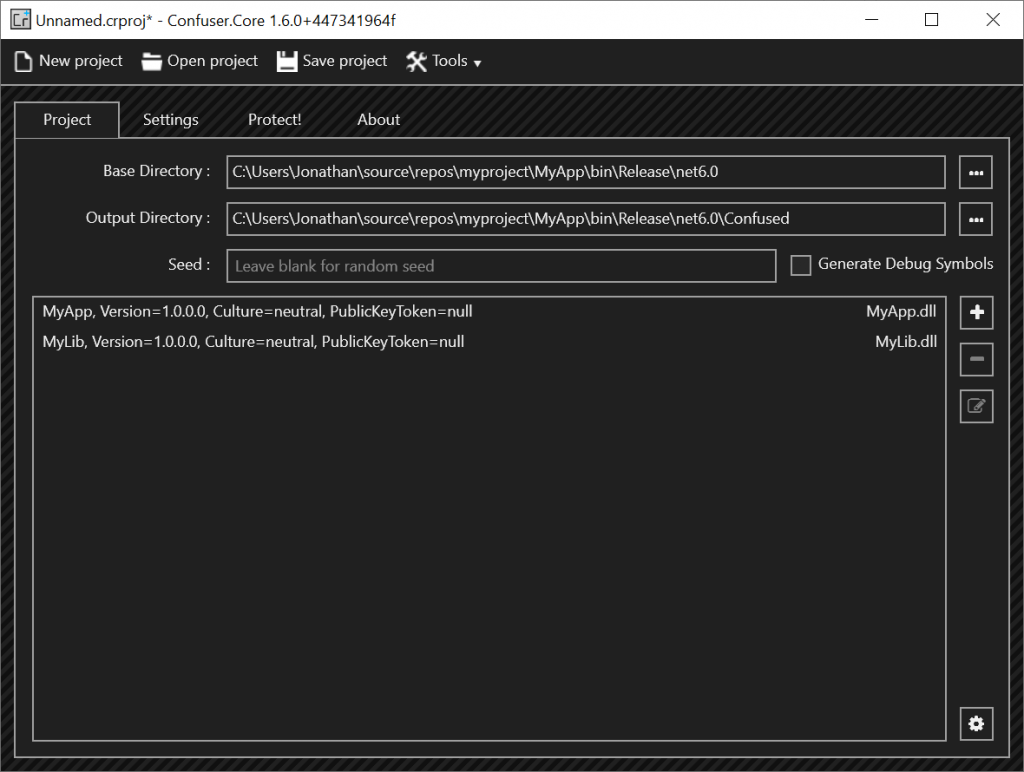
As you can see from the above screenshot, after adding the assemblies, the Base Directory and Output Directory fields are populated automatically. The Output Directory field is set to the same path as the Base Directory, but with a ‘Confuser’ directory appended. You can amend the Output Directory if required, but the Base Directory will need to stay the same in order to prevent IO errors later when applying protections.
After specifying the input modules, click on the ‘Settings’ tab to proceed to the next step of the obfuscation process.
Settings
Within the Settings tab, press the plus (+) button to the right of the ‘Rules’ area of the user interface.
This will add a rule with the text ‘true’, as shown below.
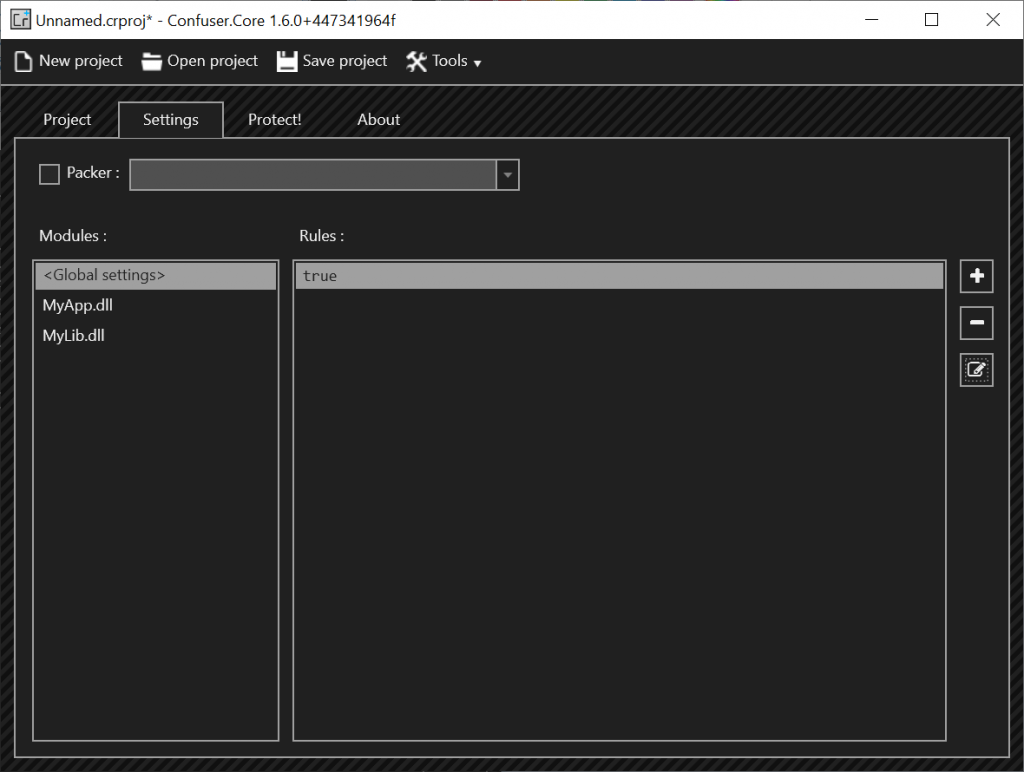
This looks a little unusual, but the GUI is essentially displaying the pattern of the rule i.e. ‘true’ to indicate that this rule should always be applied. We’ll need to edit the details of this rule before proceeding.
With the new rule selected, press the edit (pencil icon) button to open the ‘Edit rule…’ dialog.
Editing rules
The dialog for editing a rule allows individual protections to be specified by pressing the plus (+) icon to the right of the ‘Protections’ area.
Alternatively, a preconfigured set of protections can be applied by selecting an option from the ‘Preset’ drop-down control, as shown below.
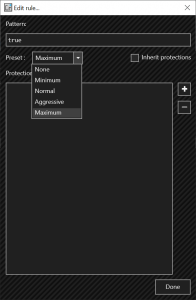
From the ‘Preset’ drop-down control, select the ‘Maximum’ option followed by the ‘Done’ button. This will apply the maximum set of available protections.
Feel free to tweak the selected preset/protections according to your requirements.
Note that some protection features (e.g. ‘rename’) can affect certain .NET features such as Reflection. Be sure to test your application thoroughly after applying obfuscation.
With that being said, click on the ‘Protect!’ tab to proceed to the final step of the obfuscation process.
Protection
The Protect! tab displays buttons that allow the process of applying protections to be initiated or cancelled, as shown below.
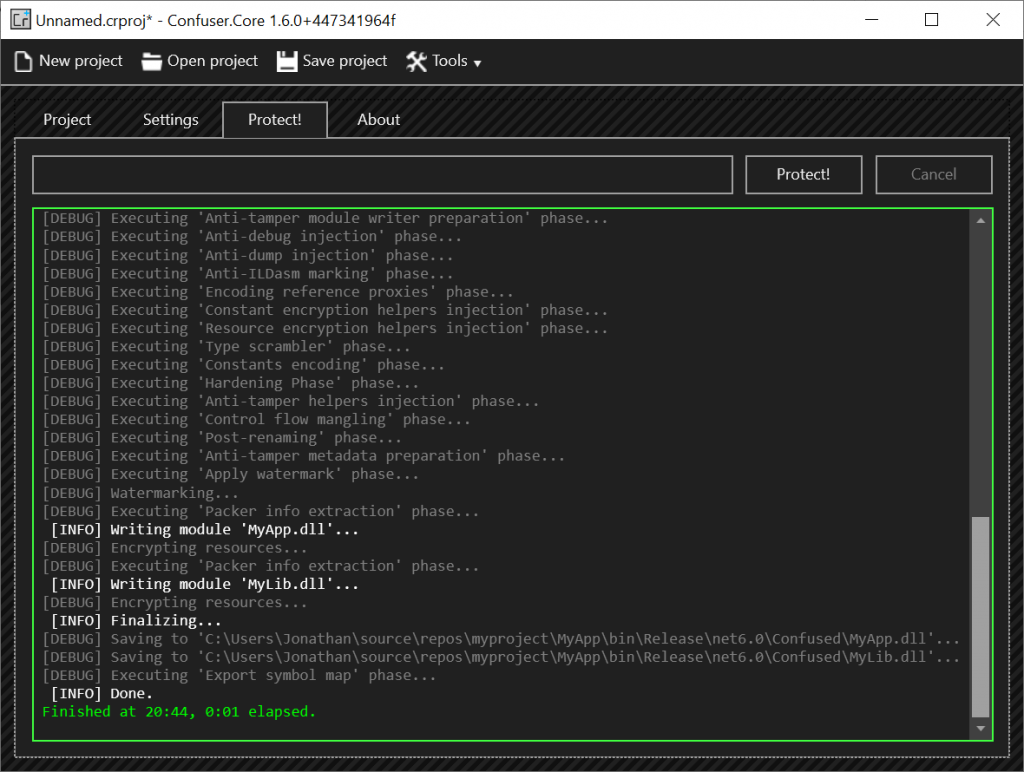
Within the ‘Protect!’ tab press the ‘Protect!’ button to apply the protections.
The log area of the user interface will display information regarding the progress of the protection process.
If all goes well you will receive a green status message, indicating that the process has finished successfully.
Using the CLI
If you need to process obfuscation from the command line, ConfuserEx offers a CLI (Command Line Interface) tool for this purpose.
The current version of the ConfuserEx CLI provides the following usage documentation.
Confuser.CLI -n|noPause <project configuration>
Confuser.CLI -n|noPause -o|out=<output directory> <modules>
    -n|noPause : no pause after finishing protection.
    -o|out     : specifies output directory.
    -probe     : specifies probe directory.
    -plugin    : specifies plugin path.
    -debug     : specifies debug symbol generation.
The easiest way to get started with the CLI is to first use the GUI to create a ConfuserEx project (.crproj) file. To do this, follow the same steps documented in the GUI section, but instead of completing the final protect step, use the ‘Save project’ button to save a project file.
Note that a ConfuserEx project file can also be created manually in any text editor as an XML document that adheres to the documented format guidelines.
After you have a project file prepared, issue a command that is similar to the following.
Confuser.CLI.exe C:\Users\Jonathan\Documents\myproject.crproj
Note that if you haven’t added the ConfuserEx installation directory to your system path then you’ll need to specify the full path to the Confuser.CLI.exe file.
After executing the above command you will see log messages output to the console. These are the same kind of messages that are displayed within the logs area of the ConfuserEx GUI. At the end of the process, a green status message will be displayed if the process has finished successfully.
A ConfuserEx CLI command can be executed as part of an automated process, such as a post-build step. Below is an example of a ConfuserEx post-build command.
if "$(ConfigurationName)" == "Release" C:\Program Files\ConfuserEx\Confuser.CLI.exe $(ProjectDir)Confuser.crproj
The above command will apply obfuscation using the settings from the specified ConfuserEx project file if the project is being built in ‘Release’ mode.
Alternatively, you can use the MSBuild Integration functionality to integrate ConfuserEx obfuscation more tightly into your build process.
Testing
Before wrapping up, it’s a good idea to check that your assemblies have been obfuscated correctly via a decompilation tool.
To test this out, download and install JetBrains dotPeek; a free .NET decompiler.
After installing and launching dotPeek, browse to your project bin folder (File –> Open) and try viewing both the clear and obfuscated versions of your assemblies to see the differences.
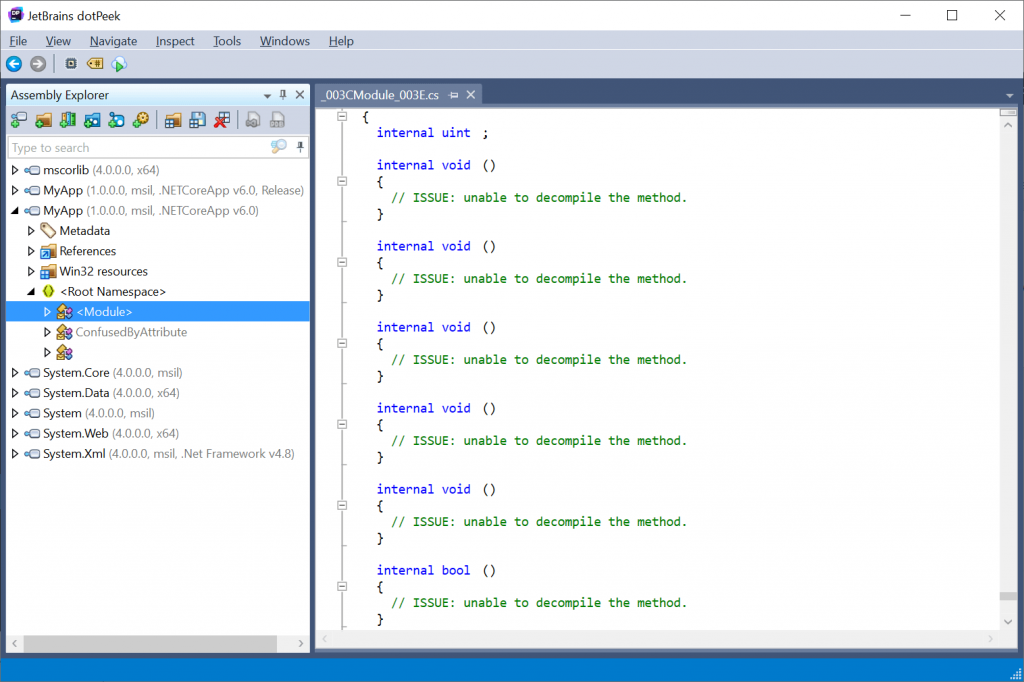
When you try to view the source code for any of your obfuscated assemblies, you should see comments such as those shown in the above screenshot.
i.e. // ISSUE: unable to decompile the method.
Note that in older versions of dotPeek, attempting to decompile an obfuscated assembly may display an error message instead or even cause the program to crash.
Now you can go forward in confidence that the protections have been applied correctly.
Summary
In this article, I have provided a walkthrough of how to use ConfuserEx to obfuscate .NET assemblies. This can offer a level of protection against viewing or tampering with the source code.
I started off by listing the protection features offered by ConfuserEx and provided links to discussions around the pros and cons of obfuscation, as well as links to many of the other obfuscation tools that are available.
Following this, I demonstrated how to apply obfuscation to assemblies using both the ConfuserEx GUI and CLI tools.
Lastly, I looked at how to test that the protections have been applied correctly using the dotPeek .NET decompiler.
Comments
Mohammad Al Hoss
How to integrate this process with clickOnce deployment?
July 4, 2022Jonathan Crozier
Hi Mohammad,
There is a ConfuserEx for Visual Studio extension that works with ClickOnce. Perhaps it is what you are looking for?
https://marketplace.visualstudio.com/items?itemName=AvinabMalla.ConfuserExforVisualStudio2017-18023
July 4, 2022Гоги
“Editing rules” is obvious dilettantish solution (as everything in FOSS). Quite unintuitive and error prone. I’m developer and couldn’t understand what is what!
November 22, 2022