

As a document-oriented database, MongoDB is very different from relational databases such as SQL Server or PostgreSQL.
This is particularly true in regards to database queries since MongoDB features its own unique query API that is completely different from using a traditional query language like SQL.
Working with MongoDB can sometimes seem like wizardry to developers coming from a relational background. My aim in this article is to clear up the mystery and show you how to get started quickly with querying MongoDB databases.
Background and setup
MongoDB is an open-source NoSQL database and its history goes back as far as 2007 when it was first developed by a company called 10gen.
In my Setting up a MongoDB development environment blog post I cover in detail the background behind MongoDB and how to set things up.
I recommend that you check out the prior post so that you are fully up to speed on MongoDB and have an environment ready that will allow you to execute the queries that I’ll be showing you.
Alternatively, perhaps you don’t want to set up MongoDB right now and you just want to try it out to see if it’s for you. That’s ok too. Head over to to the HumongouS.io MongoDB Playground where you can input custom database contents and run queries to learn how MongoDB works online.
Concepts
Let’s cover a couple of basic MongoDB concepts before we start executing some queries, specifically how MongoDB differs from relational databases.
Collections and documents
Unlike relational databases, instead of tables, MongoDB features ‘collections’.
Collections act as containers to organise related documents together that have a similar schema.
Instead of the rows that exist within relational tables, MongoDB has ‘documents’ that are organised within collections.
Dynamic schema
Documents can have a dynamic schema, so instead of predefined table columns, MongoDB documents contain fields that are key-value pairs of data.
When describing the schema of related documents in the previous sub-section, note that I used the word ‘similar’, as opposed to ‘same’. MongoDB documents do not necessarily need to have the same schema. However, it does usually make sense to keep the schema as consistent as possible for documents that are stored within the same collection.
If you’re dealing with existing MongoDB databases, most of the time, you’ll find that documents in the same collection will use the same field names. However, some of these documents may contain additional fields that are not found in other documents. MongoDB provides ways of taking this into account when querying data to cope with optional fields and other differences between documents.
If you’re worried about the fact that documents may not be consistent, don’t worry. MongoDB is very flexible by default, but there are ways of locking things down when needed. The Schema Validation feature allows a specific schema to be enforced when inserting or updating documents.
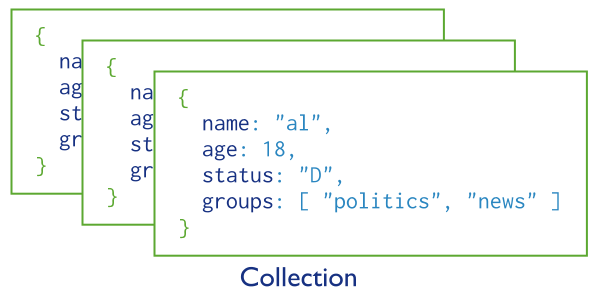
Document example
Below is an example of a MongoDB document.
{
  "_id": "ObjectId(\"573a1394f29313caabcde9ef\")",
  "plot": "Alice stumbles into the world of Wonderland. Will she get home? Not if the Queen of Hearts has her way.",
  "genres": [ "Animation", "Adventure", "Family" ],
  "title": "Alice in Wonderland",
  "released": "ISODate(\"1951-07-26T00:00:00.000Z\")",
  "year": 1951,
  "imdb": {
    "rating": 7.4,
    "votes": 87099,
    "id": 43274
  }
}
As you can see, the document is essentially JSON. However, underneath, the data is stored in a special BSON format to allow for efficient parsing and indexing of the data.
The above document features a mixture of data types, including String, Array, Date, and an embedded object. In addition to the standard JavaScript data types, the BSON format supports additional types such as ObjectID, Integer, and Decimal128.
Now that we understand how MongoDB data is stored and how it is formatted, let’s proceed to get some sample data imported into our development environment so that we can try out some queries.
Sample data
In this section, we will create a new database and import some sample data that we can work with.
I’m going to talk you through how to achieve this using MongoDB Compass, but you can also import data from the command line using the mongoimport tool. If you want to use this approach instead, you’ll need to install the MongoDB Database Tools and consult the online documentation.
MongoDB Compass connection
First of all, launch the MongoDB Compass app.

When MongoDB Compass loads, ensure that the ‘localhost’ connection string is selected or that the connection string field is empty. In either of these cases, when you press the ‘Connect’ button you will be connected to your local MongoDB server.
After MongoDB Compass has connected to the server, you will see a list of databases. If you’re operating from a fresh installation of MongoDB Server you will only have the three standard system databases, as follows.
- admin
- config
- local
We’re going to add a new user database next.
Database creation
To create a new database, press the ‘CREATE DATABASE’ button to show the ‘Create Database’ dialog.
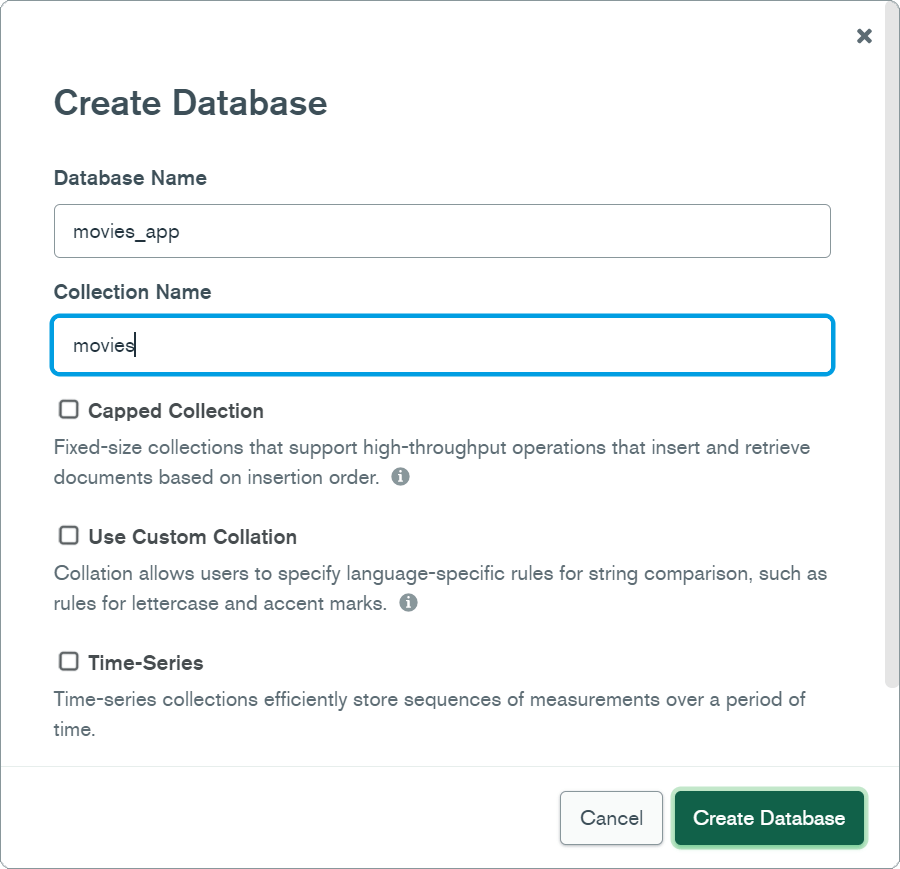
Enter the Database Name as ‘movies_app’ and the Collection Name as ‘movies’.
Press the ‘Create Database’ button on the dialog to create the database and collection.
The new database will now appear within the Databases list, as shown in the screenshot below.

Click on the ‘movies_app’ text within the Databases list to load the Collections list for the database.
Now click on the ‘movies’ text within the Collections list to load the Documents list for the collection.
Downloading sample data
Of course, the ‘movies’ collection doesn’t contain any documents yet, so we need to import some data.
I have prepared a movies.json file containing some sample data to work with. After clicking on the link, right-click in your browser and choose the ‘Save as…’ option from the context menu to choose where you want to download the file to.
Note that the sample file has been extracted from the standard sample_mflix MongoDB database and the movies collection has been condensed to 10 documents to keep things simple for this blog post.
Importing sample data
Click on the ‘Import Data’ button to load the Import dialog.
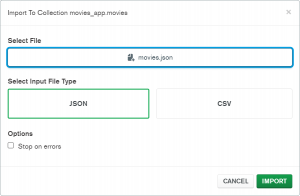
On the Import dialog, click on the ‘Select a file…’ button and then browse to the location of the ‘movies.json’ file you have already downloaded.
The Input File Type will be set to JSON automatically after selecting the import file.
Press the ‘IMPORT’ button to import the data. When the import has been completed, press the ‘DONE’ button to close the Import dialog.
The movie documents will now be displayed on the screen.
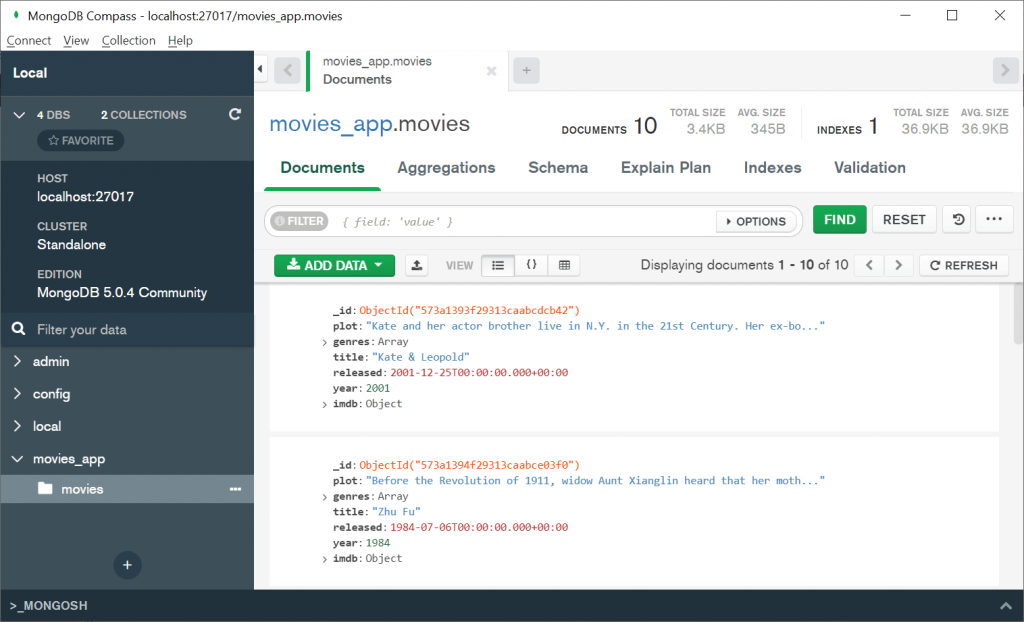
Using MongoDB Compass you can view documents in different ways, filter data, and more.
In the next section, we will use the MongoDB Shell to execute queries against the imported data so that we can learn how the MongoDB Query API works.
Shell usage
If you have followed the instructions in my Setting up a MongoDB development environment blog post, you should already have the new MongoDB Shell (mongosh) installed.
Alternatively, you can use the older shell (mongo) that comes preinstalled with MongoDB Server. If so, replace mongosh with mongo in the following instructions.
Loading the shell
The MongoDB Shell is essentially a JavaScript interpreter and lets us issue commands to a MongoDB server. As a result, we can write regular JavaScript code in the shell to do things like variable assignment and string operations which turns out to be very useful!
Open up your shell (e.g. Command Prompt or PowerShell) and enter the following.
mongosh
This will load the MongoDB Shell so that we can start interacting with our databases.
Shell commands
After loading the shell, execute the following command.
show dbs
This command will display something similar to the output below.
admin      41 kB
config     73.7 kB
local      41 kB
movies_app 73.7 kB
The above output shows the three built-in system databases, plus the new ‘movies_app’ database that we created in the previous section.
We need to switch to our new database so that we can start running queries against it.
Execute the following command.
use movies_app
This will switch to the context of the ‘movies_app’ database and will display the output shown below.
switched to db movies_app
You can run the db command at any time to check which database you are working with.
Note that if you ever forget a MongoDB Shell command you can execute the help command to remind yourself. Additionally, the db.help() command can also be used to get help for database-related functions.
Queries
If you have prior experience with a relational database such as SQL Server, MySQL or PostgreSQL, you’ll already be familiar with SQL (Structured Query Language), at least to some extent.
One of your concerns with MongoDB could be that perhaps it won’t provide you with the ability to execute sufficiently complex queries to meet your needs.
Let me put your mind to rest, in my opinion, MongoDB has one of the best and fully-featured query capabilities of any database I’ve encountered. Once you get to know the syntax, the MongoDB Query API should feel very natural and you can often write a query in a more concise format compared to a complex SQL query.
Your first query
Let’s write our first MongoDB query.
To start with, whenever we want to interact with the database we always need to type db first.
In a basic scenario, if we want to query a specific collection, we can type db followed by a period character followed by the collection name. We can then type a further period character followed by the query function or functions that we want to execute.
Note that functions always end with parentheses.
With that being said, here’s your first query.
db.movies.find();
So what does this do?
The query simply looks at the ‘movies’ collection in our database, finds all of the movie documents, and returns all of them with no filtering applied.
Based on the sample data that we imported in the previous section, the output will look something like what is shown below.
[
  {
    "_id": "ObjectId(\"573a1393f29313caabcdcb42\")",
    "plot": "Kate and her actor brother live in N.Y. in the 21st Century. Her ex-boyfriend, Stuart, lives above her apartment. Stuart finds a space near the Brooklyn Bridge where there is a gap in time....",
    "genres": [ "Comedy", "Fantasy", "Romance" ],
    "title": "Kate & Leopold",
    "released": "ISODate(\"2001-12-25T00:00:00.000Z\")",
    "year": 2001,
    "imdb": {
      "rating": 6.3,
      "votes": 59951,
      "id": 35423
    }
  },
  {
    "_id": "ObjectId(\"573a1394f29313caabce03f0\")",
    "plot": "Before the Revolution of 1911, widow Aunt Xianglin heard that her mother-in-law would sell her. Therefore, she ran to the Lu town and worked as a servant in Lord Lu Si's house, but she made...",
    "genres": [ "Drama" ],
    "title": "Zhu Fu",
    "released": "ISODate(\"1984-07-06T00:00:00.000Z\")",
    "year": 1984,
    "imdb": {
      "rating": 6.7,
      "votes": 89,
      "id": 49979
    }
  },
  {
    "_id": "ObjectId(\"573a1395f29313caabce328c\")",
    "plot": "Censored by the Polish authorities, this film was reedited and new footage added. It begins with a sci-fi motif: abstract images and electronic music take the viewer from ruins of Lebanon ...",
    "genres": [ "Drama" ],
    "title": "Rece do gèry",
    "released": "ISODate(\"1985-01-21T00:00:00.000Z\")",
    "year": 1981,
    "imdb": {
      "rating": 7.1,
      "votes": 198,
      "id": 62181
    }
  },
  (7 more documents)...
]
The query that we’ve composed using the find function is essentially the same as writing the following SQL.
SELECT TOP * FROM Movies;
The find function will potentially return multiple documents if a collection contains more than one document and depending on whether or not any criteria has been passed to the function.
Filtering
Perhaps the most common type of queries you’ll need to write are ones that filter data to return a subset of documents based on some criteria.
Equality
If we want to find a single movie that matches some specific criteria, we could make use of the findOne function by executing the following query.
db.movies.findOne( { title: "Alice in Wonderland" } );
This is referred to as a “query of equality” and is essentially the same as the following SQL.
SELECT TOP 1 * FROM Movies WHERE Title = 'Alice in Wonderland';
The first document or row found in both cases is retrieved with all of its associated fields/columns.
Note that MongoDB queries are case-sensitive, whereas by default SQL queries are not.
If we were to replace the findOne function with the find function in the above example, we would instead be retrieving all documents that match the specified criteria instead of a single document.
Query operators
Let’s say we want to retrieve all movies from our database where the year is greater than 1950. To achieve this we need to make use of a query operator within the find method.
db.movies.find( { year: { "$gt": 1950 } } );
The equivalent SQL would be as follows.
SELECT * FROM Movies WHERE Year > 1950;
In the above query example, the $gt (greater than) operator is used to apply a filter on the year field.
Notice how the ‘greater than’ operator is wrapped in curly braces and has a key-value pair format i.e. an operator key of "$gt" followed by a colon and then the value of 1950. It is vital to get this formatting correct for the query to be considered valid.
There are lots of other MongoDB operators available, such as the following common ones.
$gte: Greater than or equal to.$lte: Less than or equal to.$ne: Not equal to.
You can find the full list of query operators in the MongoDB manual.
Logical operators
At this stage, you can hopefully see that the MongoDB query syntax isn’t too complicated. However, you’re probably wondering how you can combine conditions using logical operators such as ‘and’ and ‘or’ to create more complex criteria.
In SQL this is easy to accomplish by adding the AND or the OR keyword in between the conditions you are checking.
With the MongoDB Query API, things are a little bit different, but it is still quite simple to add logical conditions once you can remember the syntax.
Let’s see if we can find all of the ’80s movies in our collection.
db.movies.find( {
   $and: [
      { year: { "$gte": 1980 } },
      { year: { "$lte": 1989 } }
   ]
} );
The equivalent SQL is as follows.
SELECT * FROM Movies WHERE Year >= 1980 AND Year <= 1989;
In the above example, the query will find all movies where the year is greater than or equal to 1980 and less than or equal to 1989. You’ll notice the square brackets after the $and operator, indicating that it takes an array of values which are the fields with conditions to apply.
The $or operator works in a similar way and both operators can be combined to build up more complex queries.
Sorting
Sorting/ordering documents within collections is straightforward via the use of the sort function.
db.movies.find().sort( { year: -1 } );
The equivalent SQL is as follows.
SELECT * FROM Movies ORDER BY YEAR DESC;
In the above example, the sort function is chained to the find function. This is important, as MongoDB must be instructed to find the movies before it can apply any sorting.
The movies are sorted by the year field in descending order, as indicated by the value of -1.
To sort in ascending order, a value of 1 should be specified instead.
Inserting
Ok, now that we’ve seen how to find, filter, and sort existing data, let’s take a look at how to insert some new data.
Simple inserts
To insert a single document into a MongoDB collection we can use the insertOne method.
db.movies.insertOne( {
    plot: "Ruth Slater is released from prison after serving twenty years...",
    title: "The Unforgivable",
    year: 2021
} );
The equivalent SQL is as follows.
INSERT INTO Movies (Plot, Title, Year)
    VALUES ('Ruth Slater is released from prison after serving twenty years...', 'The Unforgivable', 2021);
Note that for the sake of simplicity I am only inserting three basic fields.
As the name suggests, the insertOne function allows us to insert a single document by passing a new movie object formatted as JSON into the function.
Note that if you want to insert multiple documents at the same time, you can use the insert function instead and pass an array of movies.
After executing the above query we will receive output similar to the following.
{
  "acknowledged": true,
  "insertedId": "ObjectId(\"61b4b768facf7686da71fbed\")"
}
The output tells us that MongoDB has received the request to write the data to disk and the ID of the inserted object is also included in case we need it.
Document IDs
You’ll probably have noticed the _id field in all of the documents we’ve been looking at so far and have been wondering what it is used for and how it gets generated.
All MongoDB documents must include an ID that uniquely identifies the document in the database. If an ID is specified when creating a document, then this is the value that will be used, otherwise MongoDB will automatically generate an ID.
As a general rule, it’s usually best to let MongoDB take care of generating the ID for us so that we don’t have to worry about generating a unique ID from our application code.
Important notes
It is important to remember that by default MongoDB does not enforce schema validation by default and only performs the following basic checks on new data.
- No syntax errors are allowed.
- Document ID must be unique.
- Document size must be less than 16 MB.
As a result, we need to ensure that data is valid on the client-side before sending it into MongoDB.
Note the document size of 16 MB is very generous and is much greater than that of some other document databases. For example, Cosmos DB enforces a maximum document size of 2 MB.
Updating
Updating documents can be achieved via the updateMany or updateOne methods.
db.movies.updateOne( { title: "The Unforgivable" }, { "$set": { title: "Unforgivable" } });
The equivalent SQL is as follows.
UPDATE TOP (1) Movies SET Title = 'Unforgivable' WHERE Title = 'The Unforgiveable';
In the above example, the first parameter of the updateOne method is the criteria to match the documents to be updated on. We know how to formulate this already as it is the same syntax as the criteria passed to functions like find and findOne.
The second parameter is the update operation to carry out. In this case, the first document found with a title of “The Unforgivable” will have its title set to “Unforgivable” using the $set operator.
In addition to the $set operator there are a number of other update operators available. You can check out the MongoDB manual for more details on these.
Deleting
As per updating, once you know how to filter collections, deleting documents from collections becomes easier.
The same type of criteria you would pass to a function such as find or findOne is passed to one of the MongoDB deletion functions to determine which documents will be deleted.
Below is an example of how to remove all movies where the year is less than 1980.
db.movies.deleteMany({ year: { "$lt": 1980 } });
The above command will produce output similar to the following.
{ "acknowledged": true, "deletedCount": 4 }
The deletedCount field indicates how many items have been deleted from the collection.
In addition to deleteMany there are other useful functions such as deleteOne and findOneAndDelete.
Arrays
Arrays in MongoDB are very powerful and feature a unique set of operators for querying their data.
Like standard JavaScript arrays, MongoDB arrays can store data of different types in the same array, although I’m not sure how useful this is in practice!
Let’s say we want to find all of the adventure movies in our sample database collection. To do this, we can execute the following query.
db.movies.find( { "genres": "Adventure" } );
The above query will find all documents where the genres array contains the “Adventure” string.
It is important to bear in mind that array values are treated individually when we query them, so the query is matching any document containing “Adventure” somewhere within the array.
Embedded documents
Embedded documents are a really nice feature that helps to cut down on the number of collections you need to create and keeps your data together.
Embedded documents are really useful for objects that are very specific to the entity such as the address of a customer.
Note that an ID does not need to be specified for embedded documents since they are the child of the main document which already has a unique ID that can be referred to.
Thinking of our sample data, imagine we want to get a list of only the best movies out there, based on their IMDB Rating. To accomplish this we need to query the embedded imdb object using ‘dot notation’ to access its rating field.
Here’s how we do it.
db.movies.find( { "imdb.rating": { "$gt": 9 } });
The above example demonstrates that filtering on embedded fields is really just as simple as top-level document fields. The only thing we need to bear in mind is that the embedded field name must be surrounded with double quotes. Otherwise, a syntax error will be raised.
Summary
That’s it for this blog post!
I started off by providing some background on basic MongoDB concepts such as collections and documents.
Following this, I walked through how to create a database and a collection, quickly followed by showing you how to import documents from a JSON file via the MongoDB Compass app.
I then moved on to look at how to write some basic MongoDB queries, including how to find and filter documents, and how to insert, update and remove documents. Before wrapping things up, I covered how to query arrays and embedded documents.
This is really just a starting point for learning about the MongoDB Query API. There’s so much more that I could cover, including more complex queries and advanced topics such as the Aggregation Pipeline. However, that’s for another day! 🙂
Comments