

When you need to create a .NET application that can be easily deployed to a system without worrying about the installed .NET version or other dependencies, the publishing options that have been made available since .NET Core 3.0 are most welcome.
If you are publishing a modern .NET application today, not only is it possible to create a self-contained deployment that will run regardless of the installed .NET version, but you can also produce a single executable file. This makes distribution a breeze, as there’s no need to include a bunch of separate library (DLL) files alongside your program.
I find the aforementioned features particularly useful for small tools that have been developed for internal business purposes and need to be shared with colleagues outside of the software development team.
In this article, I will walk through the process of creating a standalone executable for a .NET application in detail, providing examples and tips along the way.
Prerequisites
In the Walkthrough section that follows, I will be assuming that you are using a modern Windows operating system, such as Windows 10 or Windows 11, that is capable of running Visual Studio.
I’ll be using the latest version of Visual Studio 2022 available at the time of writing to demonstrate the publishing features.
Note that it is also possible to use the .NET CLI to achieve the same results. This can be particularly useful in more advanced scenarios, for example, if you want to automate the publishing process as part of a build pipeline.
If you want to follow along, I recommend that you create a simple C# Console App, ideally targeting one of the latest .NET versions (7.0 or 8.0+) to allow you to try out the publishing procedure.
Walkthrough
In the following subsections, we will walk through the various stages of setting up and publishing a .NET application.
Note that I will be covering a basic scenario where a Console App is published to a folder, which can be a good solution for small tools and utilities. However, you may wish to choose a more advanced deployment option depending on the type of application you are building and your specific needs. The focus of this article is on the creation of a standalone executable file.
Publish Profile
The first thing we need to do is to create a Publish Profile containing the details of what to publish, along with all the settings that we wish to apply. We can do this via the Publish dialog in Visual Studio.
As mentioned in the previous section, I suggest creating a simple C# Console App if you wish to follow along.
Once you have the Console App solution opened within Visual Studio, you should then right-click on the Console project within the Solution Explorer and select the Publish… option as shown in the screenshot below.
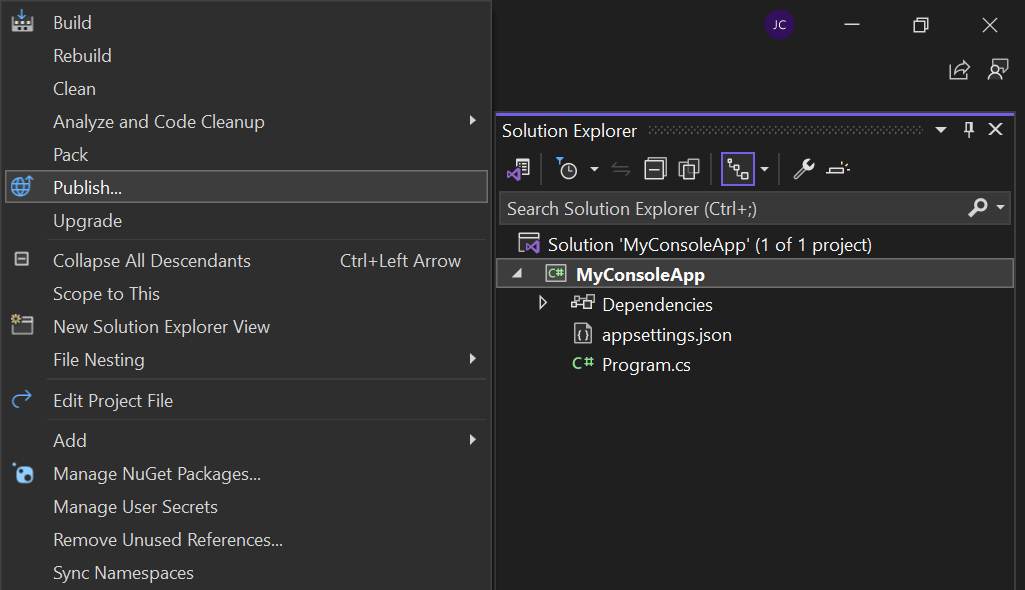
After selecting the Publish… option from the project context menu, the Publish dialog will appear.
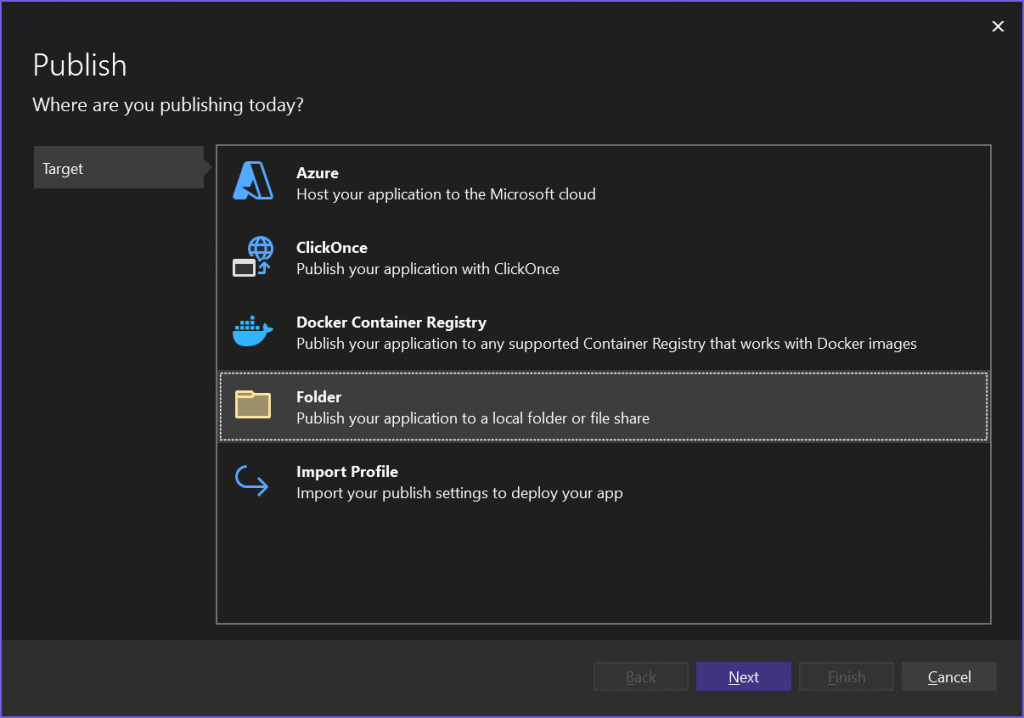
On the Publish dialog, select the ‘Folder’ option as the Target and then press the ‘Next’ button.
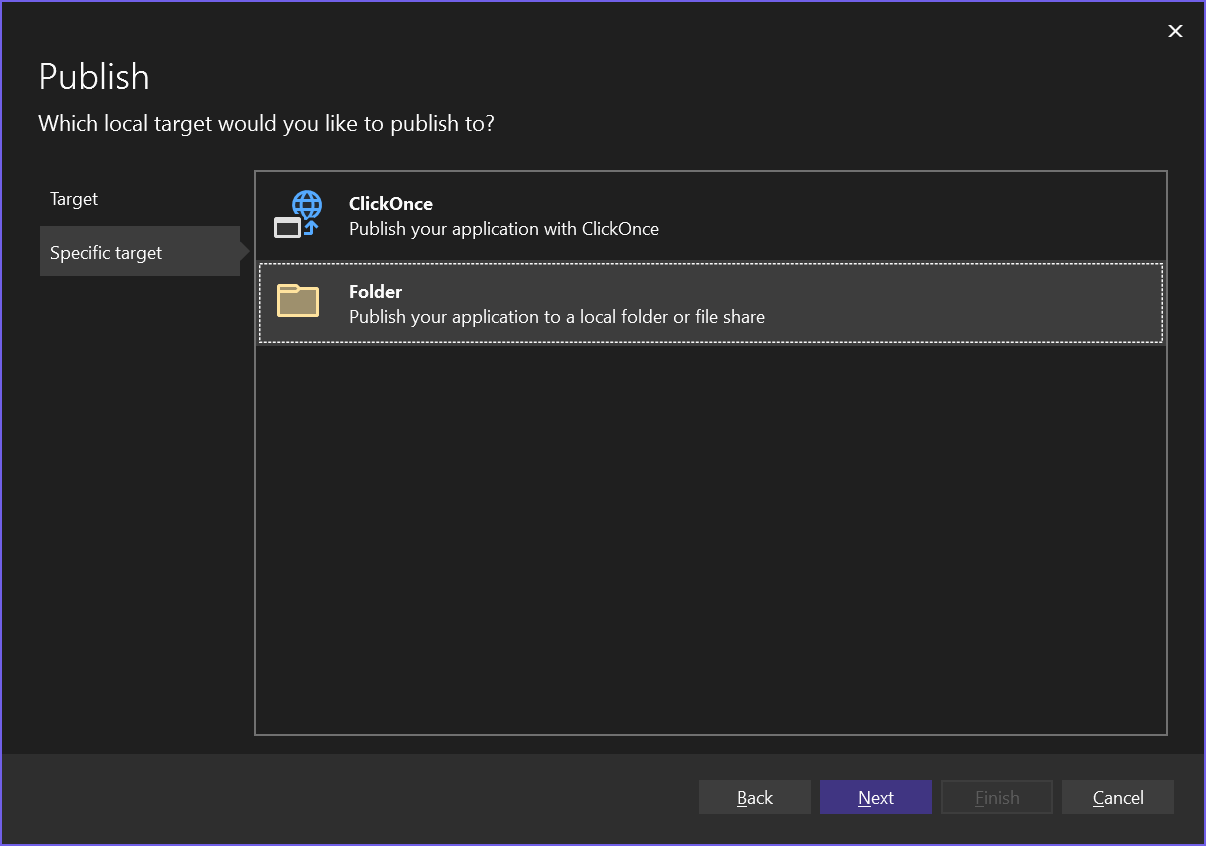
On the Specific target step, select the ‘Folder’ option again and press the ‘Next’ button to proceed.
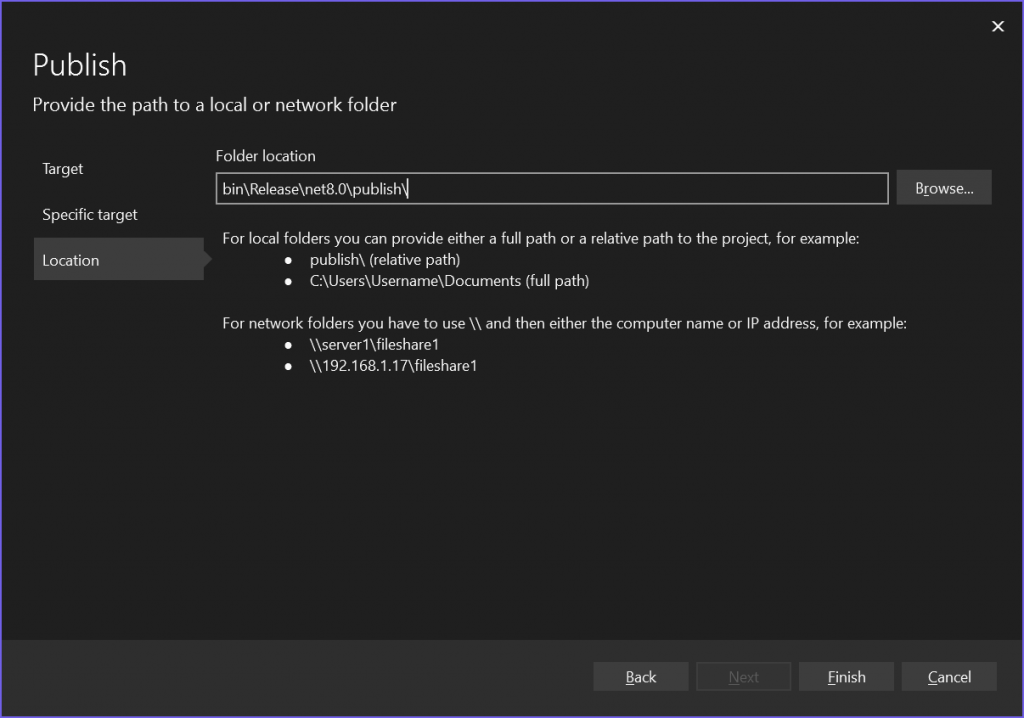
When you get to the Location step, you can customise the path where you want the published file(s) to be deployed. As indicated by the help messages this can be either a relative path to the project or the full path to a local folder or network folder.
When you’re ready, press the ‘Finish’ button to complete the setup of the publish profile.

Now that the publish profile has been created successfully, you can press the ‘Close’ button to close the Publish dialog.
Publish Settings
After closing the Publish dialog you will see the Publish window, as shown below.
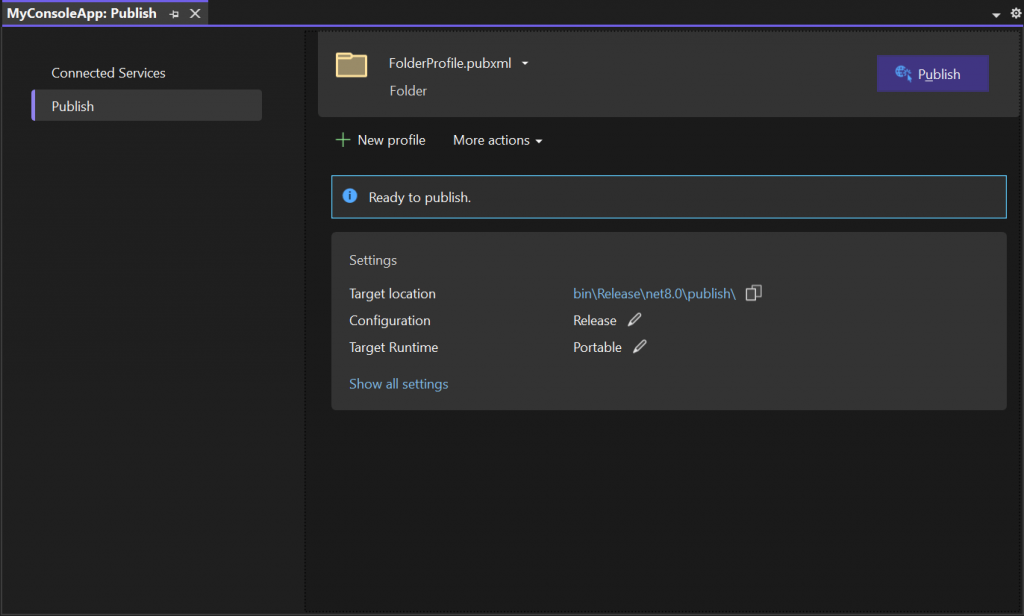
At this point, you could choose to go ahead and publish your project immediately with the default settings. However, if you want to create a standalone executable file, some specific settings need to be configured first.
To configure the settings, click on the ‘Show all settings’ link label to open the Profile settings dialog.
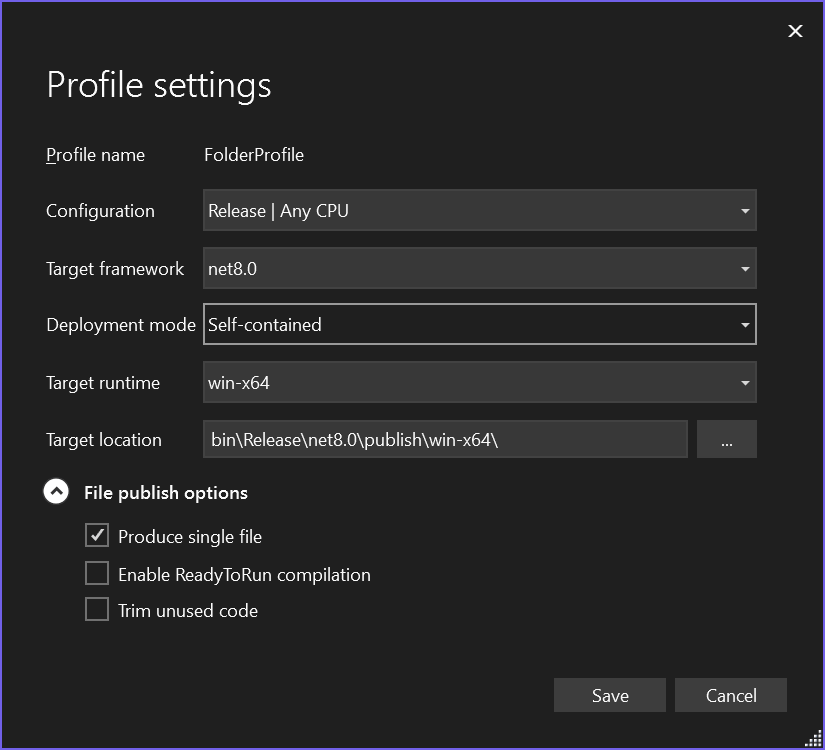
Let’s look at the settings that should be altered from the default values to achieve the single executable file requirements and some other settings that you may want to change depending on your situation.
Deployment mode
The default ‘Deployment mode’ for a Publish Profile is ‘Framework-dependent’ which means that the correct .NET version needs to be installed on the target system for the published program to run correctly. By changing this setting to ‘Self-contained’, as shown in the above screenshot, the specified .NET framework will be included as part of the deployment. This will result in a larger overall deployment size but will help to alleviate any uncertainties about installed .NET versions.
Target runtime
If the Deployment mode is set to Self-contained, the Target runtime cannot be the usual default value of ‘Portable’, so a specific runtime must be selected. After selecting Self-contained, the ‘Target runtime’ will default to ‘win-x86’ i.e. targeting 32-bit Windows machines. You will need to determine the most appropriate setting for your situation. I have selected ‘win-x64’ in this example, although ‘win-x86’ can be a good choice since will work across most Windows systems.
Produce single file
Under the ‘File publish options’ there are some additional settings that can be configured. If you want to publish your application as a single executable file, you should tick the ‘Produce single file’ checkbox, as shown in the above screenshot. This will pack all of the required DLLs into the main program EXE.
Other file publish options
Regarding the other file publish options, ‘Enable ReadyToRun compilation’ can be enabled to speed up the initial load time of your application and ‘Trim unused code’ can help to reduce the overall size of your published application. You will need to understand the tradeoffs in performance and published program size to determine the best fit for your particular situation.
When you’re happy with the chosen settings, press the ‘Save’ button on the Profile settings dialog to persist the changes.
Publishing
From the Publish window, press the ‘Publish’ button to start the publishing of your project.
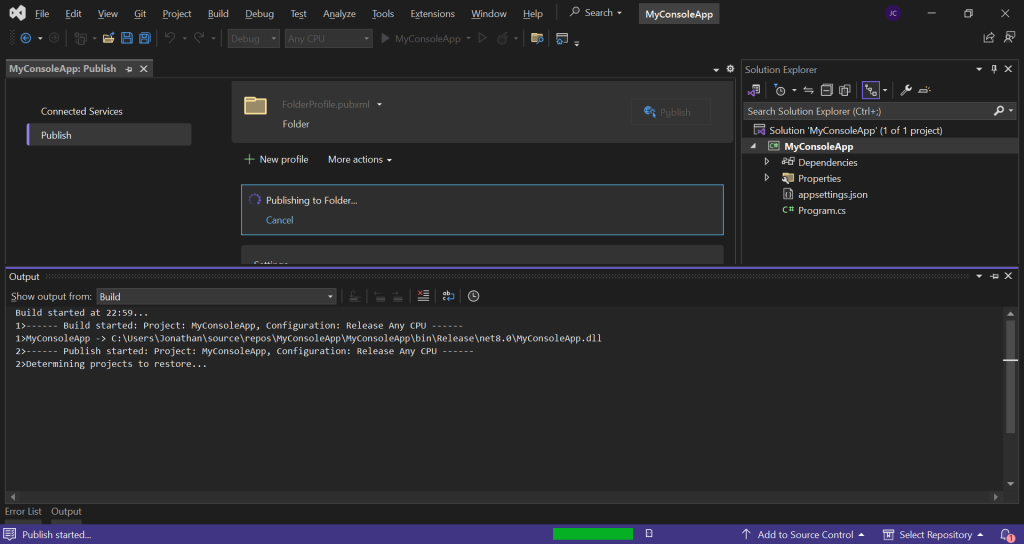
When publishing your project, a build will be kicked off, then the publishing will commence. You will be able to see the progress of the publishing process in the Output window, as shown above.
After the publishing has finished you will see a ‘Publish succeeded’ message similar to what is shown in the screenshot below.
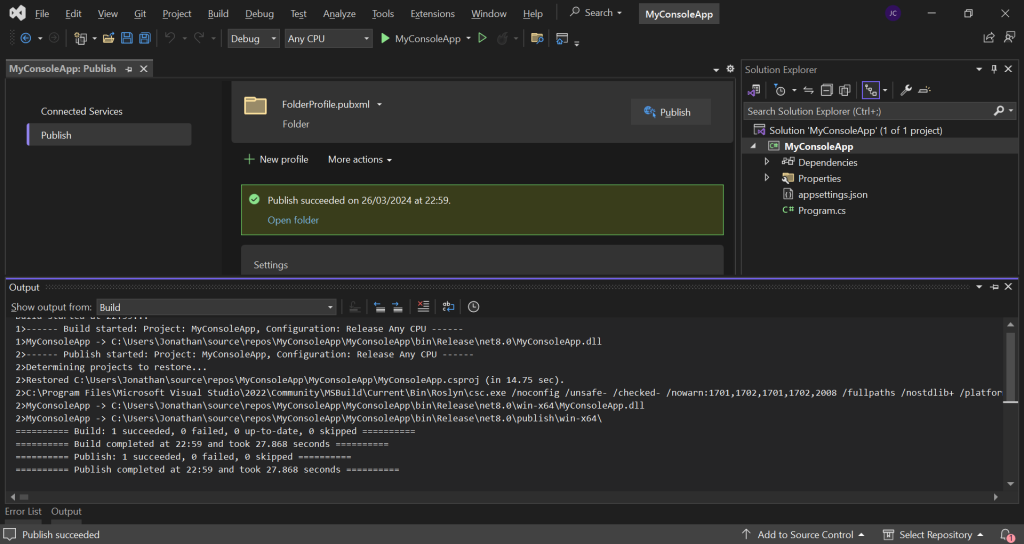
Now that the publishing has succeeded, you can press the ‘Open folder’ link label to open the folder containing the published artifacts in File Explorer.
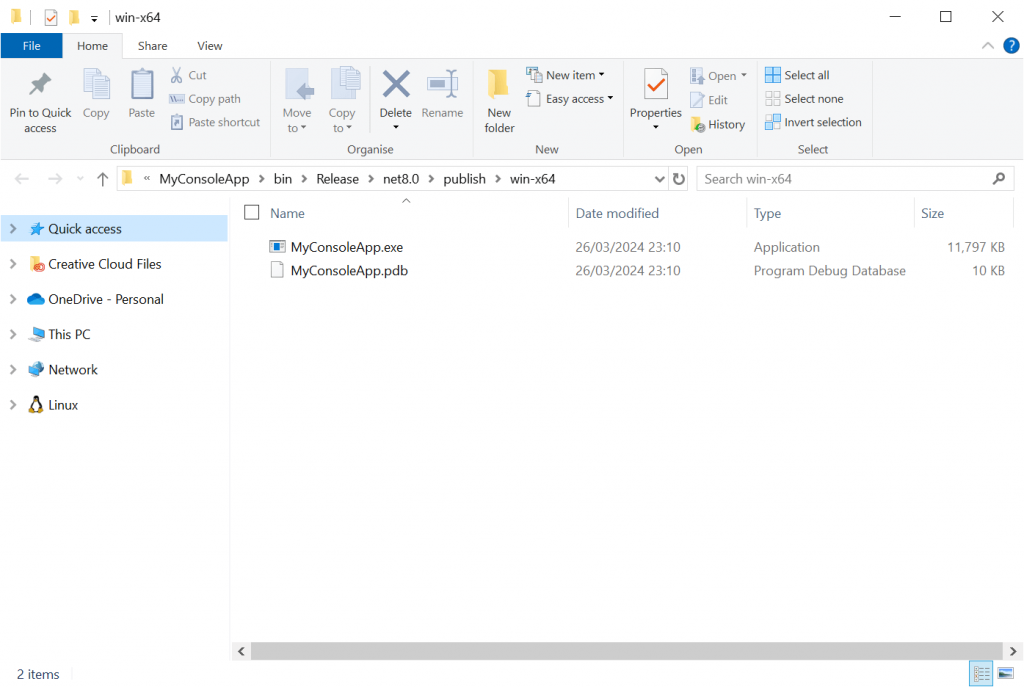
When the folder opens you should see a single executable file and not a single DLL in sight!
But wait, what’s this .pdb file doing in here?
Let’s look at how to remove .pdb files from the publish folder next.
Remove program debug files
If you want to eliminate the program debug files from the publish folder, you can manually edit the publish profile file. You can find the publish profile file via Solution Explorer within your project under Properties –> PublishProfiles –> FolderProfile.pubxml (filename may vary).
The contents of the publish profile file for the ‘MyConsoleApp’ sample project have been reproduced below for reference, based on the settings specified earlier in this walkthrough.
<?xml version="1.0" encoding="utf-8"?>
<!--
https://go.microsoft.com/fwlink/?LinkID=208121.
-->
<Project>
  <PropertyGroup>
    <Configuration>Release</Configuration>
    <Platform>Any CPU</Platform>
    <PublishDir>bin\Release\net8.0\publish\win-x64\</PublishDir>
    <PublishProtocol>FileSystem</PublishProtocol>
    <_TargetId>Folder</_TargetId>
    <TargetFramework>net8.0</TargetFramework>
    <RuntimeIdentifier>win-x64</RuntimeIdentifier>
    <SelfContained>true</SelfContained>
    <PublishSingleFile>true</PublishSingleFile>
    <PublishReadyToRun>false</PublishReadyToRun>
    <PublishTrimmed>false</PublishTrimmed>
  </PropertyGroup>
</Project>
To remove the debug files from the publish folder, you can add a DebugType element with a value of ‘none’, as shown in the updated publish profile file shown below.
<?xml version="1.0" encoding="utf-8"?>
<!--
https://go.microsoft.com/fwlink/?LinkID=208121.
-->
<Project>
  <PropertyGroup>
    <Configuration>Release</Configuration>
    <!-- Other settings omitted for brevity. -->
    <DebugType>none</DebugType>
  </PropertyGroup>
</Project>
Note that alternatively, you can use a value of ’embedded’, if you wish to embed the debug files within the executable file.
If you publish your project again after saving the above change, you will find that the .pdb file is no longer included in the publish folder.
Excluding specific files
If you have files that you don’t want to include in the single executable file, you can exclude these by adding an ExcludeFromSingleFile element to your project (.csproj) file.
For example, in the project file below the ‘appsettings.json’ file is excluded from the single file.
<Project Sdk="Microsoft.NET.Sdk">

  <PropertyGroup>
    <OutputType>Exe</OutputType>
    <TargetFramework>net8.0</TargetFramework>
    <ImplicitUsings>enable</ImplicitUsings>
    <Nullable>enable</Nullable>
  </PropertyGroup>

  <ItemGroup>
    <None Update="appsettings.json">
      <CopyToOutputDirectory>PreserveNewest</CopyToOutputDirectory>
      <CopyToPublishDirectory>PreserveNewest</CopyToPublishDirectory>
      <ExcludeFromSingleFile>true</ExcludeFromSingleFile>
    </None>
  </ItemGroup>

</Project>
After publishing the project with the above settings, two files will be found in the publish folder; ‘MyConsoleApp.exe’ and ‘appsettings.json’. Given this approach, you can create a compressed folder that includes both files and deploy them together to allow your program to be configured by the end users.
It’s important to know about some of these additional settings which cannot be configured with the current tooling in Visual Studio so that you can exercise greater control over edge cases like configuration files.
Summary
In this article, I have walked through how to publish a .NET project as a standalone executable file.
I explained how the process works from start to finish for a sample C# Console App and covered some of the advanced settings such as the self-contained deployment mode and the single file option.
I then wrapped things up by looking at some additional settings that can’t be configured via the Visual Studio tooling directly, specifically removing program debug files from the publish folder and excluding specific files from the single file executable.
Comments
Philippe Maugard
Bravo, votre pas à pas est parfait. Mais hélas, mon fichier .exe se lance toujours et arrive sur une erreur “Path empty” ! Toutes les lignes ont été vérifiées, et tous les chemins sont bons. la version non publiée en 1 seul fichier, fonctionne elle très bien.
December 2, 2024Jonathan Crozier
Bonjour Philippe, sorry to hear you are having problems! Would it be possible to share your ‘FolderProfile.pubxml’ file so I can check the settings?
December 2, 2024