

Azure Functions is an Azure cloud service that allows software developers to focus on writing code that reacts to events, without needing to concern themselves as much with the infrastructure that the code is running on. Azure Functions applications are serverless by nature and can scale to meet demand with minimal overhead and cost.
There are many possible use cases for Azure Functions and the flexibility that they provide, along with their ease of use, makes them a compelling option for everything from background tasks to Webhooks and API endpoints.
In this article, I am going to show you how to create your first C# Azure Function using Visual Studio and configure the function to trigger in response to a HTTP request.
Azure Functions benefits
Before I start walking through how you can get started with writing your first Azure Function, let me first provide a little bit more detail on Azure Functions and the potential benefits.
Further to my brief description at the beginning of the article, the text below provides a great overview of Azure Functions, taken from the Azure-Functions GitHub page.
Azure Functions is an event driven, compute-on-demand experience that extends the existing Azure application platform with capabilities to implement code triggered by events occurring in virtually any Azure or 3rd party service as well as on-premises systems. Azure Functions allows developers to take action by connecting to data sources or messaging solutions, thus making it easy to process and react to events. Azure Functions scale based on demand and you pay only for the resources you consume.
There are a couple of key takeaways to note from the above description.
Firstly, Azure Functions is ‘event driven’, meaning that code is executed in response to various events that are raised such as when a HTTP request is made, when a timer is fired, or when an item is added to a queue. The event-driven nature of Azure Functions makes it very versatile.
Secondly, Azure Functions ‘scale based on demand’, meaning that your functions can perform well under load since the required resources will be automatically provisioned whenever they are needed. There are also potential cost savings since you will only pay for the resources that are currently running.
Azure Functions increases developer productivity by removing the need to wire up the plumbing code that would otherwise be needed to connect to and react to events that take place within resources such as storage blobs and queues.
While there are many different ways of triggering an Azure Function, one of the simplest triggers is the Http trigger which I’ll be focusing on in this article.
Creating a Function App
In the following sections, I will walk you through how to create a simple Azure Function that is executed whenever a HTTP request has been made.
Prerequisites
Before we begin, make sure you have installed Visual Studio. I will be using Visual Studio 2022 and .NET 6.0.
Make sure that you have selected the ‘ASP.NET and web development’ workload within the Visual Studio Installer interface to set up the necessary tooling and project templates.
This article assumes that you are running a modern Windows operating system such as Windows 10/11.
Project creation
The first thing we need to do is create an Azure Functions project, so let’s start by opening Visual Studio.
After Visual Studio has loaded you will be presented with the launch window that allows you to open an existing project or create a new one, as shown in the screenshot below.
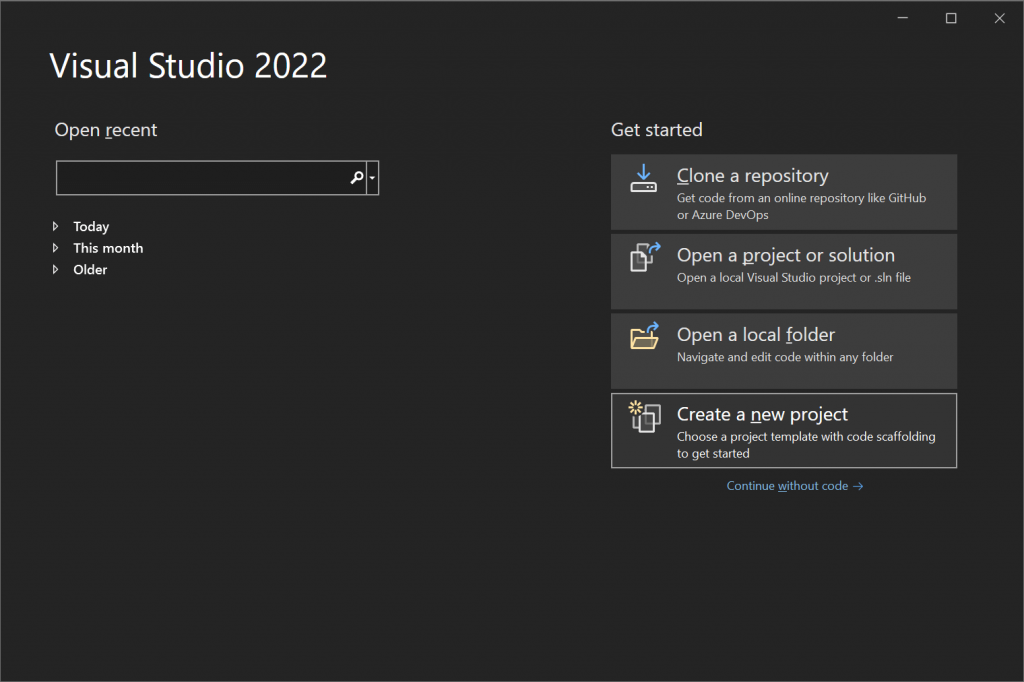
Press the ‘Create a new project’ button within the launch window to get started.
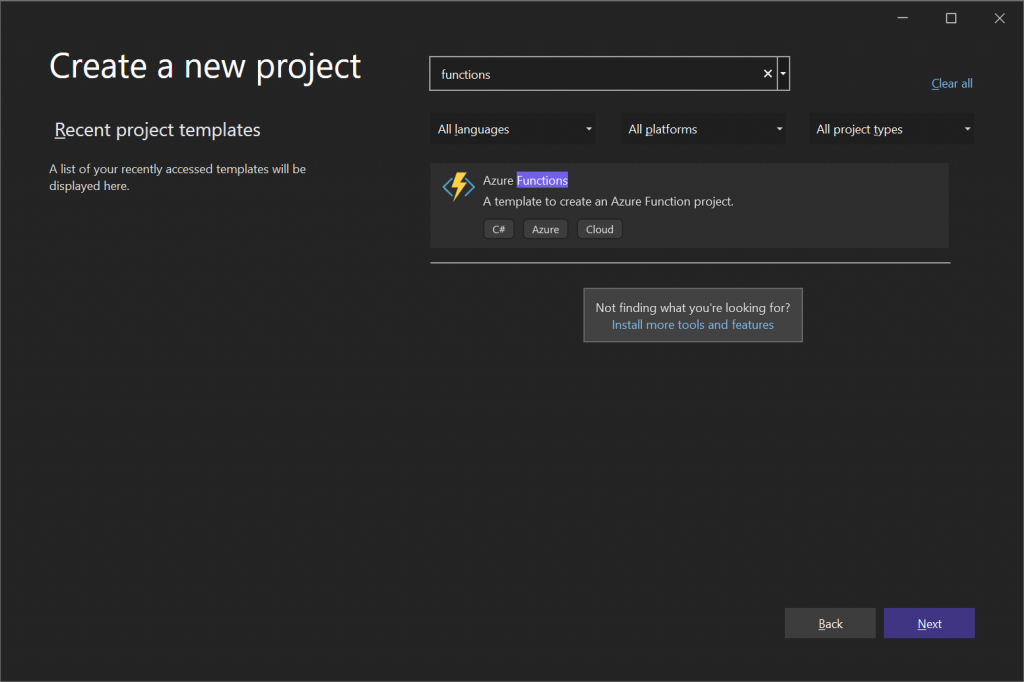
After the ‘Create a new project’ page appears, type the text ‘functions’ into the search control. An item named ‘Azure Functions’ should appear under the list of available project templates, as shown above.
If there is more than one project template in the list, make sure that ‘Azure Functions’ is selected and press the ‘Next’ button.
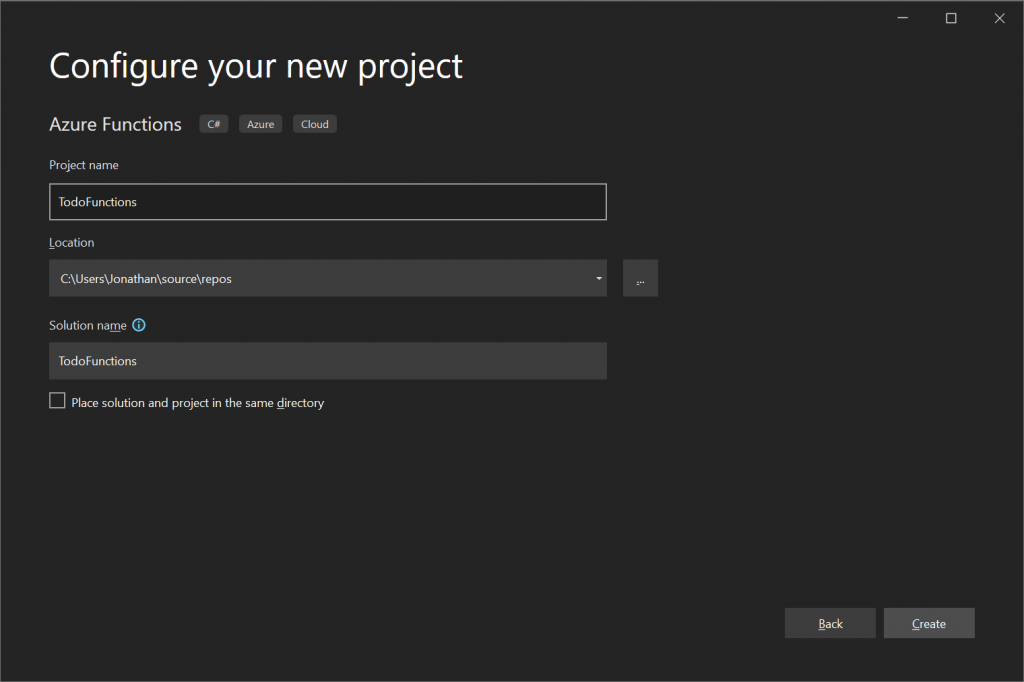
On the ‘Configure your new project’ page, type something sensible into the ‘Project name’ field (e.g. ‘TodoFunctions’), update the Location and Solution name if required, and then press the ‘Create’ button.
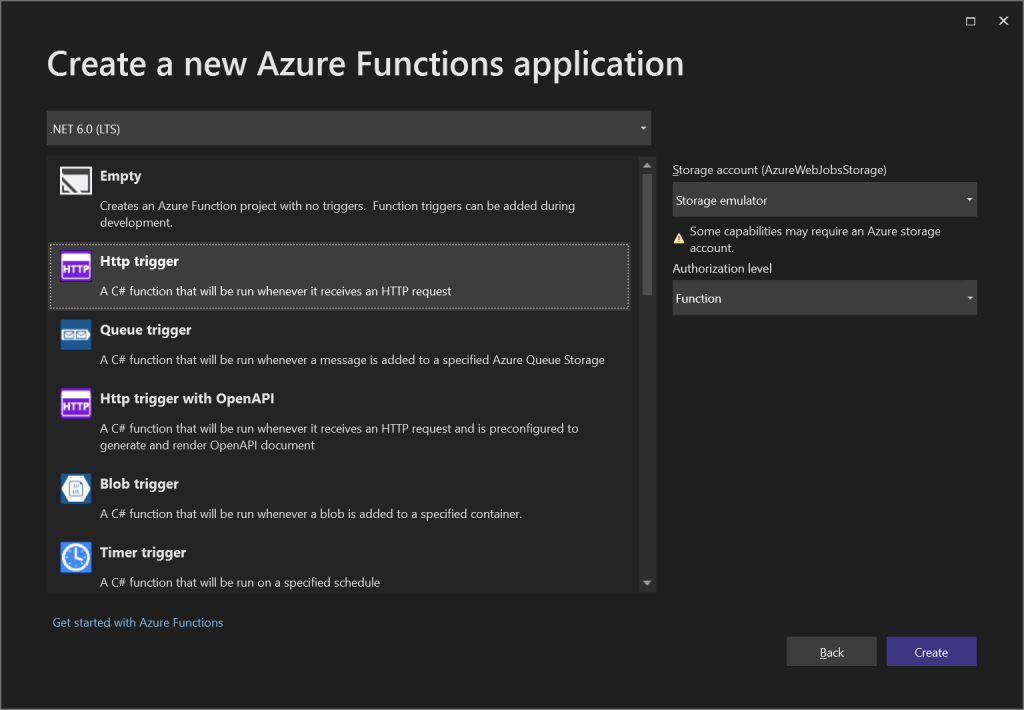
On the ‘Create a new Azure Functions application’ page, make sure the ‘Http trigger’ item is selected, leave all of the other options at their default values, and then press the ‘Create’ button.
A new solution and Azure Functions project will now be created with a minimal set of files to start with, including a default function implementation.
Default Function exploration
In the following sub-sections, I will cover how the default function that is included in the Azure Functions project template works as an introduction to how Azure Functions are implemented.
Default Function definition
The Azure Functions project template includes a function class within a file named ‘Function1.cs’. The contents of this file are displayed below for reference.
using System;
using System.IO;
using System.Threading.Tasks;
using Microsoft.AspNetCore.Mvc;
using Microsoft.Azure.WebJobs;
using Microsoft.Azure.WebJobs.Extensions.Http;
using Microsoft.AspNetCore.Http;
using Microsoft.Extensions.Logging;
using Newtonsoft.Json;

namespace TodoFunctions
{
    public static class Function1
    {
        [FunctionName("Function1")]
        public static async Task<IActionResult> Run(
            [HttpTrigger(AuthorizationLevel.Function, "get", "post", Route = null)] HttpRequest req,
            ILogger log)
        {
            log.LogInformation("C# HTTP trigger function processed a request.");

            string name = req.Query["name"];

            string requestBody = await new StreamReader(req.Body).ReadToEndAsync();
            dynamic data = JsonConvert.DeserializeObject(requestBody);
            name = name ?? data?.name;

            string responseMessage = string.IsNullOrEmpty(name)
                ? "This HTTP triggered function executed successfully. Pass a name in the query string or in the request body for a personalized response."
                : $"Hello, {name}. This HTTP triggered function executed successfully.";

            return new OkObjectResult(responseMessage);
        }
    }
}
Let’s break down the above code.
Run method signature
The Function1 class shown above features a single method named Run, this method contains the code that will execute whenever the Azure Function is called.
The Run method is decorated with the FunctionName attribute which allows us to customise the name of the function. However, the FunctionName attribute is also necessary in order for the method to be recognised as an Azure Function by the runtime.
The first parameter of the Run method is a HttpRequest which is in turn decorated with the HttpTrigger attribute. The HttpTrigger constructor accepts an AuthorizationLevel and allowed HTTP verbs. I’ll cover authorisation in my next article, but for now, we don’t need to worry about this, as authorisation isn’t enforced when debugging functions locally. The Route property is also specified for the attribute but is set to null. If specified, the Route property allows a custom route to be used instead of basing the route on the function name by convention.
The second parameter of the Run method is an ILogger which can be used to log output to the Console, Azure Application Insights, or other log stores.
Additional parameters can be injected into the Run method as needed. For example, you could add an IConfiguration parameter to get access to configuration values. This type of constructor injection works in a similar manner to a normal ASP.NET Core application.
Run method body
There is no magic going on in the code within the Run method, it is mostly using built-in .NET types to get its job done.
Firstly, the LogInformation method is used to log that the function has been called.
Next, the Query method of the HttpRequest object is used to retrieve the value of the ‘name’ query string parameter if specified.
The StreamReader class is used to read the Body of the HttpRequest asynchronously as a string and the JsonConvert library is then used to deserialise the request body string as a dynamic object.
Lastly, an OkObjectResult is returned with a response message string that is formatted depending on whether or not a ‘name’ has been specified in either the query string or the request body.
Trying out the default function
Now that we’ve covered what the default function does, let’s see if we can trigger a call to the function within our local development environment.
Press F5 within Visual Studio to debug the project.
The first time that you debug an Azure Function, a Windows Security Alert dialog that looks similar to the one shown below may appear.
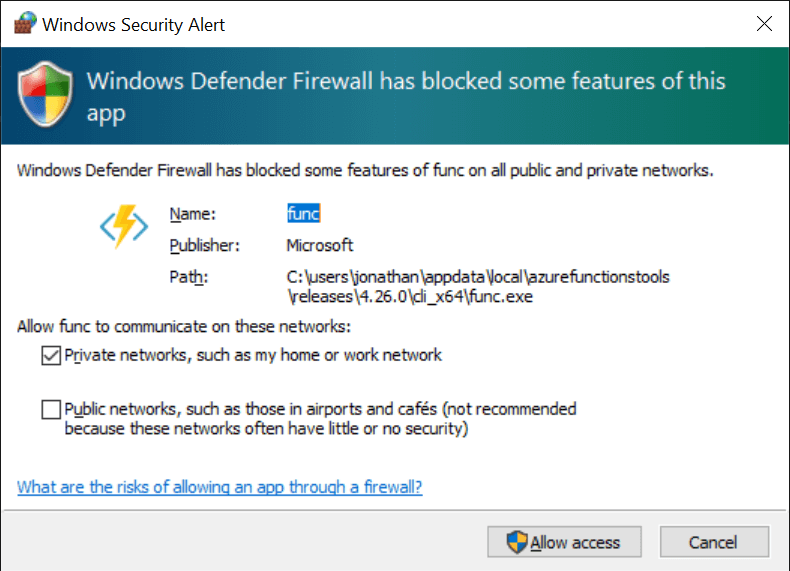
If the Windows Security Alert dialog appears, I recommend that you keep the default settings selected and press the ‘Allow access’ button to prevent any issues when debugging.
After a few seconds, a Console window should appear that looks similar to the screenshot below.
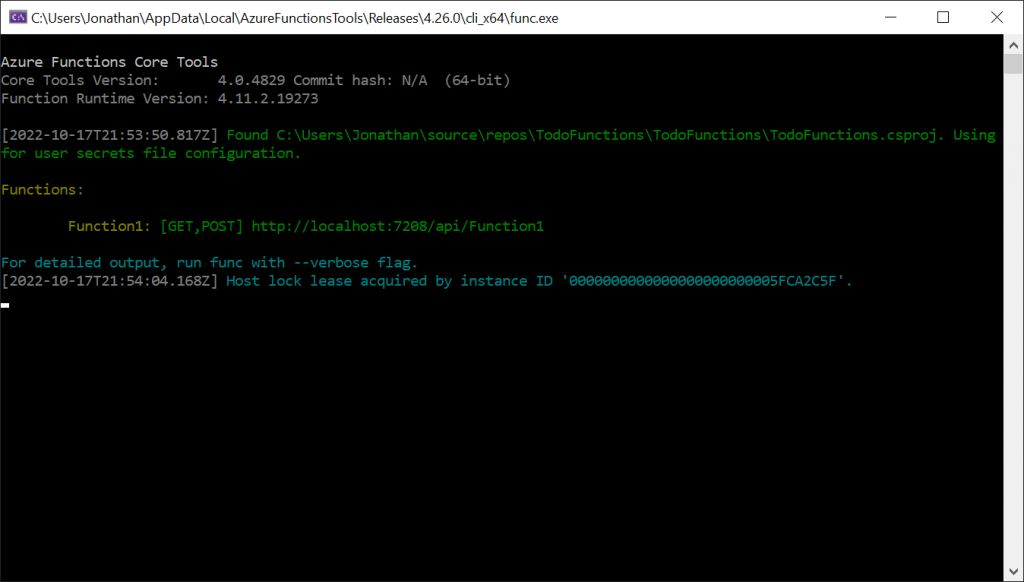
When debugging an Azure Function locally, the Console window that appears is very helpful, displaying useful information such as the Function Runtime Version and all of the available Functions that can be called.
Log messages with their associated timestamps are also displayed so that we can easily see what’s going on.
For each function, the Console debugging window displays the allowable HTTP verbs, along with the URL that can be used to access the function.
In my case, the URL that can be used to call Function1 is as follows.
http://localhost:7208/api/Function1
If you open a web browser, such as Google Chrome, and paste the URL into the address bar, Function1 should be triggered and you will see the response message from the function rendered within your browser window.
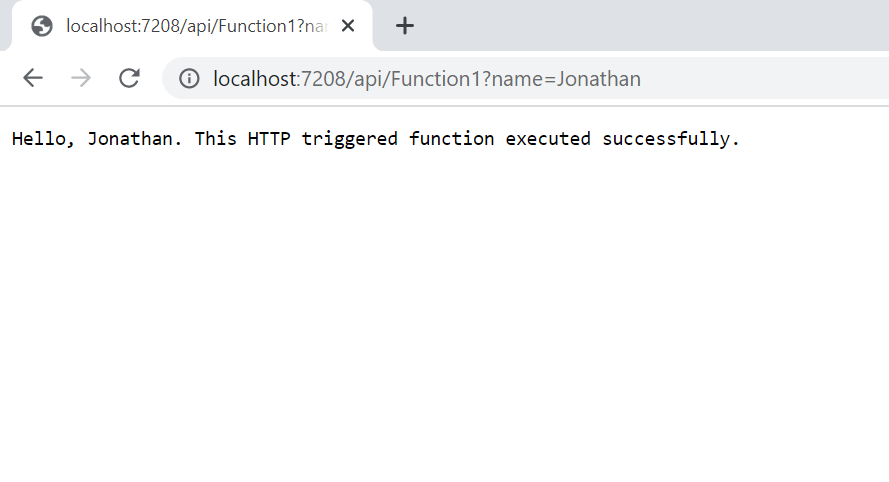
In the above screenshot, notice that I have added the ‘name’ query string parameter to the end of the URL and specified ‘Jonathan’ as its value. This causes Function1 to display a personalised response message.
Sample Function creation
The default function we’ve looked at is a great start and is useful for getting familiar with how an Azure Function is composed. Next, let’s create a new function with our own implementation.
Sample Function definition
Within your Azure Functions project, add a new file named ‘GetTodos.cs’ and paste the following code into it.
using Microsoft.AspNetCore.Http;
using Microsoft.AspNetCore.Mvc;
using Microsoft.Azure.WebJobs;
using Microsoft.Azure.WebJobs.Extensions.Http;
using Microsoft.Extensions.Logging;
using System.Collections.Generic;
using System.Linq;
using System.Threading.Tasks;

namespace TodoFunctions
{
    /// <summary>
    /// Get Todos Function Class.
    /// </summary>
    public static class GetTodos
    {
        #region Classes

        /// <summary>
        /// Represents a 'Todo' item.
        /// </summary>
        private class Todo
        {
            public int    Id        { get; set; }
            public int    UserId    { get; set; }
            public string Title     { get; set; }
            public bool   Completed { get; set; }
        }

        #endregion

        #region Fields

        /// <summary>
        /// Holds an in-memory list of Todo items for simulation purposes.
        /// </summary>
        private static IEnumerable<Todo> _todos = new List<Todo>
        {
            new Todo { Id = 1, Title = "Buy milk", UserId = 1 },
            new Todo { Id = 2, Title = "Leave out the trash", UserId = 2 },
            new Todo { Id = 3, Title = "Clean room", UserId = 2 }
        };

        #endregion

        #region Methods

        /// <summary>
        /// Gets a collection of Todos.
        /// </summary>
        /// <param name="request">The current HTTP Request</param>
        /// <param name="logger">The logger interface</param>
        /// <returns>A response body containing the Todos, if any were found</returns>
        [FunctionName(nameof(GetTodos))]
        public static async Task<IActionResult> Run(
            [HttpTrigger(AuthorizationLevel.Function, "GET", Route = "todos")]
            HttpRequest request,
            ILogger     logger)
        {
            logger.LogInformation("'{0}' request received", nameof(GetTodos));

            IActionResult result = new NotFoundResult();

            // Check if a User ID was specified in the query string.
            bool userIdSpecified = int.TryParse(request.Query["userId"], out int userId);

            // Simulate an async database call.
            var todos = await Task.Run(() =>
                userIdSpecified ?
                    _todos.Where(t => t.UserId == userId) :
                    _todos);

            // Return the Todos, if any are found.
            if (todos?.Any() == true)
            {
                logger.LogInformation("Found {0} todos", todos.Count());

                result = new OkObjectResult(todos);
            }

            logger.LogInformation("'{0}' request completed", nameof(GetTodos));

            return result;
        }

        #endregion
    }
}
The above code implements a simple REST API endpoint that returns a collection of ‘Todo’ items in JSON format. The list of todos that are returned will vary based on the value of a ‘userId’ query string parameter.
Let’s break down the above code for this function.
Sample class members
The GetTodos class is the container for the function’s Run method.
For the sake of simplicity, I have embedded a Todo class, which represents the shape of a todo item, within the GetTodos class.
I’ve also initialised a static IEnumerable collection of todos within the class which is used for simulation purposes instead of accessing the file system or a database.
Sample method signature
The Run method signature within GetTodos is very similar to the one within Function1 with just a few minor differences that are worth pointing out.
Firstly, I’m using the nameof expression instead of specifying a string directly within the FunctionName attribute.
Secondly, I’ve restricted the request to only allow HTTP GET requests.
Thirdly, I’ve specified a custom route via the Route property, meaning that the URL for the function will end with ‘/todos’ instead of ‘/GetTodos’.
Sample method body
In the method body, the LogInformation method is used to log that the function has been called and an IActionResult variable is set up with an initial value of NotFoundResult. This will result in a HTTP 404 response being returned to the client if we don’t have any todo items to return.
Next, the method checks for a query string parameter named ‘userId’ and stores its value in a userId variable.
The await Task.Run method simulates an asynchronous database query and uses LINQ to filter the results of the in-memory collection of todo items if a ‘userId’ has been specified.
If there are any todo items to return, the code logs how many todo items were found and then sets the IActionResult variable to an OkObjectResult that will serialise the todos collection to JSON in the response.
Lastly, the code logs that the request has been completed and returns the result.
Note that the code contained within the Run method is purely for demonstration purposes. When implementing a production-grade function, you’ll want to include as much validation and error handling as is needed for your scenario.
Trying out the sample function
As we did previously, press F5 within Visual Studio to debug the project.
You should now see a new function listed with the Console debug window named ‘GetTodos’.
Try copying the URL for the sample function into your web browser. For example, the URL below will call the ‘GetTodos’ function, passing in a ‘userId’ of 2.
http://localhost:7208/api/todos?userId=2
The result that is returned should look similar to the following.
[{"id":2,"userId":2,"title":"Leave out the trash","completed":false},{"id":3,"userId":2,"title":"Clean room","completed":false}]
You can also try calling the function from Postman which will make it much easier for you to test Azure Functions that support other HTTP verbs such as POST and DELETE.
I encourage you to try implementing functions that are relevant to your problem domain as the next step and consider experimenting with other simple triggers such as the Timer trigger.
In my next article, I will be covering how to publish functions that have been created in Visual Studio to Azure and look at how authorisation works for Azure Functions.
Summary
In summary, I trust that this article has helped you to get started with Azure Functions and has given you a reasonable idea of what they are like to work with.
There are many different ways to create Azure Functions; you can create functions using other languages such as Python and JavaScript, and you can even write and test functions directly within the Azure Portal. For projects that are likely to grow in size, I find that it’s often best to start from the IDE and as you’ll see in my next article, getting the functions published to Azure is quite straightforward.
Despite the fact that it’s quick to get started with, I’ve only scratched the surface of what’s possible with Azure Functions, so I definitely recommend checking out the official Microsoft Docs for a deeper dive into what’s possible. Developing a good understanding of Azure resources such as Azure Event Grid and Azure Service Bus will also be very beneficial (if you intend to use these) since one of the key benefits of Azure Functions is how easy it is to trigger function code based on events that occur within these and other resources.
If there are specific aspects of Azure Functions that you’d like me to cover in more depth, please feel free to drop me a message on my contact form or leave a comment and I’ll look into creating some more related content.
Comments