If you’re looking for a caching solution to help speed up a web application and Azure is your cloud platform of choice, it makes sense to use Azure Cache for Redis.
Azure Cache for Redis is a secure, scalable, and reliable cloud-hosted caching solution. It is based on the very popular open-source Redis database cache which boasts an impressive set of features and provides a solid platform to build upon.
In this article, I explain what Redis is, how to set it up both locally and in the cloud, and how to connect to it from an ASP.NET Core web application.
What is Redis?
Redis is an in-memory data store that can be used for a wide range of purposes, but it is very frequently used as a caching system to help improve the performance and scalability of web applications.
The official Redis website describes Redis in the following manner.
Redis is an open source (BSD licensed), in-memory data structure store, used as a database, cache and message broker. It supports data structures such as strings, hashes, lists, sets, sorted sets with range queries, bitmaps, hyperloglogs, geospatial indexes with radius queries and streams. Redis has built-in replication, Lua scripting, LRU eviction, transactions and different levels of on-disk persistence, and provides high availability via Redis Sentinel and automatic partitioning with Redis Cluster.
The official Redis website is a great resource for learning about Redis. They have great documentation and other material which you may find interesting.
From the website you can access the interactive tutorial feature which will teach you about the capabilities of Redis by allowing you to issue Redis commands and see the results.
In the sections below I walk through how to set up Redis and how to use it as a simple caching system to help speed up web applications. By using a cache we can greatly reduce the number of potentially expensive database and API calls that would otherwise need to be made.
Working with Redis locally
If you want to test Redis locally on a Windows machine, Microsoft provides a port of Redis named ‘Redis on Windows’.
Although Redis on Windows hasn’t been updated for some time now, it remains a convenient way to test Redis on a Windows machine, if you do not need access to the very latest Redis features.
Redis on Windows is available as an installable MSI package at the following location on GitHub.
https://github.com/microsoftarchive/redis/releases/download/win-3.0.504/Redis-x64-3.0.504.msi
After downloading the MSI package, run the installer and go through the installation process.
After accepting the License Agreement, I recommend ticking the ‘Add the Redis installation folder to the PATH environment variable.’ option to make your command-line experience more convenient. You may also wish to set a Max Memory Limit e.g. 250 MB. Aside from these exceptions, accept the defaults and complete the installation.
Now that Redis is installed we can test it out.
The Redis installation process installs Redis as a Windows Service. If you check your Services list (services.msc) you will see a service named ‘Redis’ which should be Running with a Startup Type of Automatic.
The Redis on Windows installation process creates a directory at the following location.
%systemdrive%\Program Files\Redis
This installation folder contains a number of executables that can be accessed from the command line. This includes the Redis Client application (redis-cli) which can be used to connect to Redis and execute commands.
From your terminal (e.g. Command Prompt or Windows Terminal) type the following text to open the Redis Client application.
redis-cli
Your terminal should now display the following.
127.0.0.1:6379>
Try issuing the following commands in sequence.
set name "Fred"
get name
keys *
del name
keys *
clear
The above commands are setting a string value in Redis with a key of ‘name’ and a value of ‘Fred’. After this, the value for the key is retrieved from the cache.
All keys are then listed and the key we created is deleted.
Finally, all keys are listed again and the terminal is cleared.
Note that you can use the flushdb command to delete all keys from the current Redis database, or the flushall command to delete all keys from all Redis databases (use with caution).
These are among the most basic commands and there are many more which you can explore here.
Setting up Redis in Azure
Now that we have Redis set up and running locally, let’s take a look at how to create an Azure Cache for Redis instance in the cloud using the Azure portal.
The process for creating the resource is quite straightforward and is covered in the following section.
Setup steps
From the Azure Home page, click on the ‘Create a resource’ link to go to the Azure Marketplace page.
Within the Search box, type the text ‘Azure Cache for Redis’ and press the Enter/Return key.
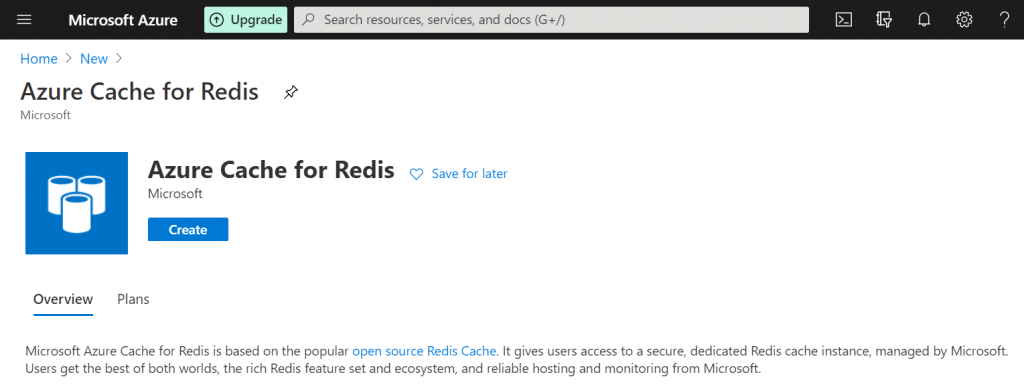
The Azure Cache for Redis resource blade should appear, as per the screenshot below.

After reviewing the Overview section, click the ‘Create’ button.
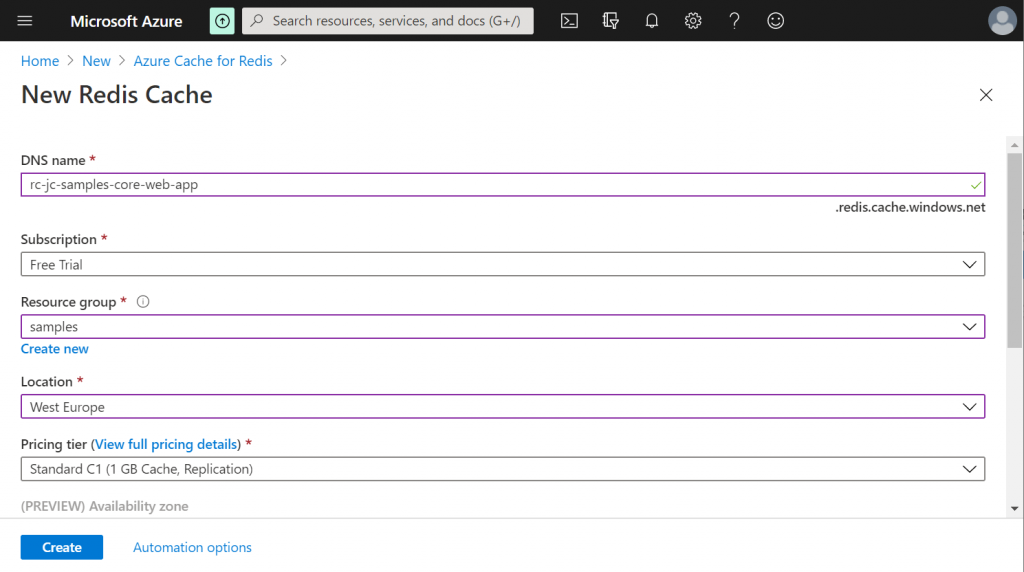
The New Redis Cache blade should appear and there are just a few required settings to fill in, as shown in the screenshot below.

Give the resource a suitable name. I’ve prefixed the name of my sample resource with the text ‘rc’.
I recommend prefixing all of your resources in Azure to help with grouping and identifying them. This is especially useful when automating deployment with the Azure CLI.
Next, if you have more than one available Azure subscription, ensure that you have selected the correct one and then select the resource group you wish to add the resource to.
Finally, select the location in which to create the resource and choose a pricing tier.
Click the ‘Create’ button to begin the deployment of the resource.
It usually takes 15-20 minutes to deploy an Azure Cache for Redis instance.
Cloud tests
One very useful feature that you’ll be glad to know exists in Azure Cache for Redis is the ‘Console’ feature which is currently in Beta.
A ‘Console’ button should be available from the Overview section of the Azure Cache for Redis resource. Click on this button to open the Console.
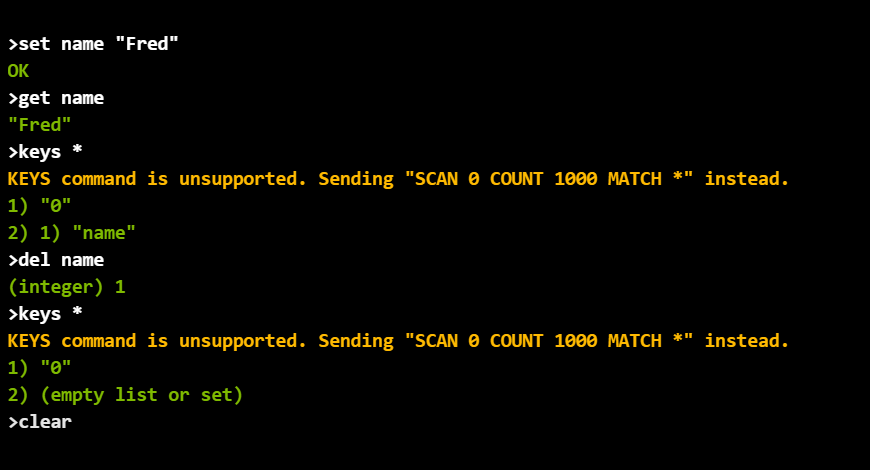
Now let’s test out our Redis cache in the cloud. Try issuing the same set of commands that we did for the local Redis on Windows instance, as shown in the screenshot below.

As you can see from the Console output, the keys command is not allowed, but the Console helpfully issues an equivalent command automatically which returns the first 1000 keys. This helps to avoid any impact on the performance of the cache when we are in production.
It’s fantastic to have a way of issuing commands directly from the Azure portal and it can prove to be very useful for quickly diagnosing any issues with the contents of the cache.
Note that if you feel more comfortable with a user interface rather than the command line, check out Redis Desktop Manager which offers a free trial.
Connecting to Redis from code
In this section, we will learn how to connect to a Redis cache from code, specifically from an ASP.NET Core web application.
StackExchange.Redis
For some time now, availing of the StackExchange.Redis library has been the defacto way to connect to Redis from a .NET app.
StackExchange.Redis is a high-performance, general-purpose .NET client for Redis which is used by Stack Exchange and other big players for high-traffic websites such as Stack Overflow.
If you want to leverage the full power of Redis, by having access to all of its features and work directly with all of the available data types, using the StackExchange.Redis library is definitely the best choice.
However, for cases where you are really just wanting to use Redis as a straightforward cache, I recommend an alternative approach which is covered in the following sections.
IDistributedCache
The IDistributedCache interface is part of the ASP.NET Core Framework within the Microsoft.Extensions.Caching.Distributed namespace.
The interface defines the following set of public operations.
GetAsyncRefreshAsyncRemoveAsyncSetAsync
There are also synchronous versions of each method i.e. Get, Refresh etc.
Additionally, there are several extension methods available within the Framework such as SetStringAsync which makes working with string cache values much more convenient.
Redis stores most data as Redis strings, but these strings can contain many types of data, including serialized binary data, which can be used when storing .NET objects in the cache.
The beauty of the IDistributedCache interface is its simplicity and how easy it is to inject the interface wherever access to a cache is needed via a dependency injection container.
NuGet
Microsoft provides a NuGet package which provides a convenient way to access a Redis cache via the IDistributedCache interface.
The NuGet package is named Microsoft.Extensions.Caching.StackExchangeRedis and it uses the StackExchange.Redis library behind the scenes, so you can be highly confident in the underlying implementation.
Note that there is also a Microsoft.Extensions.Caching.Redis library, but it is older and depends on a v1.x version of StackExchange.Redis rather than the newer v2.x versions.
After installing the NuGet package, registering support for accessing the cache is as simple as adding the following code to the ConfigureServices method of your ASP.NET Core Startup class.
services.AddStackExchangeRedisCache(setupAction =>
{
    setupAction.Configuration = Configuration.GetConnectionString("RedisConnection");
});
Behind the scenes, the above code registers a singleton instance of a RedisCache class which will be injected by the dependency injection container whenever an IDistributedCache object is required. The RedisCache class encapsulates an instance of the ConnectionMultiplexer class from the StackExchange.Redis library.
The connection to the Azure Cache for Redis instance is managed underneath by the ConnectionMultiplexer class. When using StackExchange.Redis library directly, this class should be shared and reused across your application; you should not create a new connection for each operation.
Note that you can still use the StackExchange.Redis classes directly if needed; it’s possible to mix and match using StackExchange.Redis directly and using the IDistributedCache interface within the same project.
In order for the code which we’ve added to the Startup class to work, a Connection String named ‘RedisConnection’ will need to be added to our User Secrets file, as shown below.
"ConnectionStrings": {
    "RedisConnection": "127.0.0.1:6379"
}
The value of the setting, as shown above, should work whenever you are testing against a local instance of Redis on Windows.
If you need to connect to an Azure Cache for Redis instance, you’ll need to use the full Connection String which can be found on the Azure portal. This Connection String will contain a password and SSL settings etc. as follows.
<your-resource-name>.redis.cache.windows.net:6380,password=<password>,ssl=True,abortConnect=False
In order to use the cache from a class within our ASP.NET Core project e.g. a Controller or Page, we need to inject an IDistributedCache instance. The usual way to do this is to add an IDistributedCache parameter to the class constructor and then store it in a readonly field, as shown below.
private readonly IDistributedCache _cache;

public TodosModel(IDistributedCache cache)
{
    _cache = cache;
}
Below is an example of how to implement the caching code in a method contained within the same class.
public async Task<IEnumerable<Todo>> GetTodos()
{
    const string todosKey = "todos";

    IEnumerable<Todo> todos;

    // Try getting the todos from the cache.
    var cachedTodos = await _cache.GetStringAsync(todosKey);

    if (!string.IsNullOrEmpty(cachedTodos))
    {
        // Use the todos in the cache.
        todos = JsonSerializer.Deserialize<IEnumerable<Todo>>(cachedTodos);
    }
    else
    {
        // Get the todos from the 'JSONPlaceholder' API.
        todos = await "https://jsonplaceholder.typicode.com"
                      .AppendPathSegment("todos")
                      .GetJsonAsync<IEnumerable<Todo>>();

        // Store the todos in the cache.
        await _cache.SetStringAsync(todosKey, JsonSerializer.Serialize(todos), new DistributedCacheEntryOptions
        {
            AbsoluteExpirationRelativeToNow = new TimeSpan(0, 0, seconds: 60)
        });
    }

    return todos;
}
The code first of all checks if the resource that is being requested exists in the cache and if so the resource will be deserialized from the cache.
If the resource isn’t in the cache already the resource is fetched from the API and then the item is serialized as JSON and added to the cache with an expiry of 60 seconds before returning the result.
Note that StackExchange.Redis stores ‘strings’ as hashes in Redis so that the string value and expiry settings can be encapsulated together in the same cache entry.
After the sample code above has executed, try issuing a hgetall todos command from the Console to see the fields and corresponding values for what has been stored in the cache. After 60 seconds, the cache entry will be emptied automatically by Redis.
The IDistributedCache interface provides a very clean way of interacting with the Redis cache, without having to think about the underlying implementation.
Summary
In summary, we’ve covered what Redis is and how to quickly get up and running with it as a caching service, both locally using Redis on Windows and in the cloud with the Azure Cache for Redis service.
We’ve learned that the IDistributedCache interface greatly simplifies our service layer, makes dependency injection easy, and provides the opportunity to swap out Redis for a different distributed cache in the future should we need to.
There is so much more that Redis can do and we’ve only scratched the surface of its capabilities as a caching mechanism. I encourage you again to check out the official Redis website if you want to dig deeper into Redis.
Until next time, have fun learning more about Redis!


Comments
John
Great blog!
November 2, 2020Jonathan Crozier
Thanks, John. I’m glad you found it helpful.
November 3, 2020