

Having already introduced the concept of gRPC services and having walked through how to consume a gRPC service using .NET Core, I’m now going to cover the next most fundamental topics; authentication and authorization.
For production applications, your API endpoints are normally going to be available publicly and therefore they need to be protected from unauthorized access. With ASP.NET Core, the Grpc.AspNetCore NuGet package integrates seamlessly with the existing auth infrastructure which makes life much simpler for us developers!
In this article, I’m going to be extending the sample project further, making use of the very popular Auth0 identity platform which will act as the Security Token Service our API will be protected by.
Read on to see what’s involved in integrating Auth0 into a gRPC application with ASP.NET Core.
Setting up an Auth0 account
First up, you’ll need to create a free account with Auth0, if you don’t have an account already.
Account sign-up steps
Once you’re on the Auth0 website, enter your ‘Email’ and ‘Password’ into the sign-up form and submit it, then complete the remainder of the sign-up process which is very straightforward.
For Step 1, enter your desired ‘Tenant Domain’ e.g. your name or company name, select your ‘Region’ and whether or not you want to receive marketing information, then go to the next step.
For Step 2, select the ‘Account Type’, either ‘Company’ or ‘Personal’ and then proceed to complete the creation of the account.
Once your account has been created you will be taken to the ‘Getting Started’ section within your account page.
API setup
In order to integrate our gRPC server project with Auth0, we need to create an ‘API’ that will represent the API we have created in Visual Studio.
On your Auth0 account page, you’ll notice there are lots of different menu options on the left.
Click on the ‘APIs’ section, then click the ‘Create API’ button.
Give the API a ‘Name’ e.g. ‘Todos’.
Specify an ‘Identifier’ (Audience) e.g. ‘https://todos.yourdomain.com’.
Note that you should replace ‘yourdomain’ with your own identifier.
You can leave the default value for the ‘Signing Algorithm’ as ‘RS256’.
Now click the ‘Create’ button.
Application configuration
Following the creation of the API, Auth0 should have automatically created an Application for us.
Click on the ‘Application’ section and you should see an Application called ‘Todos (Test Application)’.
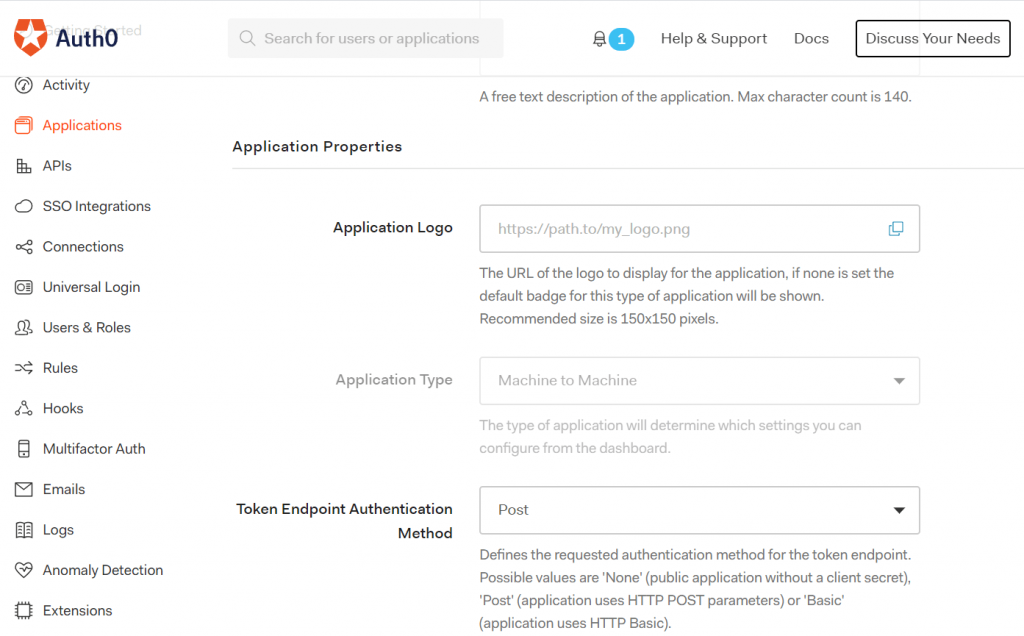
Clicking on the Application name link will take you to the ‘Settings’ section of the Application. From here you can amend lots of different settings, but the defaults will be fine for our demonstration scenario.
From the Settings section, you have access to the following values which you will need later on when setting up authentication in Visual Studio.
- Domain
- Client ID
- Client Secret
Further down the list of settings, note that the ‘Machine to Machine Applications’ option has been automatically configured for the ‘Application Type’ and this is suitable since gRPC is primarily a machine to machine protocol.
There are a plethora of other options that you can configure within Auth0 which are beyond the scope of this article, but if you are interested in exploring further you should check out the ‘Permissions’ sections within the API you just created. You can add permissions (scopes) from here which can be inspected by the ASP.NET Core server application as ‘User Claims’. This allows an application to check if an authenticated user is authorized to carry out a specific action.
Adding an endpoint to protect
Now that we have Auth0 set up, let’s add a new endpoint to the sample project in Visual Studio. We’ll then add the code which is needed to prevent unauthorized access to it.
Note that all changes in this section are to be made within the server project in the sample codebase.
Proto file updates
First off, in the ‘todos.protos’ file within the ‘Protos’ folder, add the following import line above the existing package line.
import "google/protobuf/empty.proto";
This will give us access to the ‘Empty’ type which can be used to represent a ‘void’ RPC method return type and also facilitates ‘parameterless’ RPC methods.
Next, add the following line within the Todos service definition.
rpc DeleteTodos (google.protobuf.Empty) returns (google.protobuf.Empty);
This defines a new RPC method that takes an ‘Empty’ request and returns an ‘Empty’ response.
The code which we’ll implement for the method will simply simulate the deletion of all todo items.
RPC method implementation
In the ‘TodoService.cs’ file within the ‘Services’ folder, add the following method.
/// <summary>
/// Deletes all Todos.
/// </summary>
/// <param name="request">The Empty Request message</param>
/// <param name="context">The context for the RPC call</param>
/// <returns>An Empty Response</returns>
[Authorize]
public override Task<Empty> DeleteTodos(Empty request, ServerCallContext context)
{
    var user = context.GetHttpContext().User;

    foreach (var claim in user.Claims)
    {
        Trace.WriteLine(claim);
    }

    _todos.Clear();

    return Task.FromResult(new Empty());
}
Note that the following namespaces need to be added in order for the code to compile.
- Google.Protobuf.WellKnownTypes
- Microsoft.AspNetCore.Authorization
- System.Diagnostics
Additionally, the type of the static _todos variable within the TodoService class must be updated from IEnumerable to ICollection.
For demonstration purposes, I am grabbing the ‘User’ from the current HTTP Context object and I’m iterating through the claims (see my note at the end of the Auth0 section regarding scopes and claims).
After this, the code is simulating the deletion of all todos by clearing all items from the _todos collection and then returns a new object instance of the Empty type. If the deletion were to fail in a real-world example, an Exception would be received on the client-side.
Lastly, you will notice that the method has been decorated with the Authorize attribute. This will ensure that the method is only executed if a valid auth token has been presented.
Configuring auth services
To make the authentication and authorization work we need to set up a few things in the server code.
In the Startup class of the server project, add the following instance property.
public IConfiguration Configuration { get; }
Now add a constructor, as follows.
public Startup(IConfiguration configuration) => Configuration = configuration;
A configuration object will be automatically supplied via the ASP.NET Core dependency injection system and this will provide us with access to the configuration settings which are stored in the ‘appsettings.json’ file.
Within the ConfigureServices method, add the following code.
services.AddAuthentication(options =>
{
    options.DefaultAuthenticateScheme = JwtBearerDefaults.AuthenticationScheme;
    options.DefaultChallengeScheme    = JwtBearerDefaults.AuthenticationScheme;
}).AddJwtBearer(options =>
{
    options.Authority = Configuration["Auth0:Authority"];
    options.Audience  = Configuration["Auth0:Audience"];
});

services.AddAuthorization();
Note that the following namespaces also need to be added.
- Microsoft.AspNetCore.Authentication.JwtBearer
- Microsoft.Extensions.Configuration
The code above will configure the ASP.NET Core request pipeline with the appropriate auth settings.
Any endpoints which have been decorated with the Authorize attribute will now expect a JWT Bearer token to be presented and the token must be issued by the Auth0 Authority and match the intended Audience.
Note that we’re just about to cover the addition of the ‘Auth0:Authority’ and ‘Auth0:Audience’ settings in the section below as these won’t exist just yet.
Before moving on, add the following two lines of code after the app.UseRouting() method call in the Configure method of the Startup class.
app.UseAuthentication();
app.UseAuthorization();
Adding configuration files
ASP.NET Core and .NET Core provide us with lots of nice new options for storing and reading configuration files. No longer are we stuck with the limitations of System.Configuration.
The standard ASP.NET Core project template comes with an ‘appsettings.json’ file which contains some standard settings for ‘Kestrel’ (Microsoft’s open-source web server) and Logging etc.
In order for the auth code that we configured in the server project to work, we need to add a new ‘Auth0’ section to the config file to store the ‘Audience’ and ‘Authority’ settings.
Add the following to your own ‘appsettings.json’ file.
"Auth0": {
    "Audience": "https://api.yourdomain.com",
    "Authority": "https://yourdomain.auth0.com/"
}
Note that you will need to update both settings to match the values from your Auth0 account and API.
The configuration types within the Microsoft.Extensions.Configuration namespace allow us to access sub-settings with a simple colon syntax e.g. Auth0:Audience.
To keep things consistent, we can do something similar within the client console application.
However, .NET Core console applications do not contain all of the NuGet packages we need by default.
Before proceeding further, add the following packages to the client project.
Before we add any additional code, first add a new JSON file to the client project named ‘appsettings.json’ and update its contents to the following.
{
    "Auth0": {
        "Audience": "https://api.yourdomain.com",
        "ClientId": "HdsK4KgWOfjdkseaH2sdJFDjJFSWLwsP",
        "Domain": "https://yourdomain.auth0.com"
    }
}
Note that you will need to update the settings to match the values found in the Application settings section of your Auth0 account.
In the sample project, I’ve followed best practice by configuring the ‘Client Secret’ within a User Secrets file which is located outside of the project directory. By doing this we mitigate the risk of accidentally committing the secret value to source control.
To add a User Secret setting, right-click on the client project and click on the ‘Manage User Secrets’ option.
Note that Visual Studio will helpfully add the Microsoft.Extensions.Configuration.UserSecrets NuGet package at this point if it’s not already installed.
This will open up a ‘secrets.json’ file which will be located within your User Profile. Add the following contents to the file and save your changes.
{
    "Auth0": {
        "ClientSecret": "secret"
    }
}
Note that you will need to update the secret value to match the ‘Client Secret’ setting in your Auth0 account.
Now that we have all of the required settings available, within the Main method of the Program class, add the following code to build a config object which we can use to access the settings within our configuration files.
IConfiguration config = new ConfigurationBuilder()
    .AddJsonFile("appsettings.json", true, true)
    .AddUserSecrets("98ebcf5b-4293-473a-933b-7b4853d3bb29")
    .Build();
Note that the GUID needs to be updated to match the value of the ‘UserSecretsId’ element within your project file. To see this value, simply double-click on the client project node within Visual Studio to open the project file in the editor.
Next, we are going to see how to call the protected endpoint from the client project and pull out the configuration and User Secret settings which are needed to do so.
Calling the protected endpoint
The code used to call a gRPC endpoint from a .NET Core application is very similar to the code which is used to call a regular gRPC endpoint. The only difference is that we need to pass the client credentials along with the request.
Since we’re using the OAuth 2.0 protocol via Auth0, we’ll need to pass along a Bearer token in an ‘Authorization’ header with the request.
In the code below I’m using Flurl to call the Auth0 endpoint and pass up the ‘Audience’, ‘Client ID’ and ‘Client Secret’ values.
var tokenResponse = await config["Auth0:Domain"]
    .AppendPathSegment("oauth/token")
    .PostUrlEncodedAsync(new
    {
        audience      = config["Auth0:Audience"],
        client_id     = config["Auth0:ClientId"],
        client_secret = config["Auth0:ClientSecret"],
        grant_type    = "client_credentials"
    })
    .ReceiveJson();
Note that you’ll need to install the Flurl HTTP NuGet package into the client project in order to use Flurl.
We can then call our new protected gRPC endpoint as follows.
var headers = new Metadata();
headers.Add("Authorization", $"Bearer {tokenResponse.access_token}");

await client.DeleteTodosAsync(new Empty(), headers);
Pretty neat!
Note that since Flurl can store the received JSON in a dynamic variable (tokenResponse) we can access properties on the response object at runtime without having to create a strongly-typed model.
Lastly, note that the following namespaces need to be added to the Program file before the client code will compile.
- Flurl
- Flurl.Http
- Google.Protobuf.WellKnownTypes
- Grpc.Core
- Microsoft.Extensions.Configuration
Conclusion
I’ve now covered what I believe to be all of the key things you need to know about gRPC to get started; server endpoints, client stubs and authentication/authorization.
Armed with this knowledge you can now proceed to more advanced topics such as bi-directional streaming.
There’s lots more to learn!
Comments