

Blazor is an exciting new technology that allows software developers to use .NET and C# to build robust web applications with rich user interfaces, whilst utilising the power of WebAssembly (or SignalR).
Up until relatively recently, SPA (Single Page Application) web apps were usually built using JavaScript (or TypeScript) frameworks such as Angular, React, or Vue. While these frameworks and libraries remain very popular, with the advent of WebAssembly, other languages such as C# can now run directly in the browser via new frameworks such as Blazor.
.NET developers now have more options available than ever before and can leverage their C# skills to build full-stack web applications that use C# everywhere.
In this article, I will introduce Blazor and walk you through the process of creating your first Blazor WebAssembly application using a project template. I’ll then explain the fundamental aspects of the project that you will need to understand to get started with Blazor.
What’s Blazor all about?
Blazor is a framework developed by Microsoft for building interactive web applications using C#, HTML, and CSS.
Blazor is similar to Angular and React in that it focuses on the usage of individual components that are composed together to build the overall user interface. Within each component, Razor syntax is used to allow C# code to be interspersed with HTML to make the generation of the UI elements more dynamic.
Blazor has been in development since 2018 and Microsoft is continuing to pour a lot of effort into its ongoing development and maintenance, with lots of new features being added with every new version of .NET that is released. The next upcoming version of .NET at the time of writing will be .NET 8.0 which promises lots of great Blazor improvements.
One of the biggest benefits of using Blazor as a .NET developer is that you will be able to leverage your existing C# skills to build interactive web applications. Of course, you’ll still need some knowledge of HTML and CSS, but the learning curve should be less compared to learning a JavaScript library such as React from scratch, where a good working knowledge of modern JavaScript is essential.
In the following subsections, we will consider some of the key aspects and benefits of Blazor.
Hosting models
Blazor currently comes in two flavours; Blazor Server and Blazor WebAssembly. A different hosting model is used in both cases, each with their respective pros and cons which are covered further below.
Note that a project named Blazor United is currently in development at Microsoft, which aims to combine the best of Blazor Server and Blazor WebAssembly, while also allowing traditional server-rendered pages to use the Blazor programming model.
Blazor Server
The first version of Blazor Server was released in September 2019.
As the name implies, Blazor Server runs the app on the server. A SignalR connection is used to create a ‘circuit’ that connects a client to an individual instance of the app on the server. Each time the user interacts with the application in the browser, a message is transmitted over the SignalR connection from the client to the server. The server will then respond with messages containing the details of any DOM changes that need to be applied to the page.

The above diagram illustrates how the Blazor app, along with its Razor components and .NET runtime are hosted on the server, with the SignalR connection being used to receive messages from the client and transmit DOM updates back to the browser.
Some of the benefits of Blazor Server include the following.
- Small download size and fast start-up time (since the app is hosted on the server).
- Supports all server-side APIs and .NET libraries (e.g. Entity Framework Core).
- Full debugging support on the server.
- Works in most older browser versions.
Some of the potential downsides are as follows.
- ASP.NET Core is required on the server (for SignalR).
- No offline support (due to a constant connection being required).
- Latency issues (if the client’s internet connection is poor).
- Scalability (a more powerful server is required to support many users).
Blazor WebAssembly
Blazor WebAssembly was first released in May 2020 and has seen many improvements since then.
With Blazor WebAssembly, the entire app, including the .NET runtime is downloaded to the client so that the app can be run within the browser. To be more precise, a WebAssembly-compiled version of the .NET Mono runtime is downloaded and is then used to run standard .NET assemblies. DOM updates are applied directly within the browser and there is no need to reach out to a server after the application has been downloaded, other than to make API calls to fetch data, for example.
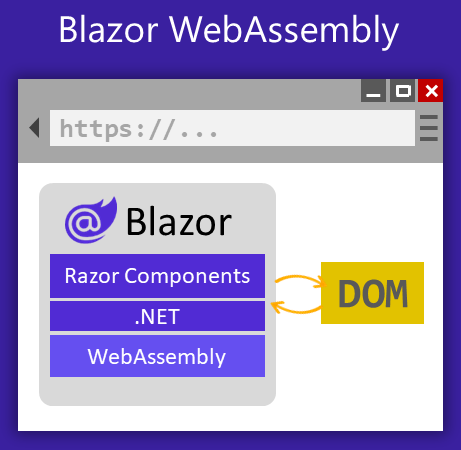
The above diagram illustrates how the Blazor app is hosted within the browser and can apply DOM updates directly without needing to reach out to a server. Everything shown in this diagram, including the .NET runtime, is contained within the browser.
Some of the benefits of Blazor WebAssembly include the following.
- Can be hosted on practically any server (ASP.NET Core not required).
- Great offline support and works well for PWAs (Progressive Web Apps).
- Very responsive (as there is no need to wait for a response from a server).
- Scalable (less powerful servers can be used since the client runs the app).
Some of the potential downsides are as follows.
- Large download size and slower initial start-up time (since a full .NET runtime must be downloaded).
- Can’t access as many .NET libraries (e.g. Entity Framework Core).
- Doesn’t work in older browsers (that don’t support WebAssembly).
Good to know
Before moving on to the practical part of the article I want to cover a few other things that I believe are good to know about Blazor to help provide some more context.
No plugins
An important point to note is that no plugins are required to run a Blazor app since it relies on open web standards such as WebSockets in the case of Blazor Server and WebAssembly in the case of Blazor WebAssembly.
Many developers are wary of new non-JavaScript web frameworks given the previous demise of browser plugins such as Flash and Silverlight, so the fact that plugins are not required to run Blazor apps provides quite a significant reassurance.
Works with JavaScript
Although some JavaScript is needed to load the initial Blazor application in both hosting models, the vast majority of your application logic can be built using nothing but C#.
When you’re developing a Blazor application, you’ll naturally want to use as much C# as possible. However, Blazor has no problem at all working with JavaScript when required.
This can be relevant for cases where you need to use a particular JavaScript library to accomplish a specific task. Blazor provides out-of-the-box support for invoking JavaScript functions efficiently via the IJSRuntime Interface. As a result, you don’t need to worry about being boxed in with Blazor, the JavaScript Interop API will act as your escape hatch.
Performance
Improvements in relation to Blazor app size and performance continue to be made with each new .NET release.
One of the things I see many developers touting is the performance benefits of Blazor when running under WebAssembly, since WebAssembly promises ‘near-native performance’. The truth is that generally speaking, Blazor is currently not as performant as the leading JavaScript frameworks, due to the .NET runtime interpreting the IL code within assemblies on the fly.
With AOT (Ahead of Time) compilation the speed of Blazor WebAssembly applications can be greatly improved, at the cost of increased application size and longer build times. Blazor apps are currently a minimum of around 1-2 MB in size and are usually several MB or more when all of the .NET libraries that make up the application are included.
However, one of the things I’m very excited about is the new jiterpreter which promises to significantly improve “runtime performance without the size and build time overhead of AOT”. I will be keeping a close eye on how this new Blazor feature develops over the incoming months.
Creating a new Blazor project
Ok, we’re finally ready to do something practical!
The following sub-sections will walk you through the process of creating a new Blazor project using the Blazor WebAssembly project template.
Prerequisites
Before beginning, make sure you have installed Visual Studio. For the purposes of this article, I will be using Visual Studio 2022 and .NET 7.0 and I recommend that you use the same versions or newer.
You will need to have selected the ‘ASP.NET and web development’ workload within the Visual Studio Installer interface to set up the necessary project templates.
Note that it is also possible to use an editor such as Visual Studio Code to create Blazor applications, provided you have installed a .NET/.NET Core SDK.
Project creation
To get started, open Visual Studio and wait for the launch window to load. From the launch window, you will have the option to open an existing project or create a new one, as shown below.
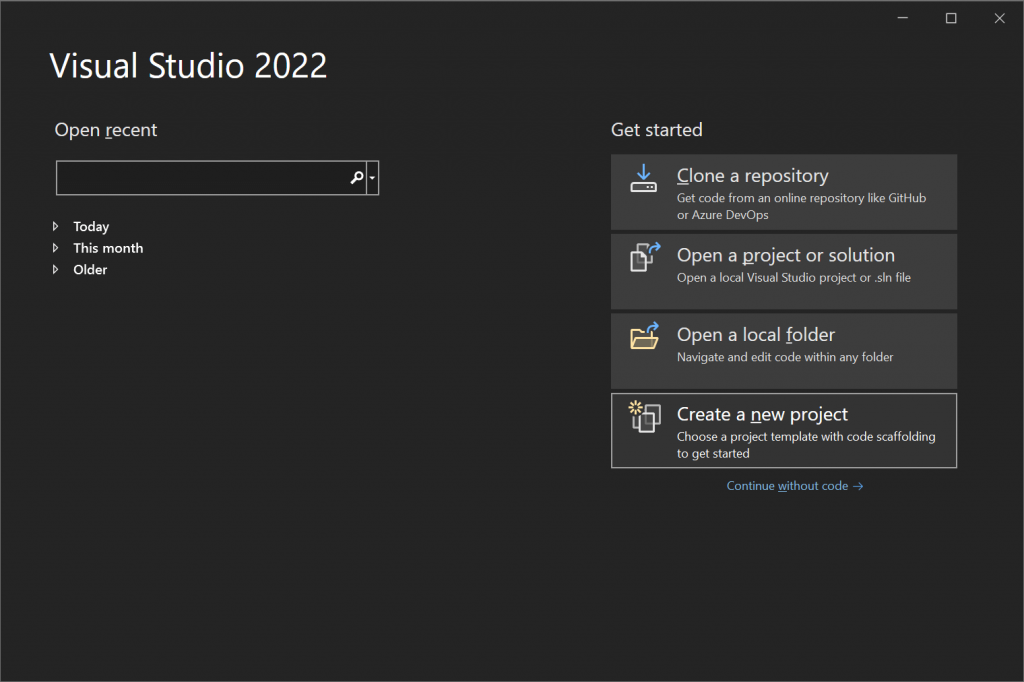
From the launch window, press the ‘Create a new project’ button to load the available project templates.
Note that if you already have Visual Studio opened you can of course simply click on File –> New –> Project…
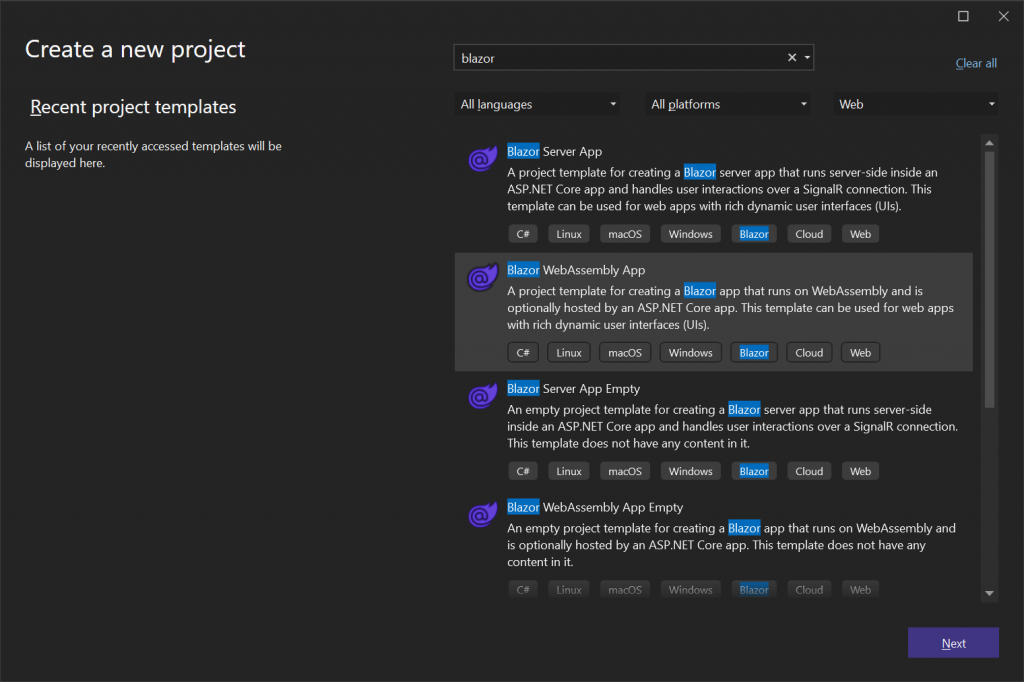
On the ‘Create a new project’ page, type the text ‘blazor’ into the search control and then select the C# ‘Blazor WebAssembly App’ item from the list. Press the ‘Next’ button to proceed to the next step.
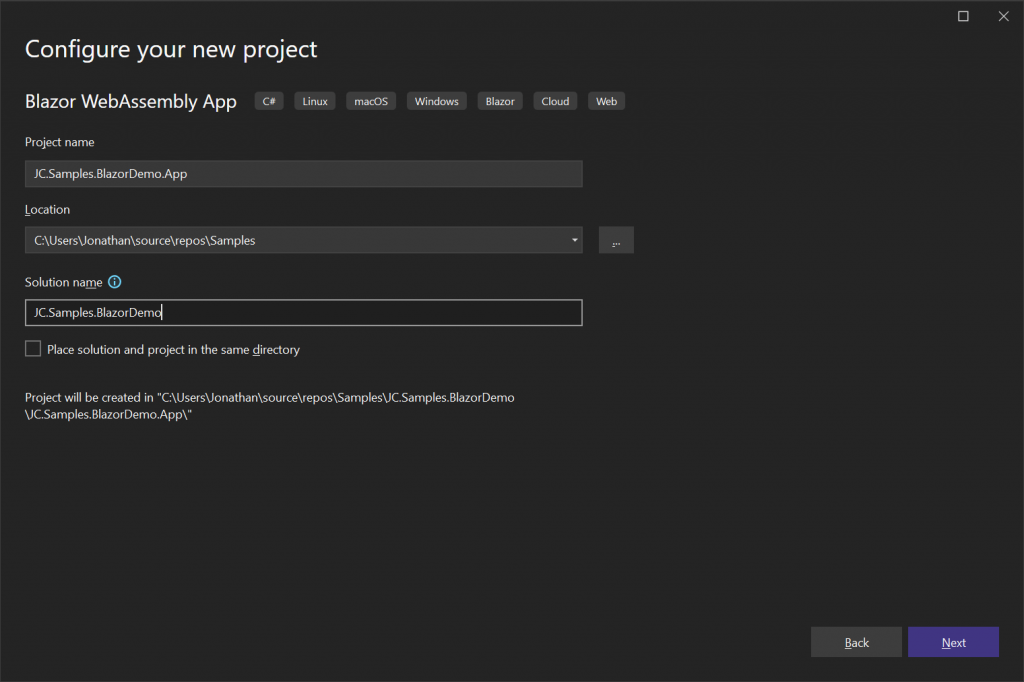
On the ‘Configure your new project’ page, enter a name for your project and solution. I’ve chosen a Project name of ‘JC.Samples.BlazorDemo.App’ and a solution name of ‘JC.Samples.BlazorDemo’. Update the Location field if necessary and then press the ‘Next’ button to proceed to the next step.
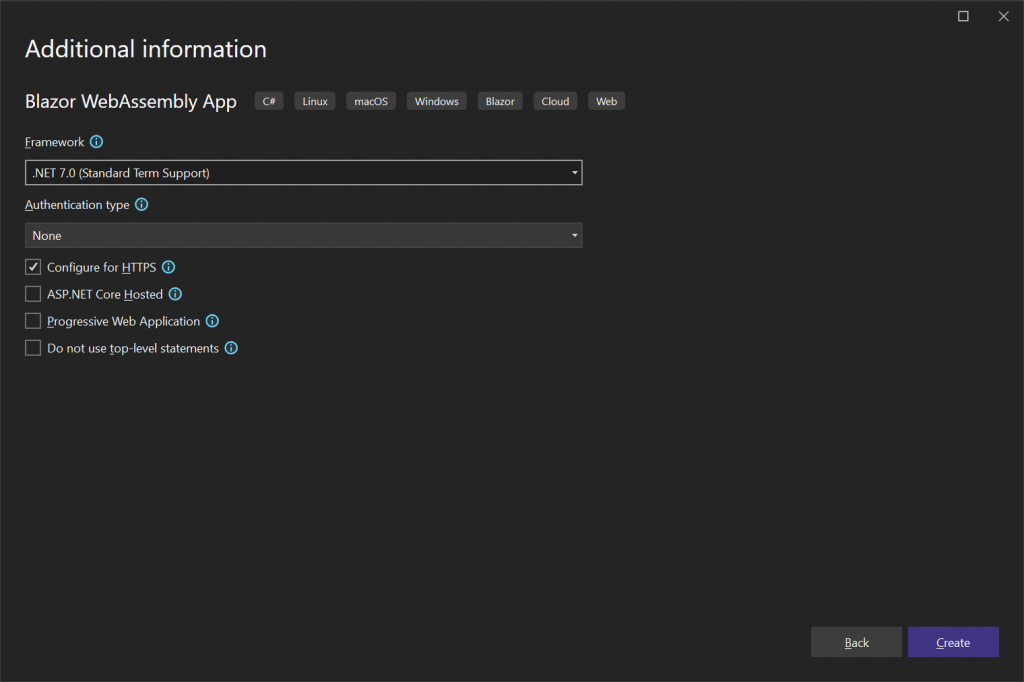
On the ‘Additional information’ page, I have changed the Framework to ‘.NET 7.0 (Standard Term Support)’ to get access to the latest Blazor features available at the time of writing. I recommend that you leave the other settings at their default values for the purposes of this walkthrough, then press the ‘Create’ button to complete the setup of the new project.
Trying out the Blazor app
Before jumping into the project code, I recommend that you first run the application, either via F5 or Ctrl + F5 to try it out.
When the application loads, click on the ‘Counter’ link within the navigation pane on the left-hand side to load the Counter page. When the Counter page loads you’ll notice a ‘Click me’ button that you can click to increment the current count that is displayed on the user interface, as shown below.

It’s pretty cool to know that the application logic is all being handled by C#!
While you have the application running, I recommend that you also try clicking on the ‘Fetch data’ link. This link will navigate to a page that simulates API requests to retrieve weather forecast data and displays the results within a table.
If you’re really curious you can try opening your browser developer tools and use the Network tab to inspect the requests that are being made. The first time that the app loads you’ll notice lots of DLLs such as ‘Microsoft.AspNetCore.Authorization.dll’ and ‘System.Linq.dll’ being downloaded to the browser. After the initial application download, you should find that these files are contained within Cache Storage in the browser to help speed things up the next time the application loads.
Reviewing the template Blazor project
Now that the project has been created using the Blazor WebAssembly template and you’ve seen what the running application does, let’s explore the files that make up the default project that has been generated.
Project structure
The Blazor WebAssembly template project is fairly lightweight. It has enough boilerplate code to help us get started quickly, but not so much that it becomes a burden to remove unneeded files or dependencies.
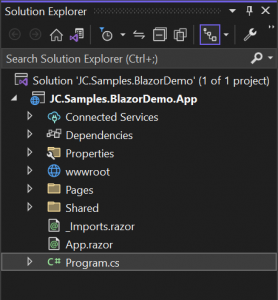
As you can see from the above screenshot, there are a few top-level files and there are three folders, including the ‘wwwroot’ folder where static assets are located.
Index HTML
Within the ‘wwwroot’ folder you’ll find an ‘index.html’ file which represents the single page that the Blazor WebAssembly app is rendered within. This is the page that will be loaded by the browser when the application starts.
The contents of index.html are listed below for reference.
<!DOCTYPE html>
<html lang="en">

<head>
    <meta charset="utf-8" />
    <meta name="viewport" content="width=device-width, initial-scale=1.0, maximum-scale=1.0, user-scalable=no" />
    <title>JC.Samples.BlazorDemo.App</title>
    <base href="/" />
    <link href="css/bootstrap/bootstrap.min.css" rel="stylesheet" />
    <link href="css/app.css" rel="stylesheet" />
    <link rel="icon" type="image/png" href="favicon.png" />
    <link href="JC.Samples.BlazorDemo.App.styles.css" rel="stylesheet" />
</head>

<body>
    <div id="app">
        <svg class="loading-progress">
            <circle r="40%" cx="50%" cy="50%" />
            <circle r="40%" cx="50%" cy="50%" />
        </svg>
        <div class="loading-progress-text"></div>
    </div>

    <div id="blazor-error-ui">
        An unhandled error has occurred.
        <a href="" class="reload">Reload</a>
        <a class="dismiss">🗙</a>
    </div>
    <script src="_framework/blazor.webassembly.js"></script>
</body>

</html>
There is nothing particularly special about this HTML file that makes it unique to Blazor, apart from the script element which loads the Blazor WebAssembly JavaScript file. When executed, the ‘blazor.webassembly.js’ file downloads the WebAssembly version of the .NET runtime along with the compiled Blazor app to the browser and starts the application.
Aside from this, note the div element with the ID of ‘app’. This is the element that will hold the root (App) component of the application and it is referenced by the Program file where the application start-up logic exists, which we’ll see in just a second.
Program file
The ‘Program.cs’ file contains the code that is used to wire up dependencies and start up the app.
The contents of the file are listed below for reference.
using JC.Samples.BlazorDemo.App;
using Microsoft.AspNetCore.Components.Web;
using Microsoft.AspNetCore.Components.WebAssembly.Hosting;

var builder = WebAssemblyHostBuilder.CreateDefault(args);
builder.RootComponents.Add<App>("#app");
builder.RootComponents.Add<HeadOutlet>("head::after");

builder.Services.AddScoped(sp => new HttpClient { BaseAddress = new Uri(builder.HostEnvironment.BaseAddress) });

await builder.Build().RunAsync();
If you have developed ASP.NET Core applications previously, you should recognise that the above application start-up code is quite similar to what you’ve seen before.
The static call to the WebAssemblyHostBuilder.CreateDefault method creates a builder instance that will be used to build a WebAssembly application host with sensible defaults for things like configuration and logging.
The App component is then configured as the root component for the Blazor WebAssembly app, within which every other component that makes up the app will be contained. The App component is mapped to an HTML element with an ID of ‘app’ via the #app selector that is passed to the Add method.
HeadOutlet is a special root component that allows content within the head element of the webpage that the Blazor app is running within to be updated via Blazor components such as PageTitle.
In a similar fashion to standard ASP.NET Core web apps, dependencies can be wired up by calling IServiceCollection extension methods. In the default Program file, the AddScoped method is called to register a HttpClient instance. This allows HTTP API calls to be made from pages/components.
The last line of code within the Program file calls the Build method which returns a WebAssemblyHost instance. The RunAsync method is then called to run the application.
App
The ‘App.razor’ file is the root component that is referenced within the Program file. It will be loaded into the div element with the ID of ‘app’ in the index.html file.
The contents of App.razor are listed below.
<Router AppAssembly="@typeof(App).Assembly">
    <Found Context="routeData">
        <RouteView RouteData="@routeData" DefaultLayout="@typeof(MainLayout)" />
        <FocusOnNavigate RouteData="@routeData" Selector="h1" />
    </Found>
    <NotFound>
        <PageTitle>Not found</PageTitle>
        <LayoutView Layout="@typeof(MainLayout)">
            <p role="alert">Sorry, there's nothing at this address.</p>
        </LayoutView>
    </NotFound>
</Router>
Since a Blazor WebAssembly app runs entirely within the browser as a SPA (Single Page Application), routing between ‘pages’ is handled on the client side, rather than the server sending a new HTML page in response to an HTTP request.
The built-in Blazor Router component takes care of the client-side routing and scans the specified assembly for page components. When the user tries to navigate to a page, Router attempts to match the route that has been requested to a page component e.g. /counter. We’ll see what defines a page component in the next section.
If a matching page component is found, the RouteView component within the Found Render Fragment (I’ll cover what Render Fragments are on another occasion) is used to render the component, passing along the route data and using the specified layout. The FocusOnNavigate component is used to focus on an element matching the specified selector after a page has been navigated to, in this case, a h1 element.
If a matching component is not found, a simple LayoutView within the NotFound Render Fragment includes a p element explaining that there’s nothing at the address. Above this, the PageTitle component is used to set the title of the page.
Counter
Now, let’s look at a Blazor page component; the Counter component.
@page "/counter"

<PageTitle>Counter</PageTitle>

<h1>Counter</h1>

<p role="status">Current count: @currentCount</p>

<button class="btn btn-primary" @onclick="IncrementCount">Click me</button>

@code {
    private int currentCount = 0;

    private void IncrementCount()
    {
        currentCount++;
    }
}
The above component contains a mixture of HTML markup and C# code; this is what is enabled by the Razor rendering engine.
The @page directive is used to indicate that this is a page component that can be accessed via a specific route i.e. /counter. Components that don’t feature a @page directive cannot be accessed as pages and must instead be nested within other components, however, page components can be nested within other components if desired.
The PageTitle component is used to set the title of the current page.
After the h1 element, the p element includes a data-binding to the currentCount variable via the @currentCount syntax. As a result of configuring this data binding, the value of the currentCount variable will be displayed within the p tag and the user interface will automatically re-render when the value of currentCount changes.
How does this happen? In a traditional web application, normally you would expect an ‘onclick’ event to be wired up to a JavaScript function. However, since this is a Blazor web app, the ‘onclick’ event for the button element is wired up a C# method named IncrementCount contained within the @code block. This method simply increments the value of the currentCount variable by 1 each time it is called.
In most cases, Blazor can automatically detect when state changes such as the change to the value of the currentCount variable occur and will automatically re-render the specific parts of the DOM that need to be updated.
If you want to explore things further, you can check out the ‘FetchData.razor’ file within the ‘Components’ folder of the project. This component uses conditional statements and loops within the markup, demonstrating the power of the Razor rendering engine.
_Imports
Another file that I want to mention before wrapping up is the ‘_Imports.razor’ file. This is where using statements that you want to make available by default within components are added. The contents of the default file are shown below for reference.
@using System.Net.Http
@using System.Net.Http.Json
@using Microsoft.AspNetCore.Components.Forms
@using Microsoft.AspNetCore.Components.Routing
@using Microsoft.AspNetCore.Components.Web
@using Microsoft.AspNetCore.Components.Web.Virtualization
@using Microsoft.AspNetCore.Components.WebAssembly.Http
@using Microsoft.JSInterop
@using JC.Samples.BlazorDemo.App
@using JC.Samples.BlazorDemo.App.Shared
You can add or remove using statements from this file according to your requirements. Adding statements here for namespaces containing the types that you frequently use will help to keep your components cleaner.
Ok, that’s all I’m going to cover in this article, we’ve covered quite a bit of ground so far!
In future articles, I will dive into more detail regarding components and introduce additional Blazor concepts that will help to further progress your understanding of Blazor.
Summary
In this article, I have introduced Blazor and have placed a particular focus on Blazor WebAssembly.
I started by explaining the different Blazor hosting models and some of the other key aspects and benefits of Blazor.
I then walked through how to create a Blazor WebAssembly application via Visual Studio, using the Blazor WebAssembly project template. After walking through the creation of the project, I demonstrated what the application looks like when it is run and covered some of the most important files contained within the Blazor project.
I trust that this article has piqued your interest in Blazor and encourages you to consider using Blazor for your next project.
Comments