

IdentityServer is the de-facto security token service for ASP.NET and ASP.NET Core web applications and it is hugely popular within the .NET community.
One of the most important security requirements to consider when setting up IdentityServer is the creation of a key (typically an X.509 certificate) which is used to cryptographically sign and validate tokens issued to clients.
In this article, I start by explaining what a signing certificate is. I then cover how to create a certificate, how to load the certificate in code, and finally how to upload and access the certificate from an Azure App Service.
What is a signing certificate?
A signing certificate is used to cryptographically sign data using a public and private key-pair.
In the case of IdentityServer, a signing certificate is used to sign and validate JWT security tokens that are issued to clients. Because the private key is held on the server it isn’t possible to alter a security token without invalidating the token signature, thereby guaranteeing the authenticity and integrity of the token.
For IdentityServer, X.509 certificates specifically are used for token signing and validation.
It is worth pointing out that IdentityServer supports both JWT tokens and reference tokens. JWT tokens are self-contained and can contain a complex set of user claims and permissions. Reference tokens don’t require a signing certificate.
For most modern applications, JWT tokens make the most sense since they contain all of the data needed to authorize a request. This means that JWT tokens can be validated by an application without requiring potentially expensive database lookups to verify that a token is valid.
I recommend checking out jwt.io for more information on exactly what JWT tokens are and the benefits they bring.
Create a signing certificate
Now that we understand what signing certificates are, we can proceed to the creation of a new token signing certificate.
At the time of writing, I find that the best tool for creating an IdentityServer signing certificate is still the MakeCert utility.
MakeCert is part of the Microsoft Windows Software Development Kit (SDK) and is often already installed on .NET developer machines since it is an optional component within the Visual Studio Installer. MakeCert facilitates the creation of X.509 certificates, which are exactly what we need to be compatible with IdentityServer.
The other tool we need to use in conjunction with MakeCert is the Pvk2Pfx utility which is used to copy private and public keys to a Personal Information Exchange file.
Let’s proceed to the steps involved in creating a new X.509 certificate for token signing purposes.
Step 1
As the first step, you need to make sure that MakeCert and Pvk2Pfx are installed on your machine.
If they aren’t there already, you’ll either need to download and install the Windows 10 SDK directly or select one of the ‘Windows 10 SDK’ options from the Visual Studio Installer to get the tools onto your system.
Step 2
Next, open the Developer Command Prompt for VS 2019 (your Visual Studio version may vary).
Alternatively, you can use a standard Command Prompt, PowerShell, or Windows Terminal.
From your terminal, change the current directory to the location where you want the certificate files to be created.
e.g. you can issue commands such as the following.
cd %userprofile%\Desktop
mkdir Certificates
cd Certificates
The above commands change the current directory to the currently logged in user’s Desktop, create a new ‘Certificates’ directory, then change the current directory to the new Certificates directory.
Step 3
Now run the following command.
makecert -sv my-app-auth.pvk -n "CN=my-app-auth" -b 01/01/2021 -e 01/01/2040 -sky signature -a sha256 -len 2048 my-app-auth.cer
Note that you should change the text ‘my-app-auth’ according to your requirements before issuing the command.
The above command creates a .pvk file containing the private key and a .cer file containing the public key.
The certificate is configured as a signature certificate via the -sky argument. The algorithm is set to SHA-256 via the -a argument and the key length is set to 2048 via the -len argument.
Note that the minimum key length supported by IdentityServer is 2048 bytes.
After issuing the above command a dialog will appear within which you need to specify the ‘Password’ and ‘Confirm Password’ fields with a suitably strong password to protect the private key.
Following this, a second dialog will appear. Enter the same password again in order to generate the public key successfully.
Step 4
Now that we have the private and public key files, we need to create a Personal Exchange Format file that can be imported into the Windows Certificate Store and Azure.
Run the following command.
pvk2pfx -pvk my-app-auth.pvk -pi "<password>" -spc my-app-auth.cer -pfx my-app-auth.pfx -po "<password>"
Note that you will need to update the ‘<password>’ text with a suitably strong password and update the filenames accordingly before issuing the above command.
The final .pfx file is now generated and can be used by your IdentityServer website to sign and validate security tokens.
Load a signing certificate
Now let’s look at how we can load a signing certificate from our code.
We need to retrieve the appropriate signing certificate from a certificate store and load it into memory so that IdentityServer can use it for signing security tokens.
Load code
We can implement a method that will allow the signing certificate we created in the previous section to be loaded both in development and production environments.
The method below will work when running on our local development machine and it will also work when we deploy the code to Azure. When running locally the certificate will be loaded from the Windows Certificate Store.
The signing certificate to load is based on the unique thumbprint of the certificate which is passed in via a parameter.
/// <summary>
/// Loads the signing certificate from the (Current User) Azure/Windows Certificate Store.
/// </summary>
/// <param name="thumbPrint">The thumbprint of the certificate to load</param>
/// <returns>The loaded certificate object</returns>
private X509Certificate2 LoadSigningCertificate(string thumbPrint)
{
    var store = new X509Store(StoreName.My, StoreLocation.CurrentUser);

    try
    {
        store.Open(OpenFlags.ReadOnly);

        X509Certificate2Collection certCollection = store.Certificates.Find(X509FindType.FindByThumbprint, thumbPrint, validOnly: false);

        if (certCollection == null || certCollection.Count == 0) throw new ConfigurationErrorsException("No certificate found containing the specified thumbprint.");

        return certCollection[0];
    }
    finally
    {
        store.Close();
    }
}
Let’s walk through what the above method is doing.
First of all, an instance of the X509Store class is created using the specified store and store location.
StoreName.My represents the store for personal certificates.
StoreLocation.CurrentUser represents the store used by the current user.
Note that it is important that the store and store location values are specified as above in order for the certificate loading logic to work when our app is running in Azure.
After creating the X509Store object, the store is opened in read-only mode (for safety and as a best practice).
Next, the Find method on the Certificates property of the X509Store object is used to look up the certificate by thumbprint.
Note that the validOnly flag is set to false since our certificate is self-signed. Also, note that self-signed certificates are perfectly valid for our use case as we are simply creating a public/private key pair for the purposes of signing security tokens. As long as we keep the private key safe we are good from a security point of view. This scenario should not be confused with trying to use self-signed SSL certificates to secure website traffic which is generally invalid since there needs to be a trust relationship between the client and the server.
An exception is thrown if a certificate with a matching thumbprint could not be found. Otherwise, the first certificate contained within the X509Certificate2Collection object is returned.
Note that if you are using IdentityServer4 and ASP.NET Core, you may want to change the ConfigurationErrorsException to another type of Exception if you don’t want to introduce a dependency on the System.Configuration.ConfigurationManager NuGet package.
Finally, the store is closed in the finally block as a best practice.
IdentityServer Options
IdentityServer is configured as middleware. If you are using IdentityServer3, within the Configuration method of your Startup class you’ll need code that is similar to the following.
var options = new IdentityServerOptions
{
    Factory            = factory,
    RequireSsl         = true,
    SigningCertificate = LoadSigningCertificate(thumbPrint),
    SiteName           = "My App Authentication"
};

app.UseIdentityServer(options);
One of the options that need to be configured before wiring up the IdentityServer middleware is the SigningCertificate property which is set by the LoadSigningCertificate method we implemented in the previous sub-section.
If you are using IdentityServer4 within an ASP.NET Core web app then you would instead pass the results of the LoadSigningCertificate method to the AddSigningCredential method as per the sample code below.
services.IdentityServer()
        .AddSigningCredential(LoadSigningCertificate(thumbPrint))
        .AddInMemoryApiScopes(Config.ApiScopes)
        .AddInMemoryClients(Config.Clients);
Note that in the above example I am using in-memory scopes and clients as per the IdentityServer sample docs for the sake of simplicity.
Regardless of your IdentityServer version, the thumbPrint variable will typically be loaded from your App Settings.
For example, for an ASP.NET application, you would use the ConfigurationManager class as follows to access settings via the AppSettings property.
string thumbPrint = ConfigurationManager.AppSettings["APP_SigningCertificateThumbprint"];
Note the use of the ‘APP_’ prefix. I’m a big fan of using a prefix like this for App Settings when I know my app is going to be deployed as an Azure App Service. The prefix helps to distinguish which settings are part of the web app, as opposed to settings for things like Application Insights or other special App Service settings. The prefix also helps to group all web app settings near the top of the settings list for convenience.
For additional help with configuring your IdentityServer website, be sure to check out the relevant parts of the official documentation for either IdentityServer3 or IdentityServer4.
Upload to Azure
As with most things in Azure, it is possible to upload the signing certificate either via the Azure portal or programmatically via an ARM template or the command line.
For the sake of simplicity, I’m going to cover how to upload the certificate via the portal.
Uploading
After logging into the Azure portal, navigate to the App Service that hosts your IdentityServer instance and click on the ‘TLS/SSL Settings’ section on the left-hand side of the page.
Now select the ‘Private Key Certificates (.pfx)’ tab group and click on the ‘Upload Certificate’ link.
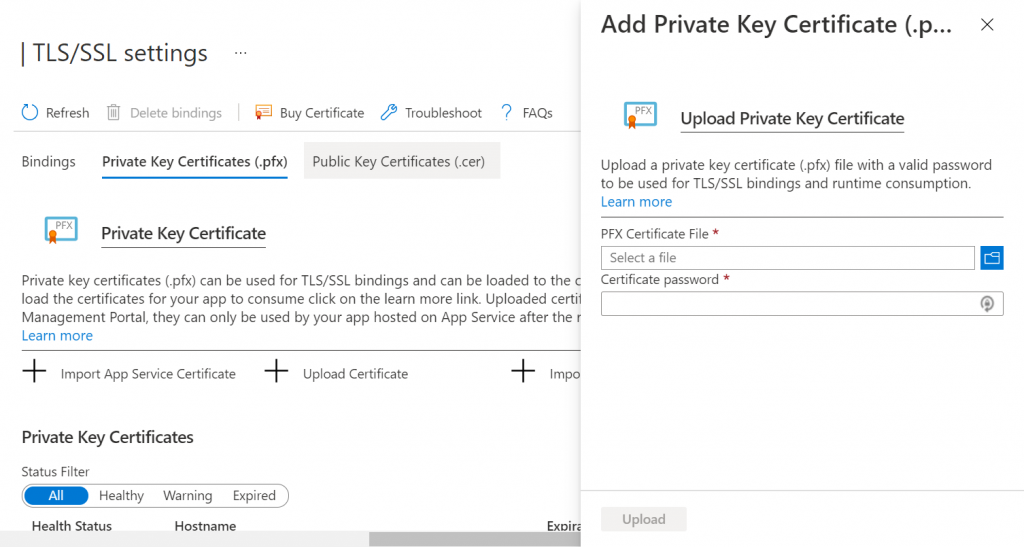
Use the folder browse button to navigate to the location of the .pfx file you created earlier and select it.
You’ll also need to specify the ‘Certificate password’.
Press the ‘Upload’ button to confirm the upload of the certificate to Azure.
Permissions
After uploading the certificate, you would be forgiven for thinking that your site will now load the signing certificate when it first launches and all will be well.
However, there’s something else you need to consider; permissions.
By default, Azure App Services do not allow “just any old certificate” to be loaded; you must configure your App Service to allow certificates. You can either specify that all uploaded certificates should be allowed, or that a specific certificate is permitted.
As a best practice, we should configure our site such that only the specific signing certificate that we have uploaded can be loaded by our App Service.
To do this, under the ‘Configuration’ section of your App Service, you’ll need to add a new Application Setting named ‘WEBSITE_LOAD_CERTIFICATES’ and provide a value that matches the thumbprint of your uploaded signing certificate.
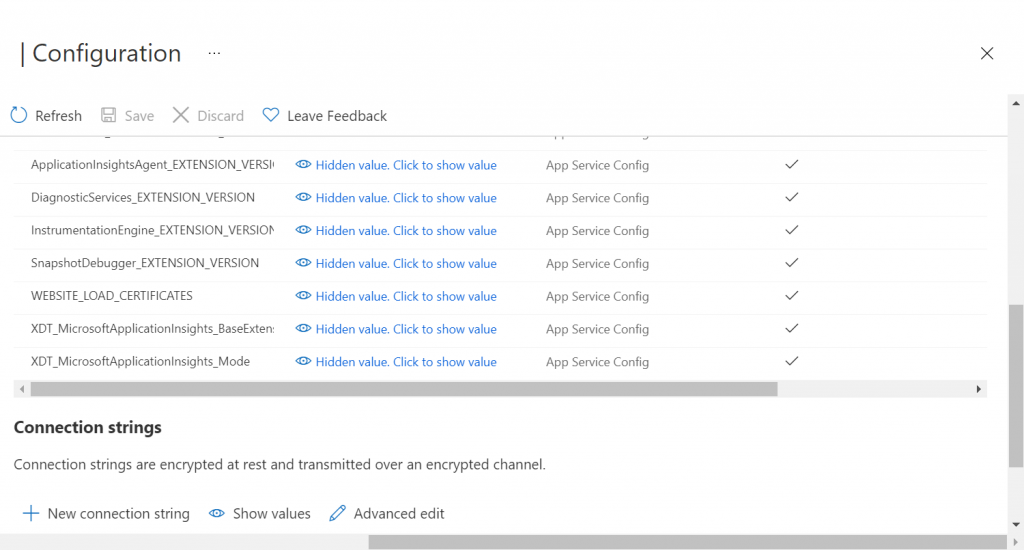
Note that at this point you should also make sure that you have set the correct value for the Application Setting that you are using to specify the thumbprint of the signing certificate to use (e.g. APP_SigningCertificateThumbprint). Don’t hard code the thumbprint value in the code.
Lastly, press the ‘Save’ button to apply the updates to your App Service configuration.
Please be aware that your App Service will be restarted after saving the configuration changes.
Now that your signing certificate has been uploaded and the configuration has been updated, your App Service should be able to successfully load and use the certificate.
Testing
After your signing certificate has been uploaded to Azure, make sure that you have already deployed the latest version of your application that includes the signing certificate loading code to Azure.
Sanity testing
The easiest way to verify that your signing certificate has been loaded successfully is to simply load your Auth website in a browser.
Providing that the IdentityServer welcome page is enabled (which is it by default) you’ll know that your App Service has started successfully and didn’t encounter any errors when loading the signing certificate.
If you don’t have the welcome page enabled, you can also append the following path to the base URL of your Auth website as an alternative verification method.
/.well-known/openid-configuration
This will display a JSON document containing lots of useful information about your IdentityServer configuration.
Request testing
At this point, it’s a good idea to try obtaining an actual security token from your website by using a tool such as Postman or curl. Below is an example curl command that you can adapt accordingly.
curl --location --request POST 'https://localhost:44350/connect/token' \
--header 'Content-Type: application/x-www-form-urlencoded' \
--data-urlencode 'grant_type=client_credentials' \
--data-urlencode 'client_id=myapp' \
--data-urlencode 'client_secret=**********' \
--data-urlencode 'scope=api.read'
Note that the bold areas in the above text need to be updated according to your environment and you may need to add additional parameters depending on your flow.
After retrieving the token you can use jwt.io to verify that you have a valid JWT security token and you can view the Header, Payload, and Signature parts of the token individually.
If you amend any aspect of your JWT token and try to use it for authorization with your API or web app, the token will be rejected since the signature will no longer be valid.
Local testing
Up to this point, I haven’t covered how to import the certificate into the Windows Certificate Store for local testing.
However, this process is quite straightforward via the certmgr.msc program that is part of Windows (right-click ‘Personal’ –> All Tasks –> Import… –> follow the Certificate Import Wizard steps).
Summary
In this article, I have explained what a signing certificate is used for and specifically how IdentityServer uses X.509 certificates to guarantee security token authenticity and integrity.
I’ve covered how to generate an X.509 certificate in a compatible format that works with IdentityServer using the MakeCert and Pvk2Pfx utilities.
I’ve demonstrated how to create a method that will load the signing certificate for both ASP.NET and ASP.NET Core web applications.
Lastly, I’ve shown how signing certificates can be uploaded to Azure via the Azure portal and how to set the appropriate permission settings to allow your web application to load the certificate.
Comments
seyhan bakır
Good article , thanks for sharing
April 26, 2022Jonathan Crozier
You are most welcome and thanks for the comment!
April 26, 2022Constantin Tica
Thanks, you helped me a lot
May 31, 2022Jonathan Crozier
That’s great to hear and thank you for the comment 🙂
May 31, 2022Matt
This is superb, thank you. However I believe there is one gap – when running the application I got the error “No signing credential is configured by the ‘IdentityServer:Key’ configuration section.”. This is because…
The default IdentityServer config section generated in appsettings.Development.json is:
“IdentityServer”: {
“Key”: {
“Type”: “Development”
}
}
When using a (Windows or Azure) key store this needs to be changed to:
“IdentityServer”: {
“Key”: {
“Type”: “Store”,
“StoreName”: “My”,
“StoreLocation”: “CurrentUser”,
“Name”: “CN=my-app-auth”
}
}
In the above ONLY the text “my-app-auth” needs to change. “Store”, “My” and “CurrentUser” are the correct values.
As for the rest, hugely appreciated.
June 11, 2022Matt
Some other hopefully helpful points!
For some reason with the Windows SDK installed (via the Visual Studio installer) although MakeCert was available from the regular Windows command line, when it came to run pvk2pfx the command line gave: “‘pvk2pfx.exe’ is not recognized as an internal or external command in command prompt”. I had to use the Developer command prompt in Visual Studio where pvk2pfx ran successfully. I did trying closing/reopening the Windows command prompt, but it still couldn’t find pvk2pfx.exe
Finally a mistake I made which may help others:
The app was finally working on Azure but running locally I got the error “X509 certificate does not have a private key”. This was because the Windows certmgr Import tool defaults to only showing cer files in a directory. I didn’t notice this, so had initially imported the cer file not the pfx. I deleted the key in certmgr and re-imported using the pfx file.
It’s helpful to know that when the key is added to the Windows certmgr, when viewing its details, the message “This certificate has an invalid digital signature” on the General and Certification Status tabs is normal. When you are investigating other problems, if you don’t know this you can think this is related to the problem.
June 11, 2022Jonathan Crozier
Hi Matt,
Great comments!
This information is sure to help out others with similar issues, so thank you for taking the time to share your solutions.
June 11, 2022