

As a Blazor developer, it is essential to have a solid understanding of the lifecycle events that take place from the moment a Blazor component is created until it is eventually torn down.
By gaining an understanding of the Blazor component lifecycle, you will be able to make your components more efficient and reduce the likelihood of bugs that are caused by code that is executing at the wrong stage of the lifecycle.
In this article, I will explain each of the fundamental lifecycle stages and walk through an example that allows us to see when each event occurs.
Component lifecycle
The Blazor component lifecycle can seem like it is somewhat complicated at first, but in fact, it is quite straightforward to understand once you get to grips with it.
A diagram always helps, so let’s take a look at the one below which illustrates the flow.
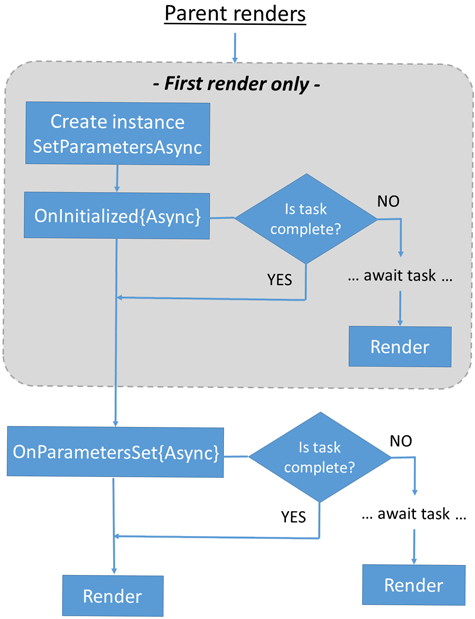
For the sake of simplicity, I recommend that you start by following the left side of the diagram from top to bottom and ignore SetParametersAsync and the asynchronous flow on the right side of the diagram for the moment.
So from top to bottom, the three main lifecycle stages are as follows.
- Initialisation (
OnInitialized{Async}) - Parameters Set (
OnParametersSet{Async}) - Render (
OnAfterRender{Async})
Let me explain each of these stages further in the following subsections.
Initialisation
When a Blazor component is first created and after the initial parameter values have been set via SetParametersAsync, the OnInitializedlifecycle method is called. The OnInitialized method can be thought of as being a bit like the constructor for the component (generally speaking it doesn’t make sense to have an actual class constructor in a Blazor component). However, unlike constructors, you should feel free to carry out any type of non-trivial initialisation work that is required, such as making an API or database request to fetch data for the component.
Having said that, the OnInitializedAsync method would be a better place for API and database requests which are usually asynchronous in nature. After OnInitialized has been called, the asynchronous version, OnInitializedAsync will be called. It is important to note that if the asynchronous code does not complete immediately, the component will be rendered again once the asynchronous work has been completed.
OnInitialized and OnInitializedAsync are the methods that you will most commonly need to override when you are creating your own components.
Parameters Set
The OnParametersSet lifecycle method is called after the component has been initialised following OnInitialized or OnInitializedAsync. OnParametersSet will also be called when a component parameter has changed after the initial render of the component.
OnParametersSet is most useful for reacting to changes to component parameters, allowing the component to apply any necessary updates to its internal state and/or the user interface.
After OnParametersSet has been called, the asynchronous version, OnParametersSetAsync will be called.
Render
After the component has finished rendering, the OnAfterRender method is called. This is a good place to do any JavaScript interop that may be required, as the DOM elements rendered by the component have been loaded at this point.
The OnAfterRender method features a firstRender parameter. The value of this parameter will be true the first time that the component has been rendered and false on each subsequent call. This can allow us to make sure that certain actions (such as calling some JavaScript code) are performed only once.
As per the previous lifecycle methods, after OnAfterRender has been called, the asynchronous version, OnAfterRenderAsync will be called.
Note that there is also the Dispose method which is called if the component implements the IDisposable interface. This will be covered later in the article.
Visualising the lifecycle
I believe that the best way to understand the Blazor component lifecycle is to see a visual indication of when the lifecycle events are occurring. Let’s set this up in the following subsections.
Note that this article assumes you are working from the default Blazor template project (see my Getting started with Blazor article) and are using Visual Studio. However, if your project or environment differs, you can still follow along and adjust the instructions according to your specific setup.
Sample component
The standard Blazor template comes with a SurveyPrompt component as standard and it is rendered as part of the main Index page which is displayed when you launch the application.
Below is the default content of the ‘SurveyPrompt.razor’ file which can be found within the ‘Shared’ folder of the Blazor WebAssembly project.
<div class="alert alert-secondary mt-4">
    <span class="oi oi-pencil me-2" aria-hidden="true"></span>
    <strong>@Title</strong>

    <span class="text-nowrap">
        Please take our
        <a target="_blank" class="font-weight-bold link-dark" href="https://go.microsoft.com/fwlink/?linkid=2186157">brief survey</a>
    </span>
    and tell us what you think.
</div>

@code {
    // Demonstrates how a parent component can supply parameters
    [Parameter]
    public string? Title { get; set; }
}
The above markup renders a grey Bootstrap alert component with an icon and a ‘title’ that is bound to the Title parameter defined within the @code section. Aside from this, some text and a link are rendered; nothing too special here.
An example of the rendered output of the component is displayed below for reference.

SurveyPrompt componentNow that we’ve seen what this component does and what it looks like when it has been rendered, let’s add some code to the component to help us to understand the lifecycle events that occur.
Lifecycle overrides
The updated contents of the ‘SurveyPrompt.razor’ file have been included below for reference. The markup is exactly the same as before, but there is now an @implements statement at the top of the file and some additional code within the @code section.
@implements IDisposable

<div class="alert alert-secondary mt-4">
    <span class="oi oi-pencil me-2" aria-hidden="true"></span>
    <strong>@Title</strong>

    <span class="text-nowrap">
        Please take our
        <a target="_blank" class="font-weight-bold link-dark" href="https://go.microsoft.com/fwlink/?linkid=2186157">brief survey</a>
    </span>
    and tell us what you think.
</div>

@code {
    // Demonstrates how a parent component can supply parameters
    [Parameter]
    public string? Title { get; set; }

    protected override void OnInitialized()
    {
        Console.WriteLine("{0}()", nameof(OnInitialized));

        base.OnInitialized();
    }

    protected override Task OnInitializedAsync()
    {
        Console.WriteLine("{0}()", nameof(OnInitializedAsync));

        return base.OnInitializedAsync();
    }

    protected override void OnParametersSet()
    {
        Console.WriteLine("{0}()", nameof(OnParametersSet));

        base.OnParametersSet();
    }

    protected override Task OnParametersSetAsync()
    {
        Console.WriteLine("{0}()", nameof(OnParametersSetAsync));

        return base.OnParametersSetAsync();
    }

    protected override void OnAfterRender(bool firstRender)
    {
        Console.WriteLine("{0}({1}: {2})",
            nameof(OnAfterRender),
            nameof(firstRender),
            firstRender.ToString().ToLower());

        base.OnAfterRender(firstRender);
    }

    protected override Task OnAfterRenderAsync(bool firstRender)
    {
        Console.WriteLine("{0}({1}: {2})",
            nameof(OnAfterRenderAsync),
            nameof(firstRender),
            firstRender.ToString().ToLower());

        return base.OnAfterRenderAsync(firstRender);
    }

    public void Dispose()
    {
        Console.WriteLine("{0}()", nameof(Dispose));
    }
}
In the above code, we are overriding the lifecycle methods that exist on the ComponentBase class that our Blazor component inherits from. In each method, some text is written to the browser Console to help us see when each lifecycle method is called. In the case of the OnAfterRender and OnAfterRenderAsync methods, the output is formatted to show the value of the firstRender parameter in a clear manner.
Rerenders
To understand the lifecycle events better, let’s make some changes to the Index page.
Below is the default content of the ‘Index.razor’ file which can be found within the ‘Pages’ folder of the default Blazor WebAssembly project.
@page "/"

<PageTitle>Index</PageTitle>

<h1>Hello, world!</h1>

Welcome to your new app.

<SurveyPrompt Title="How is Blazor working for you?" />
Let’s update this as follows.
@page "/"

<PageTitle>Index</PageTitle>

<h1>Hello, world!</h1>

Welcome to your new app.

<SurveyPrompt Title=@Title />

<button class="btn btn-primary" @onclick="UpdateTitle">Answer</button>

@code {
    public string Title { get; set; } = "How is Blazor working for you?";

    private int count = 1;

    private void UpdateTitle()
    {
        Title = $"Pretty good, thanks! ({count++})";
    }
}
In the updated version above, the Title parameter of the SurveyPrompt component is now bound to a Title property defined within the @code section.
A button has also been added which is wired up to call the UpdateTitle method when clicked. By using an incrementing count variable, the Title property that is bound to the Title parameter of the SurveyPrompt component will be updated to a new value each time the button is clicked, resulting in a rerender of the SurveyPrompt component.
Output
Now we are ready to see the output. At this point, run the application, either via F5 or Ctrl + F5 to try it out.
The above animation should give you a pretty good idea of how the lifecycle works in practice. You can see that when the component is first rendered, the lifecycle methods are called in the following order.
OnInitializedOnInitializedAsyncOnParametersSetOnParametersSetAsyncOnAfterRenderOnAfterRenderAsync
Each time the ‘Answer’ button is pressed, the OnParametersSet{Async} and OnAfterRender{Async} methods are both called. This makes sense since the parameter values have changed and the component therefore needs to render again to display the new values. Notice that the first time that OnAfterRender and OnAfterRenderAsync are called the firstRender parameter value is true.
Note that when asynchronous work takes place you may find that the order that the methods are called in will differ from what is shown above e.g. if there is some asynchronous work happening in OnInitializedAsync, you may find that OnAfterRender{Async} is called next, followed by OnParametersSet{Async} and OnAfterRender{Async} after the asynchronous work has been completed.
After navigating to the ‘Counter’ page, you can see that the Dispose method has been called. This signals the end of the component lifecycle.
Note that instead of the IDisposable interface it’s also possible to implement the IAsyncDisposable interface which requires a DisposeAsync method to be defined.
Before wrapping up, please note that there are several aspects of the component lifecycle that I haven’t covered in this article, such as the effect that calling the StateHasChanged method has on the lifecycle events; that will be a topic for another day. However, the above content should give you a pretty good understanding of the fundamentals of the Blazor component lifecycle.
Summary
In this article, I have explained the key stages of the Blazor component lifecycle.
I’ve shown how you can set up Console logging within a sample component, which helps to visualise when each lifecycle event occurs. I then finished up by displaying and discussing the output.
With an understanding of the Blazor component lifecycle, you will be able to write better components and thereby improve the quality of the applications you are developing.
Comments