If you’re seeking to get up and running quickly with PowerShell and you aren’t sure where to start, you’ve come to the right place!
PowerShell is an invaluable scripting tool for both system administrators and developers alike. Getting up to speed with it will make for a very useful addition to your toolkit.
In this article, I cover the key things you need to know about PowerShell to start being productive with it as soon as possible, including how to learn as you go along without even leaving the terminal.
PowerShell introduction
In the interests of getting started quickly, I will keep this introduction to PowerShell fairly brief.
PowerShell, as per its name, is a powerful shell that leverages the capabilities of .NET to provide a unique command-line experience.
While many other command-line tools return their output as text, everything in PowerShell is an object. This means that the results of one PowerShell command can be ‘piped’ to another to build up complex chains of commands. This is a very powerful concept and one that makes PowerShell extremely versatile.
PowerShell has evolved over time and there’s even a cross-platform version called ‘PowerShell Core’ which runs on macOS and Linux as well as Windows machines.
If you want to use PowerShell Core rather than the standard PowerShell which comes with Windows, check out the PowerShell Core section in my Windows Terminal blog post.
Before moving on, please note that most PowerShell commands are referred to as ‘cmdlets’, so where possible this is how I will refer to individual commands in the following sections. I’ll use the term ‘command’ to refer to a line of script code instead.
Getting started
To get started, let’s open a PowerShell terminal.
PowerShell has been integrated into Windows ever since Windows 7 and Windows Server 2008 R2 were released. Therefore if you’re running Windows you shouldn’t need to install anything in order to follow along.
Launch the terminal
The quickest way to launch PowerShell on Windows is to open the ‘Run’ dialog (WIN + R) then type the following command and press the Enter/Return key.
powershell
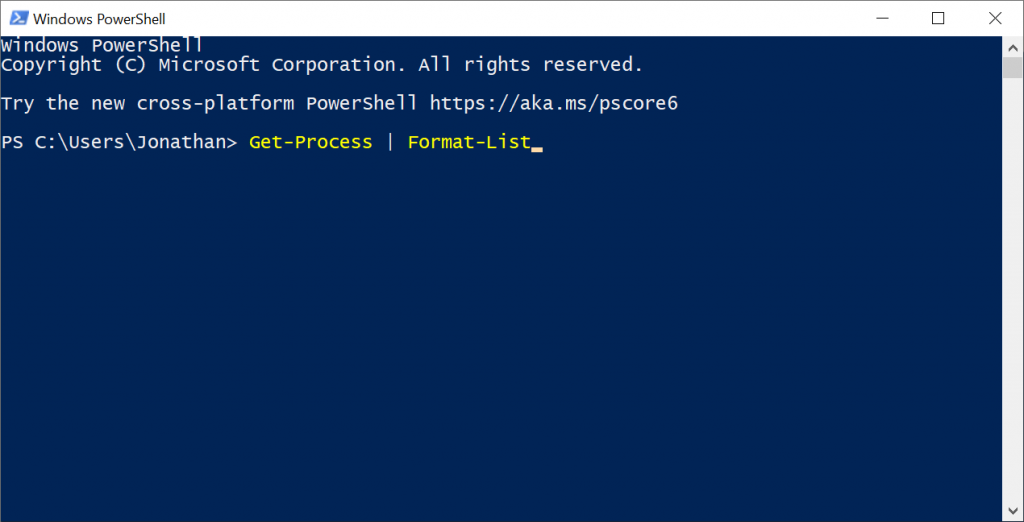
This should open up a new PowerShell window in the standard Console Host.

The terminal has a blue background by default to help differentiate it from a standard Command Prompt window.
An example command
Now for a quick example, as per the command shown in the screenshot above, type the following and then press the Enter/Return key.
Get-Process | Format-List
This command returns all currently running processes and outputs the results in a list format.
The ‘pipe’ character is used to pipe the collection of process objects which are returned by the Get-Process cmdlet to the Format-List cmdlet for display on the screen.
Most PowerShell cmdlets follow a familiar Verb-Noun convention e.g. Get-Process, Set-Process, Write-Host etc. This makes it possible to anticipate what cmdlets are likely to be available and speeds up the learning process.
Variables
PowerShell features variables, which are essential for full scripts but are also very useful when working in the terminal.
Variables work really well when operating via the terminal since you can use them in lots of different scenarios. This includes cases where you are executing regular ‘DOS’ commands.
Here’s a simple example.
$ipAddress = "192.168.1.1"
ping $ipAddress
Variables must begin with a dollar sign.
Once declared and initialised, a variable that is set within a terminal session can be used again when issuing further commands.
Getting help
Before we explore any further example commands let’s learn how to get help directly from the PowerShell terminal.
I believe that learning how to use the built-in help system greatly speeds up the process of learning PowerShell and creates a solid foundation to build upon.
As a PowerShell script creator, there are three help cmdlets that you need to know about, as follows.
Get-HelpGet-CommandGet-Member
With the above cmdlets at your disposal, you can find out almost everything you need to know regarding what is possible with PowerShell and how to use it.
Let’s cover each of these cmdlets in more detail in the following sub-sections.
Get-Help
If you are following along, execute the Get-Help cmdlet within a PowerShell session. This will output lots of information about the cmdlet, including examples.
One of the examples shown is as follows.
Get-Help Get-Process
This command will display help information regarding the Get-Process cmdlet.
You will notice, however, that only partial help is displayed. This is because PowerShell doesn’t include full offline help by default.
To correct this you can install offline help files directly from the PowerShell terminal.
Relaunch PowerShell as Administrator and then issue the following command.
Update-Help
This command will download all of the available help content for offline use. It will take a few minutes to run.
After the help content has finished downloading try reissuing the earlier command, as follows.
Get-Help Get-Process
After running the command again you should see that there is a lot more help content available than before.
The REMARKS section suggests running the following command.
Get-Help Get-Process -examples
This command outputs a range of examples.
One of the examples shown is as follows.
Get-Process | Where-Object {$_.WorkingSet -gt 20000000}
This command ‘pipes’ the output of the Get-Process cmdlet to the Where-Object cmdlet which then filters the results to only the processes which have a working set greater than 20 MB.
You should find the examples provided by the help system particularly useful as you continue to learn PowerShell.
Get-Command
Next up is Get-Command.
If you try running Get-Command on its own, you’ll be waiting for a while as PowerShell proceeds to list every single available alias, function and cmdlet available on your system!
Get-Command is a very useful cmdlet for finding out what PowerShell features you have available.
However, rather than displaying a full list, it is more often useful to apply a filter.
Get-Command | Where-Object {$_.Name -like "*process*"}
The above command filters the results from Get-Command to only show ‘commands’ with names that contain the text ‘process’. After issuing this command we can see that in addition to the Get-Process cmdlet which we’ve already come across there are a number of other process-related cmdlets such as Start-Process.
Now that we know Start-Process exists we can use the Get-Help cmdlet to find out more about it and/or include example commands, as follows.
Get-Help Start-Process -examples
After reviewing the examples we can very quickly establish how to launch Notepad in a maximised state and wait for it to close, as follows.
Start-Process -FilePath "notepad" -Wait -WindowStyle Maximized
That’s pretty neat!
Get-Member
Last but not least, there is the Get-Member cmdlet.
The basic usage of the cmdlet is as follows.
Get-Process | Get-Member
After issuing the above command, details regarding the type of object returned by the Get-Process cmdlet will be displayed, along with a list of all of the object properties.
This allows us to work out what properties we can access for display, filtering or other purposes.
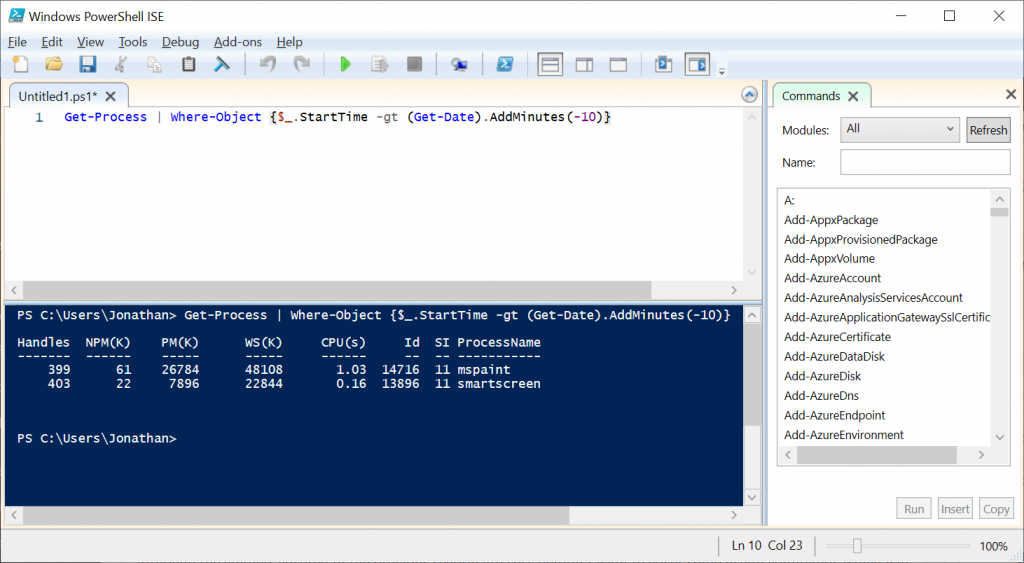
As an example, we can see that there is StartTime property that is of type DateTime. Using this information we can filter processes that have been started within the last 10 minutes as follows.
Get-Process | Where-Object {$_.StartTime -gt (Get-Date).AddMinutes(-10)}
It’s very helpful to be able to access all of this information without having to leave the terminal.
By using Get-Help, Get-Command and Get-Member together you can very quickly garner the majority of the information required to accomplish what you need to do without having to search for help online.
Useful commands
Although the help cmdlets covered in the previous section are great and allow you to self-learn quickly, I want to cover some useful commands which should give you a headstart as you begin your PowerShell journey.
Write-Host
When learning any new language, it can be very useful as you are starting out to log debug messages to the console. This helps with determining the value of variables and understanding the flow of execution.
If you need to output something to the console from PowerShell you can use the Write-Host cmdlet.
Write-Host 'Processing...'
The above command will simply output the text ‘Processing…’ to the terminal.
Write-Host can be very useful for debugging scripts and you can use it in conjunction with PowerShell variables.
Note that the Get-Variable cmdlet can be used to return a list of all available PowerShell variables for reference.
Here’s an example of using a PowerShell variable.
Write-Host "Home directory: $HOME"
The above command outputs the Home directory of the currently logged-in user.
PowerShell string interpolation allows variables to be included inside strings that are surrounded by double quotes. If a string is surrounded by single quotes the string will be interpreted literally.
Note that there is also a Write-Output cmdlet that is very similar to Write-Host but allows the output to be passed along the pipeline to another cmdlet for further processing.
Get-Service
The Get-Service cmdlet provides information regarding installed services.
Whenever you run Get-Service without any parameters, the basic details of all services which are installed on your machine will be listed. This includes both Running and Stopped services.
Building on our previous knowledge, we can issue a command like the following.
Get-Service | Where-Object {$_.Name -like "*audio*"}
This command will filter the list of services to only those which have a name containing the text ‘audio’ to see all audio-related services.
We can put more of our prior knowledge into practice by running Get-Service through the Get-Member cmdlet, as follows.
Get-Service | Get-Member
After reviewing the output of the above command we can see that Get-Service returns ServiceController objects which have a Stop method.
This means that we could issue the following command to stop all audio-related services.
Get-Service | Where-Object {$_.Name -like "*audio*"} | ForEach-Object {$_.Stop()}
The above command gets all of the audio-related services and then pipes each filtered service object to the Foreach-Object cmdlet which calls the Stop method on each one.
Note that in PowerShell the ‘dollar underscore’ syntax is used to represent the current object within a loop.
There is also a Start-Service cmdlet. As per what we did earlier, the Get-Command cmdlet can be used to find other service-related cmdlets.
Get-EventLog
In addition to querying services, we can also inspect the Event Log of a machine.
Get-EventLog -LogName System -Newest 100
The above command gets System event logs and restricts the results which are returned to the 100 most recently logged entries.
There are a number of other optional parameters which we can pass to Get-EventLog to filter the list further e.g. we can use the -EntryType parameter to filter on Warnings, Errors etc.
You can use the Get-Help cmdlet to discover the full list of available parameters.
Out-GridView
PowerShell features a number of cmdlets such as Format-Table and Format-List which output data in a specific format.
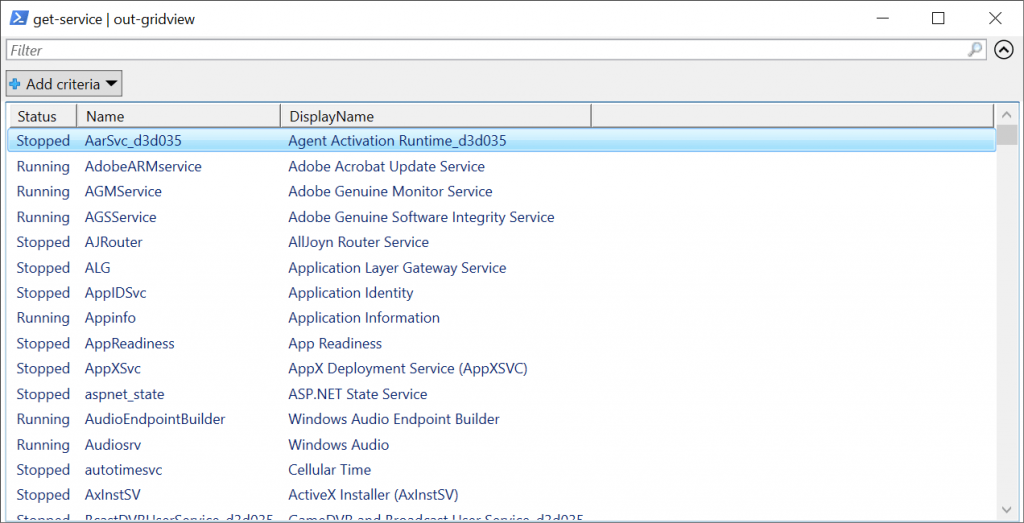
One of my personal favourites is the Out-GridView cmdlet which outputs data to an interactive grid. The grid includes some really useful features such as filtering and sorting.
We can easily pipe the results of a cmdlet to Out-GridView for display e.g. the results of Get-EventLog or Get-Service from the previous sub-sections.
Get-Service | Out-GridView
Executing the above command results in a window similar to the following appearing on the screen.

Once you have the data filtered and sorted to your liking you can copy and paste selected rows from the grid to a spreadsheet or another data source for further processing.
Get-PSDrive
A very interesting feature of PowerShell is its ‘drive’ abstraction whereby things like the Certificate Store and Registry can be treated like filesystem drives and can be navigated as such.
If you run the Get-PSDrive cmdlet, the table which is returned will list several drive options including HKCU which allows us to interact with the Current User area of the Registry.
We can use the Set-Location cmdlet to connect to the Registry.
Set-Location HKCU:
Now type the following to list the contents of the Registry within the terminal.
dir
Pretty cool, right?
You can use other directory-style commands such as cd to change ‘directory’ within the Registry.
Get-WmiObject
You can interact with Windows Management Instrumentation using the Get-WmiObject cmdlet.
Get-WmiObject Win32_PhysicalMemory
The above command returns information regarding the memory which is installed on the current machine.
Here are a couple of additional examples.
Get-WmiObject Win32_Bios
The above command shows BIOS information including the Manufacturer and Version.
Get-WmiObject -Query "select * from win32_service where name='WinRM'" |
Format-List -Property PSComputerName, Name, ExitCode, Name, ProcessID, StartMode, State, Status
The above command is a little bit more complex. It runs an arbitrary WMI query, formats the results as a list, and uses the ‘Property’ parameter to specify the object properties to return.
Get-History
Whenever you’re working with a PowerShell terminal it’s often useful to see a history of the commands you have been running. You can do this using the Get-History cmdlet.
Running Get-History will output the ‘Id’ and ‘CommandLine’ of each command which has been issued in the current session.
If you need to re-execute a particular command you can do this using the Invoke-History cmdlet.
Invoke-History 7
The above command will execute command ID 7 from the history list.
New-Object
PowerShell is built around the .NET Framework which means that we have access to the full BCL (Base Class Library), just as we do with other .NET languages such as C# and F#.
The New-Object cmdlet allows us to create an object instance of any .NET class.
$version = New-Object -TypeName System.Version -ArgumentList "1.2.3.4"
Write-Host $version
The New-Object cmdlet also allows COM objects to be created via the -COMObject parameter.
Going further
After getting familiar with some of the most commonly used PowerShell cmdlets the next thing you’ll typically want to do is to put a series of commands together into a script that can automate a process for you.
ISE
As well as the PowerShell command-line interface, Windows comes with an Integrated Scripting Environment, the PowerShell ISE.
To launch the ISE open the ‘Run’ dialog (WIN + R) and type the following command, then press the Enter/Return key.
powershell_ise
This will open a new PowerShell ISE window, which looks like the image shown below.

The PowerShell ISE is a fully-featured scripting environment with Intellisense and debugging capabilities.
With the ISE you can very quickly create a script, run it, test it, and save it for future use.
PowerShell script files are saved with the .ps1 extension.
You can learn more about the PowerShell ISE in the Microsoft Docs.
Execution Policies
When you try to run a saved PowerShell script file for the first time on your machine you will get an error message similar to the following.
File C:\Users\Jonathan\Desktop\Get Recent Processes.ps1 cannot be loaded. The file C:\Users\Jonathan\Desktop\Get Recent
Processes.ps1 is not digitally signed. You cannot run this script on the current system. For more information about running
scripts and setting execution policy, see about_Execution_Policies at https:/go.microsoft.com/fwlink/?LinkID=135170.
+ CategoryInfo : SecurityError: (:) [], ParentContainsErrorRecordException
+ FullyQualifiedErrorId : UnauthorizedAccess
This is by design. Windows does not allow un-signed PowerShell scripts to be run by default for security reasons.
To allow a locally created script to run, execute the following command via an elevated PowerShell terminal.
Set-ExecutionPolicy RemoteSigned
After executing the above command an Execution Policy Change warning will appear which you will need to acknowledge in order to proceed.
The ‘RemoteSigned’ execution policy is the next safest policy after the default ‘Restricted’ policy.
You can find out more about execution policies in the Microsoft Docs.
Remoting
Another great feature of PowerShell is its ability to execute commands remotely on other machines.
There are several options for remoting with PowerShell.
The most basic option allows a command to be executed on a single remote machine via the -ComputerName parameter which many cmdlets support, including the Get-Service cmdlet.
Get-Service -ComputerName machine-01
This is a quick way to get started with remoting, providing remote execution has been enabled by running the Enable-PSRemoting cmdlet via an elevated PowerShell terminal on the machine you are trying to connect to.
One of the most powerful remoting options is enabled by the New-PSSession cmdlet.
$session = New-PSSession -ComputerName machine-01, machine-02
The above command sets up a persistent connection to two separate machines on the network and stores the connection details in the $session variable.
The $session variable can then be passed to the Invoke-Command cmdlet along with a script block to execute.
Invoke-Command -Session $session {Get-NetIPAddress}
In addition to script blocks, you can also execute script files using Invoke-Command, as follows.
Invoke-Command -Session $session -FilePath C:\Scripts\LogIPAddress.ps1
This command will execute the ‘LogIPAddress.ps1’ script file on the machines which we are connected to via the session.
Further reading
If you are seeking to further your understanding of PowerShell and are looking for a practical guide on how to accomplish a wide range of real-world tasks, I highly recommend the PowerShell Cookbook by Lee Holmes.
The PowerShell Cookbook offers a solid introduction to PowerShell fundamentals and covers a large number of problems and solutions along with the full source code for each ‘recipe’ that is covered. As you go through the book, you’ll be amazed at how much you can achieve with PowerShell. You’ll see how PowerShell can interact with practically every aspect of the Windows operating system, automating repetitive processes and saving you valuable time.
Knowing how to make practical use of PowerShell is a highly desirable skill to have in your portfolio and I encourage you to go forth and master it!
Summary
In summary, we have looked at the essential help cmdlets which will allow you to quickly get up to speed with the capabilities of PowerShell.
We’ve also covered a number of commands which are useful to know about when getting started with PowerShell.
Lastly, we’ve briefly looked at some of the more advanced features of PowerShell, including its script editor and remoting capabilities.
I trust that you found this article helpful in getting you up to speed quickly with PowerShell!


Comments