

Windows Services offer a robust mechanism for hosting long-running background applications on Windows devices. These services are usually configured to start with the operating system and can be stopped and started on demand. They are ideal for processing background tasks as they do not show a user interface and therefore do not interfere with what the user is doing.
In the past, Windows Services could be developed using the .NET Framework by creating a class that inherits from the ServiceBase class. These services could then be installed via the InstallUtil.exe (Installer Tool).
Since the advent of .NET Core, Windows Services are now developed by creating a ‘Worker Service’ class that inherits from the BackgroundService class. The project containing the Worker Service is then configured to run as a Windows Service via the Microsoft.Extensions.Hosting.WindowsServices NuGet package. The sc command-line program can be used to install services that are developed in this new way.
In this article, I will walk you through the process of creating a Worker Service project and show you how to wire this up to run as a Windows Service.
Creating a Worker Service project
We need to create a Worker Service project before we can get into wiring an application up to run as a Windows Service.
Prerequisites
Before we begin, make sure you have installed Visual Studio. I will be using Visual Studio 2022 and .NET 6.0.
You will need to have selected the ‘.NET desktop development’ workload within the Visual Studio Installer interface to set up the necessary project templates.
This article assumes that you are running a modern Windows operating system such as Windows 10/11.
Project creation
To get started, open Visual Studio and wait for the launch window to load. From the launch window, you will have the option to open an existing project or create a new one, as shown below.
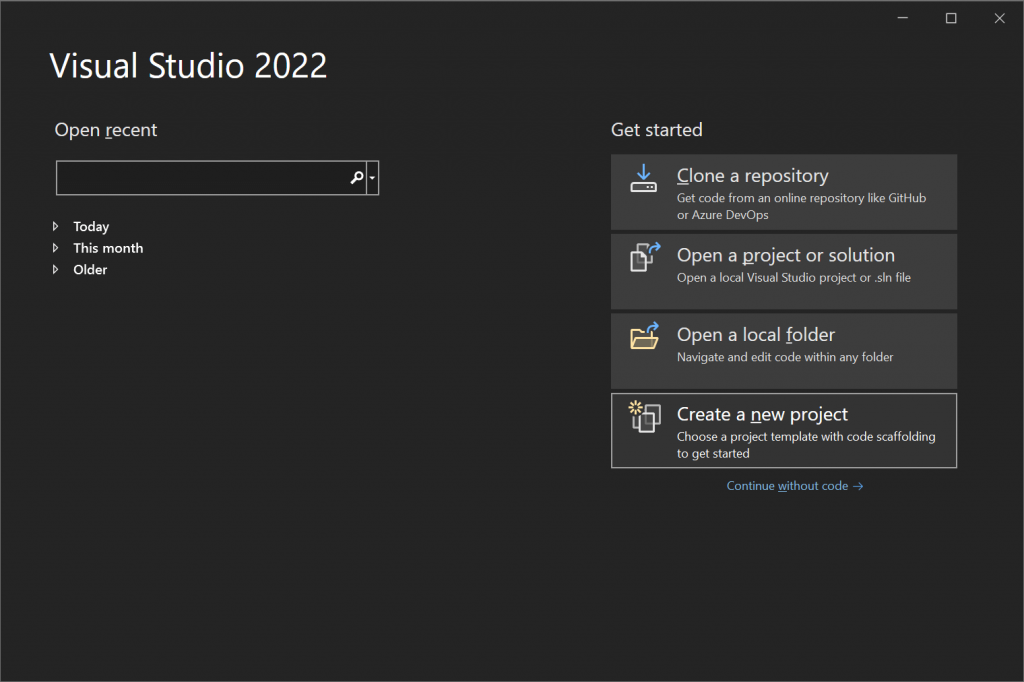
From the launch window, press the ‘Create a new project’ button to load the available project templates.
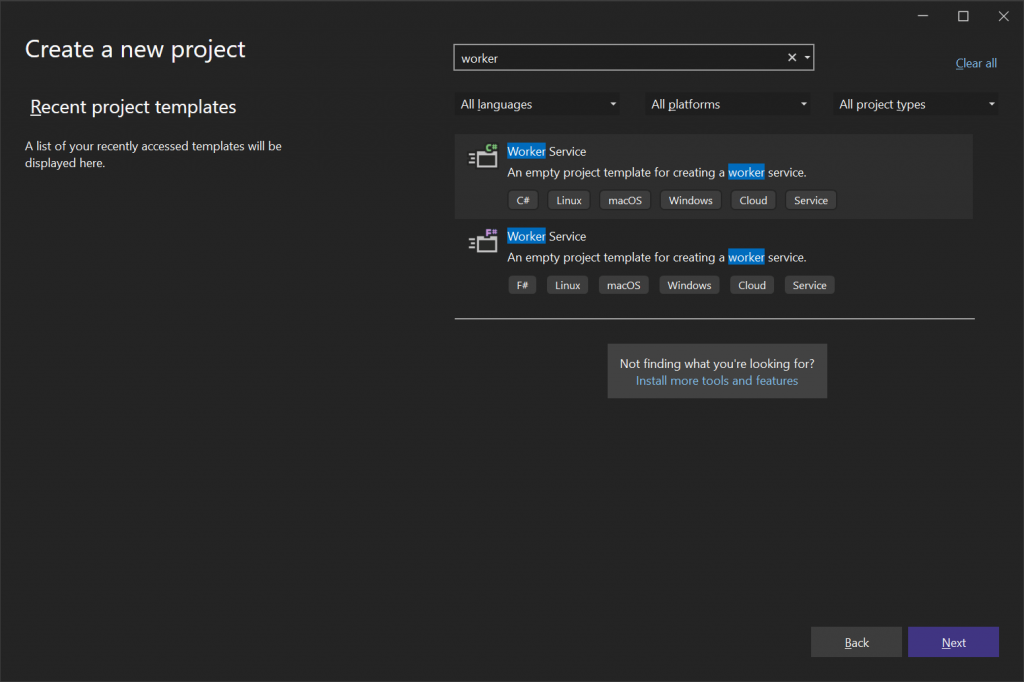
On the ‘Create a new project’ page, type the text ‘worker’ into the search control and then select the C# ‘Worker Service’ item from the list. Press the ‘Next’ button to proceed to the next step.
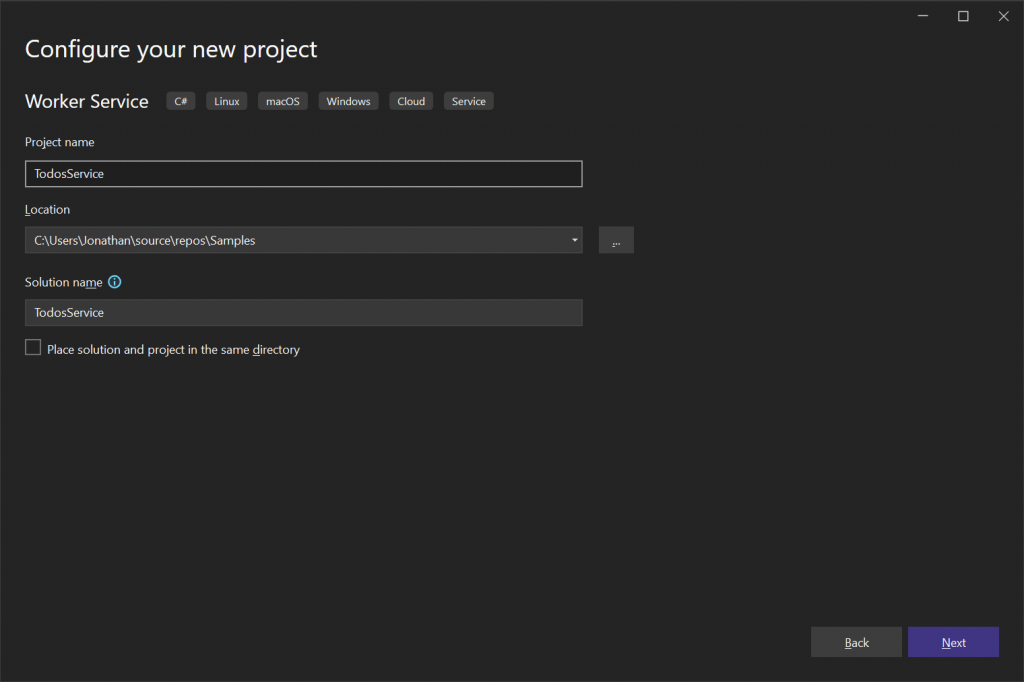
On the ‘Configure your new project’ page, enter a sensible name for the project. I’ve chosen the name ‘TodosService’ for the purposes of this walkthrough. Press the ‘Next’ button to proceed to the next step.
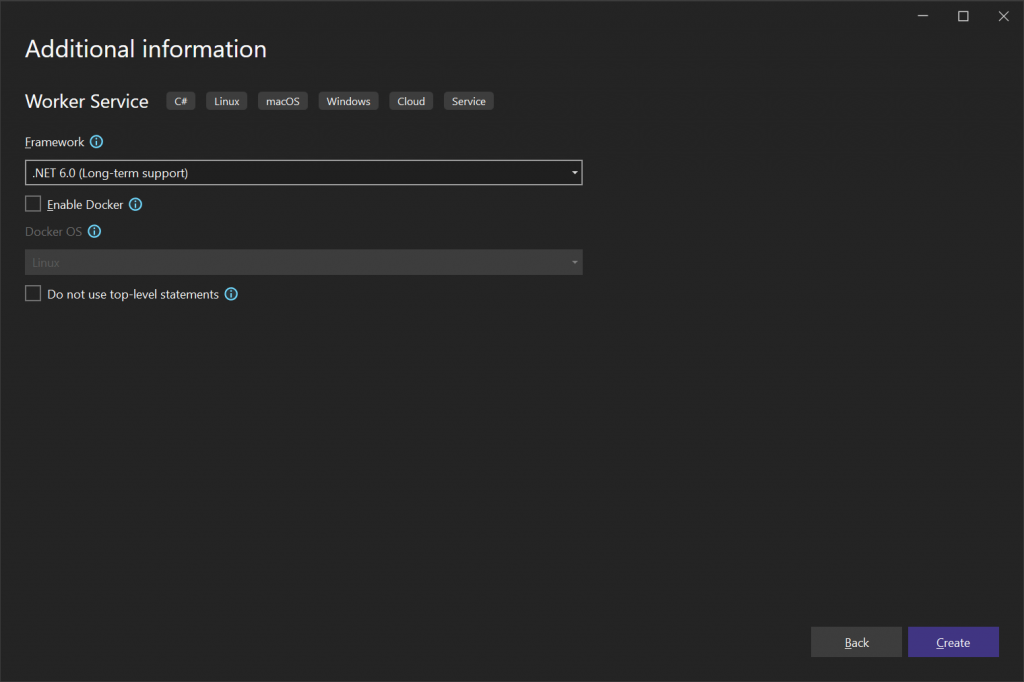
On the ‘Additional information’ page, I recommend that you leave the default values and press the ‘Create’ button to complete the setup of the new project.
Default Worker Service template
Now that the project has been created from the Worker Service template, let’s explore the main files from the default project that has been generated.
Program file
Aside from ‘appsettings.json‘ and ‘appsettings.Development.json’, there are two C# files contained within the project; namely ‘Program.cs’ and ‘Worker.cs’.
The content of the generated ‘Program.cs’ file is listed below for reference.
using TodosService;

IHost host = Host.CreateDefaultBuilder(args)
    .ConfigureServices(services =>
    {
        services.AddHostedService<Worker>();
    })
    .Build();

await host.RunAsync();
As this is a .NET 6.0 project, it can avail of top-level statements, meaning that there is no visible class definition and no Main method.
The static Host.CreateDefaultBuilder method call is used to set up an application host with sensible defaults for things like configuration and logging.
The ConfigureServices method is used to add services to the built-in dependency injection container. The AddHostedService method is an extension method on the IServiceCollection interface that adds the specified IHostedService to the container as a singleton.
The Build method initialises and returns a Host object.
Finally, the RunAsync method is called to run the application.
Worker class
So what happens after the RunAsync method is called?
This is where the Worker class comes in. Since the Worker class has been registered as a hosted service, its ExecuteAsync method will be called automatically after the host starts running. When debugging, the project will run as a Console application.
The Worker class code is listed below for reference.
namespace TodosService
{
    public class Worker : BackgroundService
    {
        private readonly ILogger<Worker> _logger;

        public Worker(ILogger<Worker> logger)
        {
            _logger = logger;
        }

        protected override async Task ExecuteAsync(CancellationToken stoppingToken)
        {
            while (!stoppingToken.IsCancellationRequested)
            {
                _logger.LogInformation("Worker running at: {time}", DateTimeOffset.Now);
                await Task.Delay(1000, stoppingToken);
            }
        }
    }
}
The Worker class inherits from the BackgroundService class, which in turn implements the IHostedService interface.
The Worker class constructor accepts an instance of ILogger which will be automatically injected from the dependency injection container after the host starts running.
As stated previously, the ExecuteAsync method will be called automatically after the host starts. The method body contains a while loop that will continue executing until cancellation is requested via the CancellationToken which is automatically passed into the method as an argument.
The code in the default project code simply logs an informational message and then calls Task.Delay with a one-second delay value before proceeding to the next iteration of the loop.
Windows Service hosting
Now that we’ve reviewed the default project template code, let’s look at how we can configure the project to be hosted as a Windows Service. To do this, we’ll need to update and install some NuGet packages.
The default project comes with a specific version of the Microsoft.Extensions.Hosting NuGet package. You’ll need to make sure that this package is up to date before proceeding further.
You’ll then need to install the latest stable version of the Microsoft.Extensions.Hosting.WindowsServices NuGet package.
Next, update the contents of the ‘Program.cs’ file to include a call to the UseWindowsService extension method as shown in the following code listing.
using TodosService;

// Initialise the hosting environment.
IHost host = Host.CreateDefaultBuilder(args)
    .UseWindowsService(options =>
    {
        // Configure the Windows Service Name.
        options.ServiceName = "TodosService";
    })
    .ConfigureServices(services =>
    {
        // Register the primary worker service.
        services.AddHostedService<Worker>();

        // Register other services here...
    })
    .Build();

// Run the application.
await host.RunAsync();
The UseWindowsService method wires up the code that is necessary for the application to run as a Windows Service. Within the body of the action that is used to configure the WindowsServiceLifetimeOptions, the name that should be assigned to the Windows Service when it is installed is set.
Aside from installation, that’s all that is required to run the application as a Windows Service!
BackgroundService methods
Although we’ve already done everything that is needed to run our application as a Windows Service, let’s update the default ExecuteAsync method implementation and look at some of the other lifetime methods from the BackgroundService class that we can override.
namespace TodosService
{
    /// <summary>
    /// The main Worker Service.
    /// </summary>
    public class Worker : BackgroundService
    {
        #region Readonlys

        private readonly ILogger<Worker> _logger;

        #endregion

        #region Constructor

        /// <summary>
        /// Constructor.
        /// </summary>
        /// <param name="logger"><see cref="ILogger"/></param>
        public Worker(ILogger<Worker> logger)
        {
            _logger = logger;
        }

        #endregion

        #region Methods

        /// <summary>
        /// Executes when the service has started.
        /// </summary>
        /// <param name="stoppingToken"><see cref="CancellationToken"/></param>
        /// <returns><see cref="Task"/></returns>
        protected override async Task ExecuteAsync(CancellationToken stoppingToken)
        {
            try
            {
                _logger.LogInformation("** SERVICE STARTED **");

                var httpClient = new HttpClient();

                int id = 1;

                while (!stoppingToken.IsCancellationRequested)
                {
                    _logger.LogInformation("Fetching todo {id} of 200...", id);

                    var todosJson = await httpClient.GetStringAsync(
                        $"https://jsonplaceholder.typicode.com/todos/{id++}");

                    _logger.LogInformation(todosJson);

                    if (id > 200)
                    {
                        id = 1;
                    }

                    await Task.Delay(1000, stoppingToken);
                }
            }
            finally
            {
                _logger.LogInformation("** SERVICE STOPPED **");
            }
        }

        /// <summary>
        /// Executes when the service is ready to start.
        /// </summary>
        /// <param name="cancellationToken"><see cref="CancellationToken"/></param>
        /// <returns><see cref="Task"/></returns>
        public override Task StartAsync(CancellationToken cancellationToken)
        {
            _logger.LogInformation("Starting service");

            return base.StartAsync(cancellationToken);
        }

        /// <summary>
        /// Executes when the service is performing a graceful shutdown.
        /// </summary>
        /// <param name="cancellationToken"><see cref="CancellationToken"/></param>
        /// <returns><see cref="Task"/></returns>
        public override Task StopAsync(CancellationToken cancellationToken)
        {
            _logger.LogInformation("Stopping service");

            return base.StopAsync(cancellationToken);
        }

        #endregion
    }
}
In the above code, the Worker class has been updated with a new implementation of the ExecuteAsync method and the StartAsync and StopAsync methods have been overridden.
The StartAsync method is called when the application host is ready to start, whereas the StopAsync method is called when the application host is performing a graceful shutdown. It isn’t necessary to override either of these methods, but I find it helpful to log that the methods are being called.
Within the ExecuteAsync method, a HttpClient is used to fetch and display the JSON output of HTTP requests to the JSONPlaceholder API using the GetStringAsync method. The ‘todos’ endpoint returns up to 200 todo records, so there is logic to reset the id variable back to 1 after the limit of 200 has been reached.
Of course, you can implement whatever logic you like within the ExecuteAsync method, and you don’t necessarily need to have a while loop. For example, you could instead have code that opens a gRPC channel and awaits streamed messages from a gRPC server, or you could kick off a background timer that performs work on a separate thread.
Windows Service installation
For Windows Services that are developed using the .NET Framework, the InstallUtil.exe (Installer Tool) can be used for installation purposes.
However, for .NET Core Worker Services that are intended to run as Windows Services, we need to use the standard sc command-line program instead.
After you have published your Worker Service project to a folder, you can register it as a Windows Service using an sc command that is similar to the following.
sc create TodosService binPath= "<path_to_publish_directory>\TodosService.exe" DisplayName= "Todos Service" obj= LocalService start= auto
The above command will register a Windows Service named ‘TodosService’, with the ‘binPath’ pointing to the main program executable file of the published Worker Service project.
The ‘DisplayName’ parameter is used to set the Name that will be displayed within the Windows Services Manager.
The ‘obj’ parameter sets the user account that the service should run as. This could be set to ‘LocalService’, ‘NetworkService’, or ‘LocalSystem’ depending on the required permission level and security requirements.
The ‘start’ parameter is used to configure the Startup Type for the service.
Note that the spaces between the equals (=) and double-quote (“) characters is intentional as they allow the above command to be compatible with both modern Windows 10/11 operating systems as well as older versions such as Windows 7 which require the spaces.
If you want to configure the Description that appears within the Windows Services Manager, this needs to be configured using a separate command, as follows.
sc description TodosService "Fetches Todo items in a continuous loop."
The above command sets an appropriate Description for the Windows Service named ‘TodosService’.
Summary
In this article, I provided step-by-step instructions on how to create a .NET Core Worker Service project and I walked through the code that is included in the default Worker Service template project.
I then explained how to configure the Worker Service project to run as a Windows Service and updated the default implementation to provide you with some ideas on what you can use Windows Services for. I also made you aware of the additional BackgroundService lifetime methods that can be overridden.
Finally, I included examples of how to register your application as a Windows Service using the sc command-line program and how to configure common Windows Service attributes such as Display Name, Startup Type, and Description.
Comments
Ed Holguin
Hello Jonathan! Thank you for the great and simple write up on this. I followed everything just fine but I’m stumped when installing. I’m getting an error “The account name is invalid or does not exist, or the password is invalid for the account name specified.” Is there something that needs to be done for “LocalService” to work correctly? Thanks in advance for any help you can provide.
July 25, 2023Jonathan Crozier
Hi Ed,
Thanks for the comment!
What operating system are you trying to install the Windows Service on?
Try updating the ‘obj’ parameter as follows.
July 25, 2023obj= "NT AUTHORITY\LocalService"Dave
Thank you Jonathan, After reading and trying articles on windows service in .Net for over 2 hours. Your article is the first that worked and explained what I was missing.
April 18, 2024Jonathan Crozier
That’s great, Dave! I’m very glad it helped you out 🙂
April 18, 2024Lou
I am getting an error on this line, saying IHostBuilder does not contain a definition for UseWondowsService
IHost host = Host.CreateDefaultBuilder(args).UseWindowsService(options =>
I have Microsoft.Extensions.Hosting 8.0.1
November 1, 2024.Net 8, 64 bit.
Lou
Please disregard my previous comment.
November 1, 2024I was missing Microsoft.Extensions.Hosting.WindowsServices
Jonathan Crozier
Hi Lou, I’m glad you managed to resolve the issue. Let me know if you need anything else!
November 5, 2024